Adding a fingerprint to Windows 11 makes logging in more secure and convenient. In just a few simple steps, you can set up Windows Hello and use your fingerprint to sign in. First, you’ll need a compatible fingerprint scanner. Then, head to the Windows Settings to configure the fingerprint option. Once set up, you can enjoy a faster, safer way to access your computer.
How to Add Fingerprint in Windows 11
Setting up fingerprint recognition on your Windows 11 device will allow you to log in with just a swipe of your finger. Follow these steps to configure your fingerprint for Windows Hello.
Step 1: Open Settings
Navigate to the Start menu and select ‘Settings’ by clicking on the gear icon.
The Settings menu is your gateway to altering how your computer behaves. You can also press Windows + I to open it directly.
Step 2: Go to Accounts
In the Settings window, click on ‘Accounts.’
This section handles everything from login options to email accounts. It’s the heart of where you manage user details.
Step 3: Select Sign-in Options
Under ‘Accounts,’ locate and click on ‘Sign-in options.’
Here, you’ll find various ways to log into your device, including password, PIN, and fingerprint.
Step 4: Set Up Fingerprint Recognition
Under ‘Sign-in options,’ find ‘Fingerprint recognition (Windows Hello)’ and click ‘Set up.’
This prompts the wizard to guide you through the fingerprint setup. The wizard is designed to make this process as smooth as butter.
Step 5: Follow the On-Screen Instructions
Follow the prompts to scan your fingerprint multiple times to ensure all angles of your fingerprint are captured.
The device will ask you to lift and rest your finger several times. This ensures accurate reading every time you log in.
Once you’ve completed these steps, your fingerprint is linked to Windows Hello. Your fingerprint will now be your key to unlocking your device, providing a secure and effortless way to sign in.
Tips for Adding Fingerprint in Windows 11
- Make sure your device has a built-in fingerprint scanner or you have an external one.
- Keep your finger clean and dry for optimal scanner performance.
- Update your fingerprint periodically for improved accuracy.
- Consider setting a backup PIN or password in case of fingerprint issues.
- Test your fingerprint login several times to ensure it works seamlessly.
What should I do if my fingerprint isn’t recognized?
Try cleaning the fingerprint scanner and ensuring your finger is dry. If problems persist, consider re-registering your fingerprint.
Can I add multiple fingerprints?
Yes, Windows 11 allows you to add multiple fingerprints, which is handy if you use more than one finger or share the device.
Is a fingerprint more secure than a password?
Fingerprints offer convenience and security, as they are unique to you and difficult to replicate.
What happens if my fingerprint scanner stops working?
You can still log in using a PIN or password. It’s advisable to have these backup methods set up.
How do I remove a fingerprint?
Go to ‘Sign-in options’ and there you can remove any stored fingerprint by selecting the ‘Remove’ button.
Summary
- Open Settings.
- Go to Accounts.
- Select Sign-in Options.
- Set Up Fingerprint Recognition.
- Follow the On-Screen Instructions.
Conclusion
Fingerprint technology in Windows 11 is a game-changer for anyone tired of typing passwords. It’s quick, reliable, and adds an extra layer of security to your digital life. Once you’ve set up your fingerprint, you’ll wonder how you ever lived without it. It’s like having a secret handshake with your computer—exclusive, personal, and unique to you.
The process we’ve outlined is straightforward, and with the right equipment, you’ll be set up in no time. Whether you’re using a laptop with a built-in scanner or an external device, the steps remain the same. It’s a small effort for a significant payoff in convenience and security.
Remember to keep your scanner clean and your fingers dry for the best performance. And don’t forget to set up a backup login method just in case technology decides to have an off day. By securing your device this way, you’re taking a proactive step in safeguarding your personal information.
So why not enhance your Windows 11 experience? Dive into the settings, add that fingerprint, and make your computer as unique as you are.

Matthew Burleigh has been writing tech tutorials since 2008. His writing has appeared on dozens of different websites and been read over 50 million times.
After receiving his Bachelor’s and Master’s degrees in Computer Science he spent several years working in IT management for small businesses. However, he now works full time writing content online and creating websites.
His main writing topics include iPhones, Microsoft Office, Google Apps, Android, and Photoshop, but he has also written about many other tech topics as well.
Read his full bio here.
Featured guides and deals
Adding a fingerprint to Windows 11 makes logging in more secure and convenient. In just a few simple steps, you can set up Windows Hello and use your fingerprint to sign in. First, you’ll need a compatible fingerprint scanner. Then, head to the Windows Settings to configure the fingerprint option. Once set up, you can enjoy a faster, safer way to access your computer.
How to Add Fingerprint in Windows 11
Setting up fingerprint recognition on your Windows 11 device will allow you to log in with just a swipe of your finger. Follow these steps to configure your fingerprint for Windows Hello.
Step 1: Open Settings
Navigate to the Start menu and select ‘Settings’ by clicking on the gear icon.
The Settings menu is your gateway to altering how your computer behaves. You can also press Windows + I to open it directly.
Step 2: Go to Accounts
In the Settings window, click on ‘Accounts.’
This section handles everything from login options to email accounts. It’s the heart of where you manage user details.
Step 3: Select Sign-in Options
Under ‘Accounts,’ locate and click on ‘Sign-in options.’
Here, you’ll find various ways to log into your device, including password, PIN, and fingerprint.
Step 4: Set Up Fingerprint Recognition
Under ‘Sign-in options,’ find ‘Fingerprint recognition (Windows Hello)’ and click ‘Set up.’
This prompts the wizard to guide you through the fingerprint setup. The wizard is designed to make this process as smooth as butter.
Step 5: Follow the On-Screen Instructions
Follow the prompts to scan your fingerprint multiple times to ensure all angles of your fingerprint are captured.
The device will ask you to lift and rest your finger several times. This ensures accurate reading every time you log in.
Once you’ve completed these steps, your fingerprint is linked to Windows Hello. Your fingerprint will now be your key to unlocking your device, providing a secure and effortless way to sign in.
Tips for Adding Fingerprint in Windows 11
- Make sure your device has a built-in fingerprint scanner or you have an external one.
- Keep your finger clean and dry for optimal scanner performance.
- Update your fingerprint periodically for improved accuracy.
- Consider setting a backup PIN or password in case of fingerprint issues.
- Test your fingerprint login several times to ensure it works seamlessly.
What should I do if my fingerprint isn’t recognized?
Try cleaning the fingerprint scanner and ensuring your finger is dry. If problems persist, consider re-registering your fingerprint.
Can I add multiple fingerprints?
Yes, Windows 11 allows you to add multiple fingerprints, which is handy if you use more than one finger or share the device.
Is a fingerprint more secure than a password?
Fingerprints offer convenience and security, as they are unique to you and difficult to replicate.
What happens if my fingerprint scanner stops working?
You can still log in using a PIN or password. It’s advisable to have these backup methods set up.
How do I remove a fingerprint?
Go to ‘Sign-in options’ and there you can remove any stored fingerprint by selecting the ‘Remove’ button.
Summary
- Open Settings.
- Go to Accounts.
- Select Sign-in Options.
- Set Up Fingerprint Recognition.
- Follow the On-Screen Instructions.
Conclusion
Fingerprint technology in Windows 11 is a game-changer for anyone tired of typing passwords. It’s quick, reliable, and adds an extra layer of security to your digital life. Once you’ve set up your fingerprint, you’ll wonder how you ever lived without it. It’s like having a secret handshake with your computer—exclusive, personal, and unique to you.
The process we’ve outlined is straightforward, and with the right equipment, you’ll be set up in no time. Whether you’re using a laptop with a built-in scanner or an external device, the steps remain the same. It’s a small effort for a significant payoff in convenience and security.
Remember to keep your scanner clean and your fingers dry for the best performance. And don’t forget to set up a backup login method just in case technology decides to have an off day. By securing your device this way, you’re taking a proactive step in safeguarding your personal information.
So why not enhance your Windows 11 experience? Dive into the settings, add that fingerprint, and make your computer as unique as you are.
Matthew Burleigh has been writing tech tutorials since 2008. His writing has appeared on dozens of different websites and been read over 50 million times.
After receiving his Bachelor’s and Master’s degrees in Computer Science he spent several years working in IT management for small businesses. However, he now works full time writing content online and creating websites.
His main writing topics include iPhones, Microsoft Office, Google Apps, Android, and Photoshop, but he has also written about many other tech topics as well.
Read his full bio here.
JavaScript is not available.
We’ve detected that JavaScript is disabled in this browser. Please enable JavaScript or switch to a supported browser to continue using x.com. You can see a list of supported browsers in our Help Center.
Help Center

Dengan mengeklik Lanjutkan, Anda menyetujui Perjanjian Pengguna , Kebijakan Privasi , dan Kebijakan Cookie LinkedIn.
Kami telah mengirimkan link sekali pakai ke alamat email utama Anda
Klik link untuk login langsung ke akun LinkedIn Anda.
Jika Anda tidak menemukan email tersebut di kotak pesan, periksa folder spam.
Setuju & Bergabung dengan LinkedIn
Dengan mengeklik Lanjutkan, Anda menyetujui Perjanjian Pengguna , Kebijakan Privasi , dan Kebijakan Cookie LinkedIn.
Adding fingerprint recognition to your Windows 11 setup is a breeze. It allows you to unlock your device with just a touch, making life a bit more convenient and secure. To set it up, you’ll need to access Windows Settings, navigate to the sign-in options, and follow the prompts to register your fingerprint. Now, let’s get into the nitty-gritty details and walk through the process step by step.
How to Add Fingerprint in Windows 11
Setting up fingerprint recognition on your Windows 11 device will enhance your security while making it easier to log in. Follow these steps to set it up in no time.
Step 1: Open Settings
Click on the Start menu and select the Settings gear icon.
The Settings menu is your control center for tweaking your Windows experience. You can find everything here, from network settings to personal customization options.
Step 2: Navigate to Accounts
Within the Settings menu, click on “Accounts” to proceed.
Accounts settings handle everything related to your user profile. This is where you manage your sign-in preferences, including the addition of a fingerprint.
Step 3: Select Sign-in Options
Choose “Sign-in options” from the Accounts menu.
Here, you’ll find various ways to sign into your device, like passwords, PINs, and our focus—fingerprints.
Step 4: Set up Fingerprint
Find “Windows Hello Fingerprint” and click on “Set up.”
Windows Hello is Microsoft’s biometric authentication feature. Selecting to set up a fingerprint will initiate the process to capture and register your unique print.
Step 5: Follow the Setup Wizard
Follow the on-screen instructions to scan and register your fingerprint.
The setup wizard will guide you through placing your finger on the sensor multiple times. It’s designed to capture every aspect of your fingerprint for accurate identification.
Once you’ve completed these steps, your fingerprint will be registered, and you can now use it to log into your device. This means no more typing out passwords or PINs every time you want to access your computer.
Tips for Adding Fingerprint in Windows 11
- Ensure your device has a fingerprint sensor before starting.
- Keep your finger clean and dry for an accurate scan.
- If you have trouble, try different fingers to find the best match.
- Remember to set up a backup sign-in option, like a PIN or password.
- Regularly clean the fingerprint sensor to ensure it works smoothly.
Can I use any finger for fingerprint sign-in?
Yes, you can use any finger, but make sure it’s comfortable and consistent for daily use.
What if my fingerprint doesn’t scan the first time?
Try cleaning the sensor and ensuring your finger isn’t wet. Re-register if necessary.
Is a fingerprint more secure than a password?
Fingerprint authentication is generally more secure as it’s unique to you and harder to replicate.
Can I set up multiple fingerprints?
Yes, Windows 11 allows you to register more than one fingerprint for convenience.
How do I remove a registered fingerprint?
Go to the Sign-in options in Settings and choose to remove or change your fingerprint settings.
Summary
- Open Settings.
- Navigate to Accounts.
- Select Sign-in Options.
- Set up Fingerprint.
- Follow the Setup Wizard.
Conclusion
Adding a fingerprint in Windows 11 is not just about enhancing security—it’s about embracing a convenient and modern way to navigate your digital life. With just a touch, you’re granted access to your digital world, making the traditional password feel like a relic of the past. It’s a small change that brings a big impact, streamlining your daily routine while keeping your data safe.
Security isn’t just about keeping others out; it’s about making sure you can easily get in. By setting up fingerprint recognition, you’re ensuring that your device knows you better than ever, recognizing you not by what you remember, but by who you are.
So, what’s stopping you from trying it out? Dive into your Settings, follow the steps, and see how this little feature can make a big difference. If you found this guide helpful, consider exploring other features Windows 11 has to offer. There’s a whole world of customization and convenience waiting for you.
Matthew Burleigh has been writing tech tutorials since 2008. His writing has appeared on dozens of different websites and been read over 50 million times.
After receiving his Bachelor’s and Master’s degrees in Computer Science he spent several years working in IT management for small businesses. However, he now works full time writing content online and creating websites.
His main writing topics include iPhones, Microsoft Office, Google Apps, Android, and Photoshop, but he has also written about many other tech topics as well.
Read his full bio here.
Featured guides and deals
Adding another fingerprint on your iPad is a straightforward process that can help make accessing your device even more convenient. By following a few simple steps, you’ll be able to add a new fingerprint, whether it’s for a different finger or for another user, in no time.
How to Add Another Fingerprint on iPad
In this section, we’ll break down the process of adding a new fingerprint to your iPad. By the end of these steps, your iPad will recognize the additional fingerprint and allow access accordingly.
Step 1: Open Settings
Start by opening the Settings app from your home screen.
The Settings app is where you’ll manage all the configurations for your iPad, including security features like fingerprint recognition.
Step 2: Go to Touch ID & Passcode
Tap on the “Touch ID & Passcode” option in the Settings menu.
You’ll need to enter your current passcode to proceed. This step ensures that only authorized users can make changes to your iPad’s security settings.
Step 3: Add a Fingerprint
Scroll down and tap on “Add a Fingerprint.”
Your iPad will prompt you to place your finger on the Home button multiple times to capture various parts of your fingerprint. Follow the on-screen instructions carefully.
Step 4: Follow On-screen Prompts
Place your finger on the Home button as instructed by the device.
Make sure your finger is clean and dry. Adjust the position of your finger so that the iPad can capture all sides of your fingerprint.
Step 5: Complete the Process
Once the iPad has successfully scanned your finger, tap “Continue” to finalize the addition of the new fingerprint.
Your iPad will confirm that the new fingerprint has been added and will now recognize it for unlocking and other authenticated activities.
Once you’ve completed these steps, your iPad is now equipped to recognize the new fingerprint. You can use either the original or the new fingerprint to unlock your device or perform other secure actions.
Tips for Adding Another Fingerprint on iPad
- Cleanliness : Make sure your finger is clean and dry before scanning.
- Multiple Angles : Move your finger around to capture different parts of the fingerprint.
- Passcode : Always have a strong passcode as a backup.
- Family and Friends : Add fingerprints for trusted family members.
- Regular Updates : Ensure your iPad’s software is up-to-date for the best security features.
Can I add multiple fingerprints?
Yes, you can add up to five different fingerprints on your iPad.
Is it possible to delete a fingerprint?
Absolutely, just go to “Touch ID & Passcode” and swipe left on the fingerprint you want to delete.
What should I do if my fingerprint isn’t recognized?
Try cleaning the Home button and your finger. If that doesn’t work, you may need to re-add the fingerprint.
Do I need to enter my passcode after adding a fingerprint?
Yes, your passcode is a backup and will be required for some actions, especially after restarting your iPad.
Can I use Touch ID for apps?
Yes, many apps support Touch ID for authentication, and you can enable this in each app’s settings.
Summary
- Open Settings.
- Go to Touch ID & Passcode.
- Add a Fingerprint.
- Follow On-screen Prompts.
- Complete the Process.
Conclusion
Adding another fingerprint on your iPad is a quick and easy way to improve the usability and security of your device. Whether you’re adding a second fingerprint for yourself or allowing a loved one to access your iPad, these steps ensure that the process is smooth and straightforward. Keeping your iPad updated and secure is crucial, and using Touch ID is a simple yet effective way to do just that. If you found this guide helpful, take a moment to explore other security features and tips to get the most out of your iPad. Happy fingerprinting!
Matthew Burleigh has been writing tech tutorials since 2008. His writing has appeared on dozens of different websites and been read over 50 million times.
After receiving his Bachelor’s and Master’s degrees in Computer Science he spent several years working in IT management for small businesses. However, he now works full time writing content online and creating websites.
His main writing topics include iPhones, Microsoft Office, Google Apps, Android, and Photoshop, but he has also written about many other tech topics as well.
Read his full bio here.
Featured guides and deals
The Touch ID sensor on your iPhone has a number of different applications, including the ability to unlock the device, or even make a payment with Apple Wallet.
These functions can be enabled or disabled to suit your personal preferences, but they require fingerprints to be saved on the device in order to function.
You likely enrolled several fingerprints when you first set up your iPhone in iOS 9, but you may find that a certain fingerprint isn’t working.
Fortunately, the fingerprints on your iPhone are not set in stone, and you can update or remove them as needed.
Below are the steps needed to remove or update a Touch ID fingerprint on an iPhone in iOS 9 –
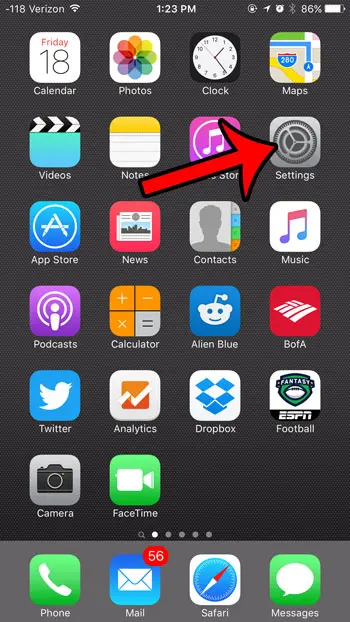
- Open the Settings menu.
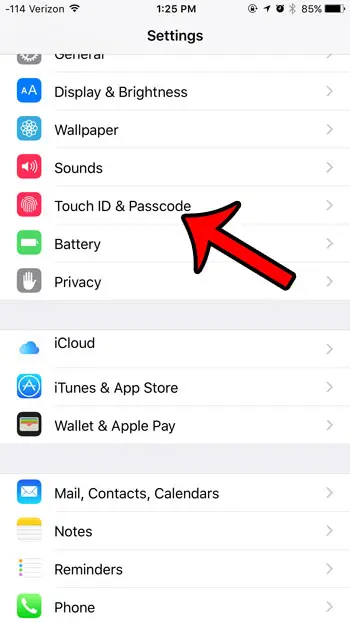
- Select the Touch ID & Passcode option.
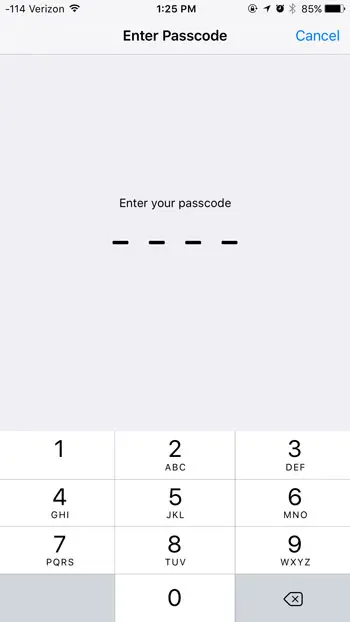
- Enter your passcode (if one is currently set on the device).
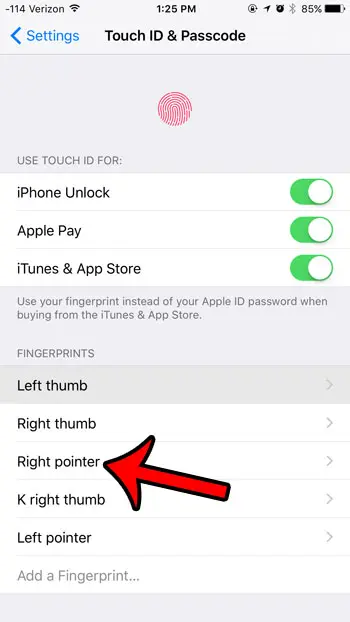
- Select the fingerprint that you wish to update or remove.
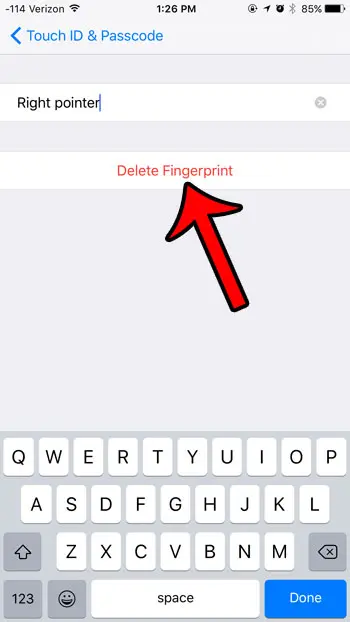
- Change the name if that is the element of the fingerprint that you wish toupdate. If you want to remove or update the fingerprint itself, then tap the Delete Fingerprint button. Continue below if you wish to update the fingerprint that you just deleted.
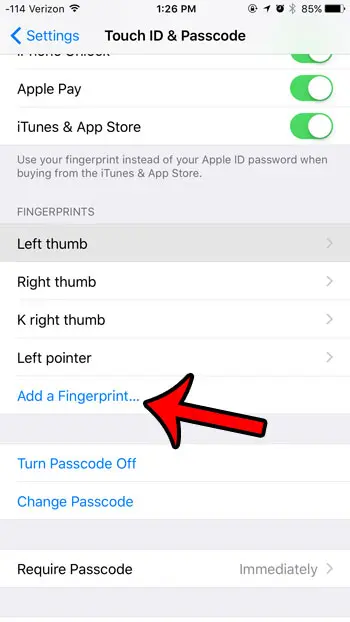
- Tap the Add a Fingerprint button.
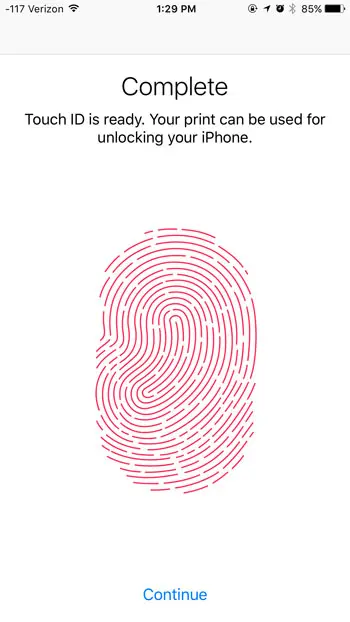
- Place and lift your finger repeatedly until the iPhone indicates that the fingerprint is complete.
These steps are repeated below with pictures –
Step 1: Tap the Settings icon.
Step 2: Open the Touch ID & Passcode menu.
Step 3: Enter your device passcode, if prompted.
Step 4: Tap the listing for the fingerprint that you wish to update.
Step 5: Delete and enter a new name for the fingerprint, if that is what you wish to update. However, if you wish to delete or update the fingerprint itself, then tap the Delete Fingerprint button. If you simply wished to delete the fingerprint, then you are done. If you wish to re-add the same fingerprint or a new one, then continue below.
Step 6: Tap the Add a Fingerprint button.
Step 7: Place and lift your finger on the Touch ID sensor as instructed. Your iPhone will let you know once it has enough information to complete the fingerprint entry.
Now that you know how to add or remove fingerprints in iOS 9 on your iPhone, you can edit the fingerprints that are currently saved on the device and used to unlock it.
Would you like to change the passcode on your iPhone, or switch to a different passcode format? Learn how with this article .
Matthew Burleigh has been writing tech tutorials since 2008. His writing has appeared on dozens of different websites and been read over 50 million times.
After receiving his Bachelor’s and Master’s degrees in Computer Science he spent several years working in IT management for small businesses. However, he now works full time writing content online and creating websites.
His main writing topics include iPhones, Microsoft Office, Google Apps, Android, and Photoshop, but he has also written about many other tech topics as well.
Read his full bio here.
Featured guides and deals
