Blocking YouTube on Windows 11 can help manage distractions or restrict access for specific users. To achieve this, you can modify the Hosts file or use parental controls. The following steps will guide you through the process, ensuring YouTube is inaccessible on your Windows 11 device.
How to Block YouTube on Windows 11
These steps will guide you to block YouTube on Windows 11 by editing the Hosts file. This method stops your browser from accessing YouTube by redirecting its address to a local IP.
Step 1: Open Notepad as Administrator
Launch Notepad with administrator privileges.
To open Notepad as an administrator, type “Notepad” in the Windows search bar. Right-click on Notepad from the search results and select “Run as administrator.” This step is crucial because only an admin can make changes to system files like the Hosts file.
Step 2: Access the Hosts File
Navigate to the Hosts file location.
Once Notepad is open, click “File” then “Open.” Type C:WindowsSystem32driversetc in the address bar and press Enter. In the file type dropdown menu, choose “All Files” to see the Hosts file. Select and open it.
Step 3: Edit the Hosts File
Add YouTube’s web addresses to the file.
Scroll to the bottom of the Hosts file and enter the following lines:
127.0.0.1 youtube.com
127.0.0.1 www.youtube.com
These lines redirect YouTube requests to your local machine, effectively blocking access.
Step 4: Save the Changes
Save the modified Hosts file.
After adding the lines, click “File,” then “Save” to apply the changes. Closing Notepad will ensure the Hosts file is updated with your modifications.
Step 5: Test the Configuration
Verify that YouTube is blocked.
Open a web browser and try to access YouTube. If you’ve done everything correctly, the site should be inaccessible, confirming that the block is in place.
Once you’ve completed these steps, YouTube will be blocked on your Windows 11 device. Anyone using it will be unable to access the site, ensuring a distraction-free or restricted environment.
Tips for Blocking YouTube on Windows 11
- Remember to back up the Hosts file before making changes, in case you need to restore it.
- Use parental controls as an alternative method for blocking YouTube.
- To unblock YouTube, remove the lines added to the Hosts file.
- Consider using a third-party application that offers more features for parental control.
- Regularly check for updates on Windows settings, as methods may change with new updates.
Can I block YouTube for only one user?
Yes, by configuring parental controls, you can restrict YouTube access for specific user accounts.
Does blocking YouTube affect other Google services?
No, blocking YouTube through the Hosts file will not impact other Google services like Gmail or Google Drive.
Can I still use YouTube apps on my device?
No, blocking YouTube in the Hosts file will also prevent apps from accessing the site.
Is it possible to bypass this block?
Yes, tech-savvy users might find workarounds like using a VPN or changing DNS settings.
Will this method block YouTube on other devices?
No, this only blocks YouTube on the specific Windows 11 device where you edit the Hosts file.
Summary
- Open Notepad as Administrator.
- Access the Hosts File.
- Edit the Hosts File.
- Save the Changes.
- Test the Configuration.
Conclusion
Blocking YouTube on Windows 11 is a practical measure for those who need to focus or control internet usage. By following the outlined steps, you can effectively restrict access to YouTube on your device. Whether it’s for personal productivity or to manage what content is accessible in a family setting, knowing how to block YouTube empowers you to take control over digital environments.
It’s wise to familiarize yourself with these methods, as they can be applied to other websites as well, offering a broader range of control. As technology evolves, new tools and methods will emerge, so staying informed and adaptable is key.
If you’re curious about other ways to enhance productivity or parental control, explore further articles and resources. Remember, taking small steps like this can lead to significant improvements in managing digital habits.

Matthew Burleigh has been writing tech tutorials since 2008. His writing has appeared on dozens of different websites and been read over 50 million times.
After receiving his Bachelor’s and Master’s degrees in Computer Science he spent several years working in IT management for small businesses. However, he now works full time writing content online and creating websites.
His main writing topics include iPhones, Microsoft Office, Google Apps, Android, and Photoshop, but he has also written about many other tech topics as well.
Read his full bio here.
Notepad is a free text editor included with every copy of Windows 7, and it provides a very basic tool for creating and printing text documents.
But you may find that Notepad is printing the file name at the top of the page, which can be problematic for your needs.
Fortunately, this is a setting that you can adjust, allowing you to print your Notepad files without the included file name, if you so wish.
Our tutorial below will show you where to go in Notepad to apply the change to your documents and remove the file name from the top of your printed documents.
Stop Printing File Name at the Top of the Page in Notepad
The steps in this article were written using the version of Notepad included in Windows 7.
Step 1: Open the document in Notepad.
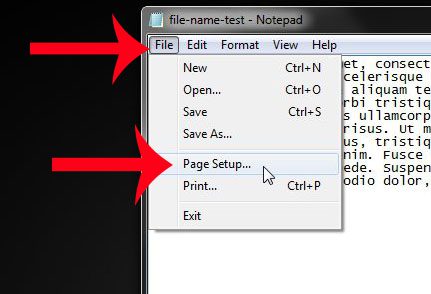
Step 2: Click the File tab at the top of the window, then click Page Setup .
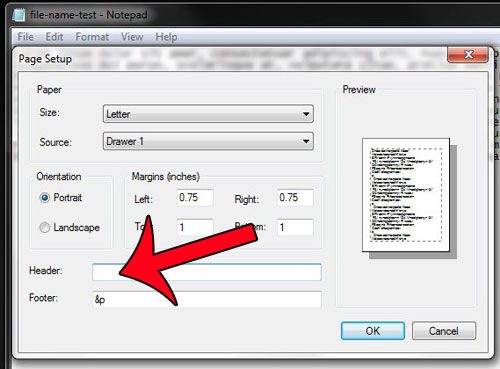
Step 3: Click inside the Header field, then delete the &f text displayed there. Note that there may also be &p text displayed in the Footer field, which will print the page number at the bottom of the page. You can delete that as well, if you do not need the page number printed at the bottom of the page.
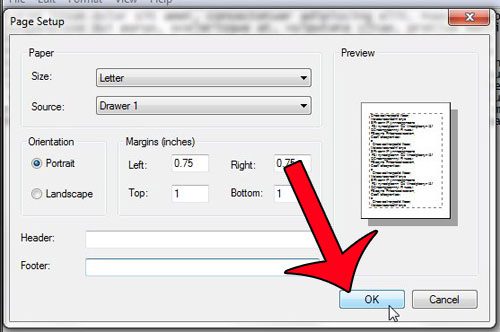
Step 4: Click the OK button at the bottom of the window to apply the changes.
You can then click File at the top of the window, then Print to open the Print window and print your document.
Note that if you want to print the file name and page numbers on future documents, then you will need to add the &f and &p text back into the header and footer fields on the Page Setup menu, respectively.
Find out how to remove the file name from a printed document in Notepad if you don’t wish to display that information on the printed version of the document.
Do CSV files on your computer open in Notepad by default, but you would prefer to have them open with Excel? This guide will show you how to make that change.
Matthew Burleigh has been writing tech tutorials since 2008. His writing has appeared on dozens of different websites and been read over 50 million times.
After receiving his Bachelor’s and Master’s degrees in Computer Science he spent several years working in IT management for small businesses. However, he now works full time writing content online and creating websites.
His main writing topics include iPhones, Microsoft Office, Google Apps, Android, and Photoshop, but he has also written about many other tech topics as well.
Read his full bio here.
