Blocking YouTube on Windows 11 can be a straightforward process if you know where to look. One efficient way is through your computer’s settings, which allows you to control access directly. Alternatively, you can use third-party applications or browser extensions for a more controlled approach. Whether it’s for minimizing distractions or for parental controls, these steps will guide you to successfully block YouTube on a Windows 11 device without any hassle.
How to Block YouTube on Windows 11
In this section, we’ll guide you through how to block YouTube on Windows 11 using the Windows Hosts file method. This approach is suitable for those who want to block access to YouTube across all browsers without needing additional software.
Step 1: Open Notepad as Administrator
First, open Notepad with administrative privileges.
The Hosts file needs admin rights to be edited. Right-click on the Notepad icon and select “Run as administrator” to ensure you have the necessary permissions.
Step 2: Navigate to the Hosts File
Now, use Notepad to locate the Hosts file on your PC.
In Notepad, click on “File” and then “Open.” Enter the path C:WindowsSystem32driversetc in the address bar. Change the file type to “All Files” to see the Hosts file, and select it.
Step 3: Edit the Hosts File
Insert a new line at the end of the file to block YouTube.
Add the line “127.0.0.1 www.youtube.com” at the end of the Hosts file. This redirects attempts to access YouTube back to your local machine, effectively blocking it.
Step 4: Save Changes
Once you’ve made your edits, save the file.
Press “Ctrl + S” to save your changes. Make sure you have not altered any other lines, as this could affect your system’s network settings.
Step 5: Restart Your Browser
Finally, restart your web browser to apply changes.
Close your browser completely and reopen it for the changes to take effect. YouTube should now be inaccessible from any browser on your Windows 11 PC.
After completing these steps, YouTube will be blocked on your Windows 11 device. If you try to access the site, it will not load, effectively keeping distractions at bay or controlling screen time for younger users.
Tips for Blocking YouTube on Windows 11
- Consider using parental control apps for more options and features.
- Remember to undo changes if you want to restore access later.
- Be aware that tech-savvy users might find ways around blocked sites.
- Test the block by restarting your computer and checking multiple browsers.
- Keep your Hosts file backed up in case you need to revert changes.
Can I block YouTube on specific browsers only?
Yes, you can use browser extensions specifically designed to block sites like YouTube.
How do I unblock YouTube if I change my mind?
Simply remove the line you added in the Hosts file and save the changes.
Will blocking YouTube affect other Google services?
No, modifying the Hosts file this way only targets YouTube based on the URL.
Is there a way to schedule YouTube blocking?
Yes, third-party apps allow you to schedule access times.
Can this method block the YouTube app on Windows 11?
No, this method only blocks the website, not any installed applications.
Summary of Steps
- Open Notepad as Administrator.
- Navigate to the Hosts File.
- Edit the Hosts File.
- Save Changes.
- Restart Your Browser.
Conclusion
Blocking YouTube on Windows 11 can be a handy solution for those looking to bolster productivity or implement parental controls. By modifying the Hosts file, you’re applying a simple yet effective method that requires no additional software. However, remember that this approach is limited to web browsers and doesn’t affect the YouTube app if installed on your system.
For those worried about tech-savvy individuals bypassing this block, consider exploring more comprehensive solutions involving parental control apps or network-level restrictions. These options offer deeper control and monitoring capabilities. Whether you’re managing your time better or ensuring a safer online environment for kids, the steps outlined here provide a solid foundation. For further reading, check out articles on digital well-being and parental control technologies. Keep exploring and take control of your digital space with these handy techniques!

Matthew Burleigh has been writing tech tutorials since 2008. His writing has appeared on dozens of different websites and been read over 50 million times.
After receiving his Bachelor’s and Master’s degrees in Computer Science he spent several years working in IT management for small businesses. However, he now works full time writing content online and creating websites.
His main writing topics include iPhones, Microsoft Office, Google Apps, Android, and Photoshop, but he has also written about many other tech topics as well.
Read his full bio here.
Notepad is a free text editor included with every copy of Windows 7, and it provides a very basic tool for creating and printing text documents.
But you may find that Notepad is printing the file name at the top of the page, which can be problematic for your needs.
Fortunately, this is a setting that you can adjust, allowing you to print your Notepad files without the included file name, if you so wish.
Our tutorial below will show you where to go in Notepad to apply the change to your documents and remove the file name from the top of your printed documents.
Stop Printing File Name at the Top of the Page in Notepad
The steps in this article were written using the version of Notepad included in Windows 7.
Step 1: Open the document in Notepad.
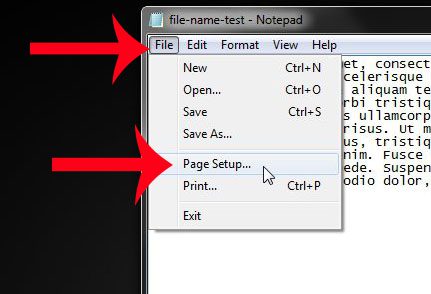
Step 2: Click the File tab at the top of the window, then click Page Setup .
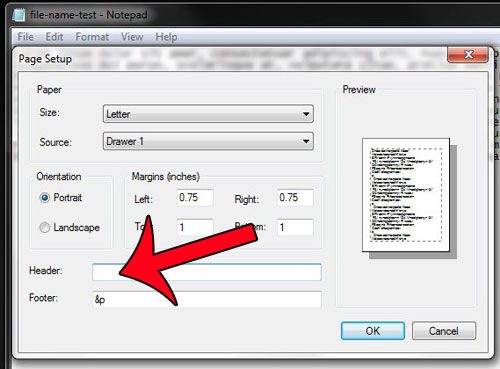
Step 3: Click inside the Header field, then delete the &f text displayed there. Note that there may also be &p text displayed in the Footer field, which will print the page number at the bottom of the page. You can delete that as well, if you do not need the page number printed at the bottom of the page.
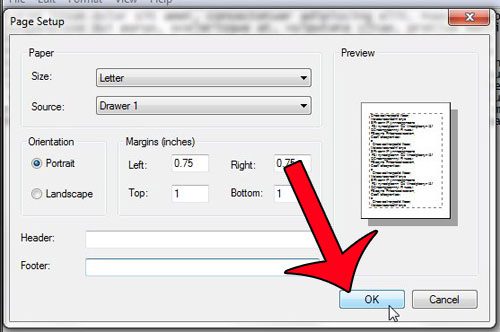
Step 4: Click the OK button at the bottom of the window to apply the changes.
You can then click File at the top of the window, then Print to open the Print window and print your document.
Note that if you want to print the file name and page numbers on future documents, then you will need to add the &f and &p text back into the header and footer fields on the Page Setup menu, respectively.
Find out how to remove the file name from a printed document in Notepad if you don’t wish to display that information on the printed version of the document.
Do CSV files on your computer open in Notepad by default, but you would prefer to have them open with Excel? This guide will show you how to make that change.
Matthew Burleigh has been writing tech tutorials since 2008. His writing has appeared on dozens of different websites and been read over 50 million times.
After receiving his Bachelor’s and Master’s degrees in Computer Science he spent several years working in IT management for small businesses. However, he now works full time writing content online and creating websites.
His main writing topics include iPhones, Microsoft Office, Google Apps, Android, and Photoshop, but he has also written about many other tech topics as well.
Read his full bio here.
Featured guides and deals
