Bypassing the “Let’s Add Your Microsoft Account” prompt in Windows 11 can be a handy trick when you want to set up a local account instead. This process allows you to enjoy the full benefits of Windows 11 without being tethered to a Microsoft account. You can accomplish this by disconnecting from the internet during the Windows setup process and opting to create an offline account. Here’s how you can do it step-by-step.
How to Bypass “Let’s Add Your Microsoft Account” in Windows 11
In this section, we will guide you through bypassing the requirement to set up a Microsoft account during the installation of Windows 11. By following these steps, you can create a local account instead, giving you more control over your privacy and data.
Step 1: Disconnect from the Internet
Start by ensuring your device is not connected to any network.
When installing Windows 11, unplug any Ethernet cables and disable Wi-Fi. This step is crucial because Windows tries to connect to a Microsoft account online. Without internet access, the system will prompt you to create an offline account instead.
Step 2: Proceed with Windows Installation
Continue with the Windows installation screens.
Follow the on-screen instructions until you reach the “Let’s Add Your Microsoft Account” screen. Without internet connectivity, the option to create a local account will appear as an alternative.
Step 3: Select Offline Account Option
Choose to set up an offline account when prompted.
You should now see an option to create an offline account. Select this option, which allows you to bypass the Microsoft account requirement altogether.
Step 4: Create a Local Account
Enter your desired username and password for the local account.
Here, you’ll set up your username and password for your new local account. Make sure to choose something memorable yet secure.
Step 5: Complete the Setup Process
Finish the remaining setup steps as instructed on the screen.
Finalize the Windows setup by completing any additional settings or personalization preferences. Once done, you can start using Windows 11 with your newly created local account.
After completing these steps, you will have successfully bypassed the Microsoft account setup. Your device will now boot into Windows 11, and you can log in using your local account credentials. This keeps your data more private while still allowing you full functionality of the Windows OS.
Tips for Bypassing “Let’s Add Your Microsoft Account” in Windows 11
- Stay Offline: Always disconnect from the internet before starting the Windows setup process to avoid the Microsoft account requirement.
- Know Your Preferences: Decide if a local account or Microsoft account suits your needs better before starting the setup.
- Secure Your Local Account: Use a strong, unique password for your local account to protect your data.
- Consider Future Access: Remember, certain features like OneDrive integration require a Microsoft account, so plan accordingly.
- Alternate Login Methods: You can always add a Microsoft account later through Windows settings if necessary.
What is the benefit of using a local account on Windows 11?
Using a local account offers increased privacy and control over your personal data since it doesn’t require syncing with Microsoft services.
Can I switch to a Microsoft account later?
Yes, you can switch to a Microsoft account later through settings if you wish to access more features.
Will I lose any features using a local account?
Some features like OneDrive and certain apps may require a Microsoft account, but core Windows functionality remains unaffected.
How do I reconnect to the internet after setup?
Once the local account is set up, you can reconnect to Wi-Fi or plug in the Ethernet cable to access the internet.
Is this method safe for my computer?
Yes, using a local account is a safe and legitimate option provided by Windows, ensuring your privacy while using the operating system.
Summary
- Disconnect from the internet.
- Proceed with installation.
- Select offline account.
- Create a local account.
- Complete setup.
Conclusion
In today’s world, managing one’s digital footprint is more important than ever. Bypassing the “Let’s Add Your Microsoft Account” prompt in Windows 11 allows you to maintain control over your personal data and enjoy the benefits of a more private experience. While a Microsoft account offers seamless integration with the company’s ecosystem, a local account provides a straightforward way to use your device without additional online ties.
Remember, you can always switch to a Microsoft account later if your needs change. The key is understanding and taking advantage of the flexibility Windows 11 offers. By following this guide, you can make an informed decision that aligns with your personal tech philosophy. So whether you’re a privacy advocate, a tech tinkerer, or simply someone who values simplicity, this approach gives you the freedom to choose how to interact with your device. Have fun exploring Windows 11, and don’t hesitate to dive deeper into its features to customize your experience even further.

Matthew Burleigh has been writing tech tutorials since 2008. His writing has appeared on dozens of different websites and been read over 50 million times.
After receiving his Bachelor’s and Master’s degrees in Computer Science he spent several years working in IT management for small businesses. However, he now works full time writing content online and creating websites.
His main writing topics include iPhones, Microsoft Office, Google Apps, Android, and Photoshop, but he has also written about many other tech topics as well.
Read his full bio here.
Featured guides and deals
Printers can be difficult ot work with, and troubleshooting them can take you to a lot of different places on your computer.
One common issue that can arise with a printer is when it says that it is offline, even though it’s turned on and seems to be hooked up correctly.
Our tutorial below will show you some steps to try so that you can learn how to change a printer from offline to online.
How to Switch a Printer from Offline to Online in Windows 7
- Click Start , then Devices and Printers .
- Right-click the printer, then click See what’s printing .
- Select the Printer tab, then click Use printer offline to clear the check mark.
Our guide continues below with additional information on how to switch a printer from offline to online , including pictures for these steps.
If you’re lucky, then this should work and your queued documents will start printing. However, sometimes this isn’t enough and you need to do some more troubleshooting. We discuss those additional troubleshooting steps further in this article.
Printers can be frustrating when they are not working correctly, due largely to the fact that errors can occur for seemingly no reason. Whether your print jobs don’t look right, you are getting constant paper jams, or printing is inconsistent or erratic, printers are often some of the most difficult electronic devices to work with. So if your printer is showing as offline and you can’t print, then you may be trying to figure out why it’s showing as offline when the printer was working before and nothing has changed.
One issue that you might encounter is Windows 7 not being able to connect to your printer to send documents that you want to print. Further investigation into the issue might lead you to discover that Windows 7 thinks the printer is offline.
There are several reasons why this might be occurring, so you will need to follow the instructions in this tutorial to learn how to change your printer from offline to online .
Once your printer is back online, it should then start printing the documents that you have sent to the printer that are currently sitting in your print queue.
How Do You Change a Printer from Offline to Online? (Guide with Pictures)
Windows is recognizing your printer as being offline because it is unable to communicate with the printer. This can be caused by several different situations, so you need to pinpoint exactly from where the problem is originating.
These steps will show you how to change a printer from offline to online from a Windows laptop or desktop computer.
Step 1: Click theStartbutton at the bottom-left corner of your screen, then clickDevices and Printers.
Click Start then choose Devices & Printers .
Step 2: Right-click the printer that is showing as offline, then clickSee what’s printing.
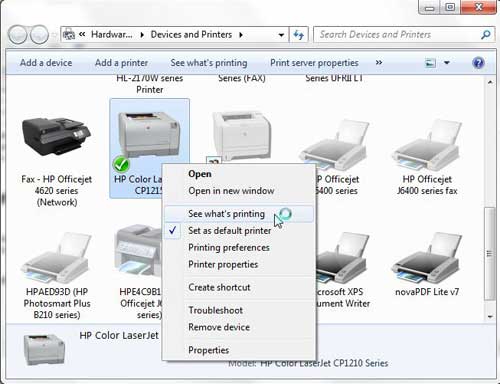
Right-click on the printer, then select See what’s printing.
Step 3: Click thePrinterlink at the top of this window, then click theUse Printer Offlineoption to remove the check mark.
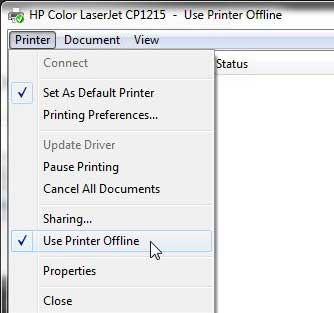
Select Printer , then Use Printer Offline .
Now that you know how to change printer from offline to online you can try this step whenever your computer is unable to print a file.
If this solved your problem, then you are all set and can continue with your printing . However, if this did not resolve the issue, then there are some more troubleshooting steps you can try.
Additional Troubleshooting for an Offline Printer in Windows 7
Check that the printer is turned on, and that the USB cable is properly connected to both the back of the printer and your computer. If your printer is wireless, you may need to restart the printer, then restart your computer to see if you can re-establish the wireless connection.
If you are using a wireless printer, have you recently changed your router, or changed the name of the wireless network ? If so, you may need to update your wireless printer with the new wireless network settings . If your wireless printer does not feature a control panel on the printer that allows you to change the network settings, you may need to temporarily connect the printer to your computer with a USB cable to modify the settings.
If your wired printer is still showing an offline status, despite the fact that it is plugged in and connected to your computer, then there may be a problem with the port to which the device is connected.
How to Change a Printer Port in Windows 7
You can use these steps to change the printer port for a printer that has been set up in Windows 7.
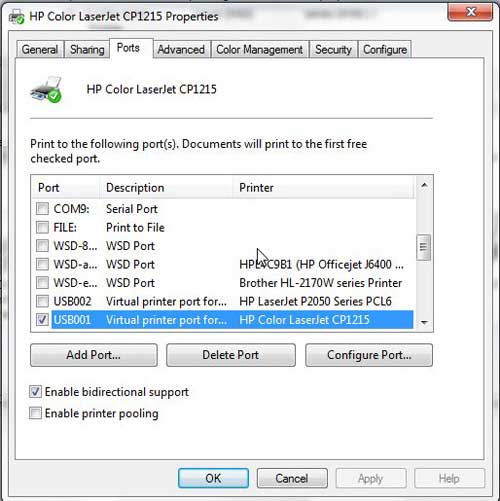
Step 1: Return to theDevices and Printersmenu, right-click your printer, then clickPrinter Properties.
Step 2: Click thePortstab at the top of the window, choose the correct port from the list at the center of the window, clickApply, then clickOK.
If you are still unable to print, then one final option you can attempt is to stop and restart the print spooler . You can follow the instructions in this article to learn how to manage the print spooler.
If you are still unable to print after following all of these instructions, then you may need to uninstall, then reinstall your printer. You can remove a printer from your computer by right-clicking the printer, then clicking Remove device . Once the printer has been uninstalled, follow your printer’s installation guide to properly reinstall it.
Why Is My Printer Offline?
The sections in the article above provide a bunch of different options and settings that you can check in order to see why your printer might be offline.
There are so many potential reasons that your printer might be offline that it’s hard to point to one specific reason why it might be happening.
In my experience, the best, simplest, and most useful thing that you can do when your printer is showing as offline is to simply restart the printer.
This can resolve issues related to a wireless printer that isn’t connected to a network, it can force the print spooler to restart, and it can fix print jobs that are stuck in the print queue.
While your printer is going through the process of restarting it can be helpful to restart your computer, too. And if you have a wireless printer and have been experiencing connection issues with other wireless devices as well, then even restarting your modem and your router might not be a bad idea.
How do I restart a printer?
You can reboot your printer by pressing the Power button on the printer, waiting until it has completely turned off, then pressing the Power button again to turn it back on.
How can I check my printer status?
If you aren’t sure whether or not your printer is in Printer Online or Printer Offline mode in Windows 11, then a quick way to check is to go to Start > Settings > Devices > Printers & Scanners .
You can then click on your printer and choose the Open Queue option. When you open print queue windows on your computer you can see any documents that are currently queued up to print.
When the printer window is open you can click the Printer option in the menu bar, then make sure the Use Printer Offline option isn’t selected.
How can I change the printer driver that my printer is currently using?
If you go to Start > Settings > Devices > Printers & Scanners then select your printer, you can click the Printer properties button, which will open a new window.
In this window you can choose the Advanced tab, then click the Driver drop down menu and choose a different driver. You could also click the New Driver button, which will launch the Add Printer Driver Wizard .
How do I run printer troubleshooter in Windows 11?
If you aren’t sure what the problem is, you can try the Windows utility that will cycle through a bunch of potential settings to try and fix the problem.
This means it will do things like restart printer related services, such as restarting the print spooler service and checking for outdated printer drivers.
You can do this by clicking the Windows button in the taskbar, searching for “Printer” then selecting the Printers & scanners option.
You can then select your printer and click the Run the troubleshooter option.
Why is my HP Printer offline?
The Hp printer offline Windows 11 steps are the same for Hewlett Packard printers as they are for other printers.
You need to open the Windows Settings menu, choose Bluetooth and devices, then select Printers & scanners.
You can then click on the default printer or whatever printer you want to check, then make sure Use printer offline is not selected.
If it is offline and clicking that option doesn’t put it back online, then you will need to go through the troubleshoot printer offline process of checking the printer cable (or the network status for wireless printers) and restarting the printer and the computer.
If that doesn’t work, then you may printer offline – how to put online instructions on the printer manufacturer’s website, which may involve reinstalling printer software and drivers.
Matthew Burleigh has been writing tech tutorials since 2008. His writing has appeared on dozens of different websites and been read over 50 million times.
After receiving his Bachelor’s and Master’s degrees in Computer Science he spent several years working in IT management for small businesses. However, he now works full time writing content online and creating websites.
His main writing topics include iPhones, Microsoft Office, Google Apps, Android, and Photoshop, but he has also written about many other tech topics as well.
Read his full bio here.
Featured guides and deals
