Deleting a page in Word on your iPad may seem tricky if you’re not familiar with the app, but it’s actually pretty straightforward. By following a few easy steps, you’ll be able to remove any unwanted pages from your document in no time. This guide will walk you through the process, ensuring you know exactly what to do.
How to Delete a Page in Word on iPad
In this tutorial, we’re going to show you the exact steps to delete a page in Word on your iPad. Follow the steps below, and you’ll be able to tidy up your document quickly.
Step 1: Open Microsoft Word
First, open the Microsoft Word app on your iPad.
Make sure you have the latest version of the app installed to avoid any compatibility issues. You can update it from the App Store if needed.
Step 2: Open Your Document
Next, open the document where you want to delete a page.
Locate the document in your files or recent documents list and tap to open it. Ensure you have the appropriate permissions to edit the document.
Step 3: Navigate to the Page
Scroll to the page you want to delete.
Use your fingers to scroll through the document. If it’s a long document, you might want to use the navigation pane for quicker access.
Step 4: Select the Text
Tap and hold to select all the text on the page.
Once the text is highlighted, you can adjust the selection by dragging the blue handles to cover the entire page.
Step 5: Delete the Text
Tap the backspace or delete key on your on-screen keyboard.
This action will remove the selected text, and if the page is empty, it will disappear from your document.
Step 6: Check for Remaining Elements
Ensure there are no leftover elements like spaces or page breaks.
Scroll back and forth to confirm the page is gone. If there are hidden elements, repeat the selection and deletion process.
After completing these steps, the unwanted page in your Word document on iPad will be deleted, making your document cleaner and more professional.
Tips for Deleting a Page in Word on iPad
- Make sure your document is backed up before making significant changes to avoid data loss.
- If you accidentally delete something important, use the undo feature to quickly restore it.
- Use the navigation pane to quickly jump to specific sections of your document.
- Turn on “Show/Hide” formatting marks to identify hidden elements that may cause extra pages.
- Practice these steps on a sample document to get comfortable with the process before making changes to important files.
Why is there an extra blank page in my Word document?
An extra blank page can appear due to hidden formatting marks, such as paragraph breaks or page breaks. Turning on “Show/Hide” formatting marks can help identify and remove them.
Can I undo a page deletion in Word on iPad?
Yes, you can use the undo feature by tapping the undo arrow at the top of the screen to restore a deleted page.
Is there a way to merge pages in Word on iPad?
You can merge content by copying and pasting text from one page to another, but Word does not have a specific “merge pages” feature.
How do I prevent accidental deletions while editing?
Regularly save your document and consider using the undo feature to revert any accidental deletions.
Can I delete multiple pages at once in Word on iPad?
Word on iPad doesn’t allow for multi-page deletion in one go. You’ll need to repeat the steps for each page you want to delete.
Summary
- Open Microsoft Word
- Open your document
- Navigate to the page
- Select the text
- Delete the text
- Check for remaining elements
Conclusion
Deleting a page in Word on your iPad is a simple task once you know the steps. By following the guide above, you can easily manage and clean up your documents. Remember to back up your files before making significant changes and use the undo feature if you make a mistake.
Keeping your documents organized not only makes them look more professional but also makes them easier to read and navigate. If you’re interested in more tips and tricks for using Microsoft Word on your iPad, consider exploring other features and capabilities the app offers.
Happy editing!

Matthew Burleigh has been writing tech tutorials since 2008. His writing has appeared on dozens of different websites and been read over 50 million times.
After receiving his Bachelor’s and Master’s degrees in Computer Science he spent several years working in IT management for small businesses. However, he now works full time writing content online and creating websites.
His main writing topics include iPhones, Microsoft Office, Google Apps, Android, and Photoshop, but he has also written about many other tech topics as well.
Read his full bio here.
If you have ever explored the various settings for a document in Microsoft Word, then you probably encountered the Page Setup dialog box.
This menu contains a variety of different ways that you can customize the appearance of your document on the page. But there are some other options on the Print menu that can come in handy, especially if you want to print two or more pages on a single sheet of paper in Microsoft Word.
Everyone has different printing needs, and those needs are amplified when you are working with a program as flexible as Microsoft Word 2010.
You can print on a variety of different types of paper, you can format your documents to an impressive degree, and you can even do some light picture editing.
Microsoft Word – Print Two Pages on One Sheet
- Open your document.
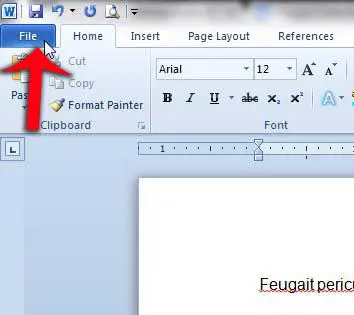
- Click the File tab.
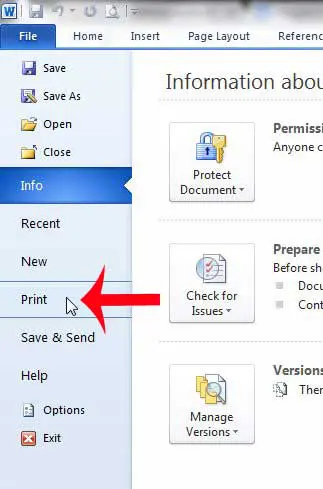
- Select the Print tab.
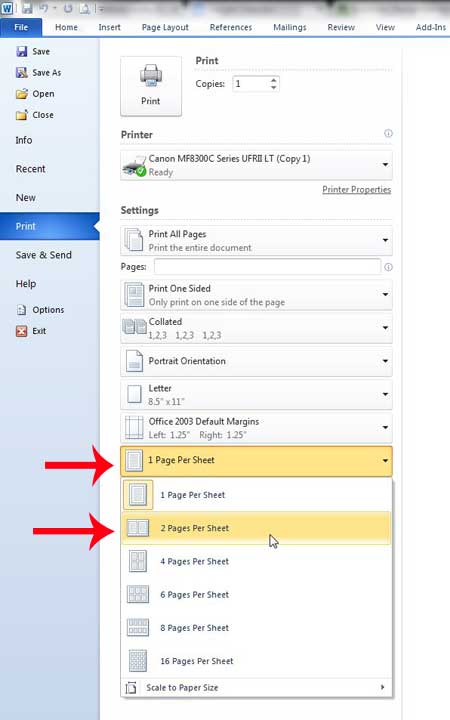
- Choose the 1 Page Per Sheet button, then select 2 Pages Per Sheet .
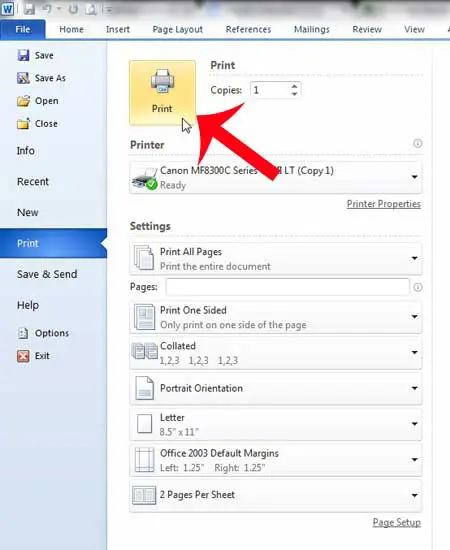
- Click Print .
Our guide continues below with additional information on printing more than one page per sheet in Microsoft Word, including pictures of these steps.
How to Print Two Pages Per Sheet in Word 2010 (Guide with Pictures)
The tutorial below will teach you how to print two pages on one sheet for the document that you are currently editing. This will not change the default settings so that every document prints this way. So any future document that you print from Word 2010 will print with one page per sheet. This is important to keep in mind if you will be switching between one and two pages per sheet with any regularity.
If you do a lot of document printing, then a black and white laser printer can save you some money on toner over time. This Brother HL-2270DW is a great option, as it is inexpensive, wireless, and easy to set up. It also has some of the best user reviews of a printer that I have ever seen.
Step 1: Open the document that you need to print in Word 2010.
Step 2: Click theFiletab at the top-left corner of the window.
Step 3: ClickPrintin the column at the left side of the window.
Step 4: Click the1 Page Per Sheetbutton at the bottom of the window, then click the2 Pages Per Sheetoption to print multiple pages on a single sheet.
Step 5: Click thePrintbutton at the center of the window.
Now that you know how to print two pages on one sheet in Word 2010, you can use this printing option to start using less paper when you need hard copies of your documents.
Our article continues with additional discussion on printing multiple pages on a single sheet of paper in Microsoft Word 2010.
What Happens When Printing Multiple Pages of a Document on a Single Sheet of Paper in Word?
While a single page document, or a document where you have elected to print just one page per sheet of paper, can print correctly with little effort, you can encounter some problems in Word’s print dialog window when you want to put multiple pages on the same sheet.
If you are only selecting two pages per sheet from the sheet drop-down list then you will have half-sized pages for the entire document.
But when you have a multi-page document and you are trying to turn it into a one-page document, then you might find that the text on your pages is becoming too small to read easily.
While you might not need to use a full-sized page on each sheet of paper, the solution to print multiple pages per sheet for a Word document is going to vary depending on the type of content in the document. You will likely need to try a couple of the different sheet per page options, or adjust the page size and see how Word displays your document.
After you make the change the print preview window should update almost immediately, allowing you to see how it will look before you select print and potentially waste a bunch of paper.
More Information on How to Print Two Pages on One Sheet – Word 2010
The steps above were performed in Microsoft Word 2010 but will work in most other versions of Microsoft Office as well, including Microsoft Word 2013, Word 2016, and Word for Office 365.
You can also use these steps if you are going to print to a PDF instead of an actual printer.
After you click the 1 Page Per Sheet button you probably noticed that there are options to print more than just two pages per sheet. In the image above, for Microsoft Word 2010, you have these options when printing multiple pages per sheet:
- 1 Page Per Sheet
- 2 Pages Per Sheet
- 4 Pages Per Sheet
- 6 Pages Per Sheet
- 8 Pages Per Sheet
- 16 Pages Per Sheet
The default paper size for your document is likely to be either Letter or A4, depending on where in the world you live. However, if you switch the paper size to something larger, like legal paper, you might be able to fit more pages on a sheet. You can find this setting by going to Page Layout > Size > then selecting the desired size. You may also want to consider switching the paper orientation, too, to see if that helps your printing situation.
Microsoft Word 2010 has some other uses, too. For example, you can use Word for some of the easiest label printing around .
Matthew Burleigh has been writing tech tutorials since 2008. His writing has appeared on dozens of different websites and been read over 50 million times.
After receiving his Bachelor’s and Master’s degrees in Computer Science he spent several years working in IT management for small businesses. However, he now works full time writing content online and creating websites.
His main writing topics include iPhones, Microsoft Office, Google Apps, Android, and Photoshop, but he has also written about many other tech topics as well.
Read his full bio here.
