Deleting labels in Gmail on your iPad is a straightforward process that helps you keep your email organized and clutter-free. This quick guide will show you how to remove those pesky labels that you no longer need, all within just a few taps. By the end, you’ll have a cleaner, more efficient inbox.
How to Delete Labels in Gmail App on iPad
Deleting labels in the Gmail app on your iPad is an easy task once you know the steps. Follow these instructions to tidy up your mail by removing any unwanted labels.
Step 1: Open the Gmail app
First, unlock your iPad and find the Gmail app icon. Tap to open it.
Once the app is opened, make sure you’re logged into the account where you want to delete labels.
Step 2: Tap on the menu icon
Step 2: Tap on the menu icon (three horizontal lines) located at the top-left corner of the screen.
This will open a side menu where you can see various options like Inbox, Sent, Drafts, and more.
Step 3: Scroll down to “Settings”
Scroll all the way down in the side menu until you find the “Settings” option. Tap on it.
In the Settings, you will see a list of all your connected Gmail accounts.
Step 4: Select the account
Select the account for which you want to delete the label by tapping on it.
This will open a new menu with various settings specific to that account.
Step 5: Manage labels
In the account settings, scroll down and tap on “Manage labels.”
Here, you’ll see a list of all the labels associated with that account.
Step 6: Select the label to delete
Find the label you want to delete and tap on it.
This will open the settings for that specific label.
Step 7: Delete the label
Finally, tap on “Delete” to remove the label.
A confirmation pop-up will appear. Confirm your action to delete the label.
After you complete these steps, the label will be removed from your Gmail account. Emails tagged with this label will still be available in your inbox or other folders but will no longer have the label attached.
Tips for Deleting Labels in Gmail App on iPad
- Double-check before deleting: Make sure the label you’re deleting isn’t one you need later.
- Use labels wisely: Instead of deleting every label, think about combining labels for better organization.
- Regular maintenance: Periodically review your labels to keep your mail organized.
- Back up important emails: Before deleting a label, ensure the emails you need are labeled correctly elsewhere.
- Customize your labels: Rename or color-code labels for easier identification instead of deleting them.
Can I undo a label deletion?
Unfortunately, once a label is deleted, you can’t undo it. You’ll need to create a new label if you made a mistake.
Will emails be deleted if I delete a label?
No, your emails will remain in your inbox or other folders even if you delete a label.
Can I delete multiple labels at once?
No, labels must be deleted one at a time in the Gmail app.
Are labels deleted only from the app or from everywhere?
Deleting a label in the app removes it from your Gmail account entirely, so it will be gone on all devices.
How can I create a new label?
Go to the “Manage labels” section in your account settings and choose “Create new label.”
Summary
- Open the Gmail app.
- Tap on the menu icon.
- Scroll down to “Settings.”
- Select the account.
- Tap on “Manage labels.”
- Select the label to delete.
- Tap on “Delete.”
Conclusion
There you have it! Deleting labels in the Gmail app on an iPad is a breeze once you know the steps. This process can help you keep your inbox organized and ensure that only the most necessary labels are in use. Regularly review your labels and clean out those that no longer serve a purpose to maintain a streamlined email experience.
If you found this guide helpful, why not check out other Gmail tips and tricks to further enhance your email management? Stay organized and efficient, and happy emailing! Whether you’re a student, a professional, or just someone who likes to keep things tidy, understanding how to manage your Gmail labels can be a game-changer.

Matthew Burleigh has been writing tech tutorials since 2008. His writing has appeared on dozens of different websites and been read over 50 million times.
After receiving his Bachelor’s and Master’s degrees in Computer Science he spent several years working in IT management for small businesses. However, he now works full time writing content online and creating websites.
His main writing topics include iPhones, Microsoft Office, Google Apps, Android, and Photoshop, but he has also written about many other tech topics as well.
Read his full bio here.
Featured guides and deals
Printing multiple labels in Microsoft Word is a breeze once you get the hang of it. First, you’ll need to set up a new label template or use an existing one. Next, you’ll input your label information, be it addresses, names, or other necessary details. Finally, you’ll print your labels, and voila, you have a set of neatly printed labels ready for use!
After completing this action, you’ll have a sheet (or sheets) of labels ready for whatever purpose you need them for, such as mailing, organizing files, or labeling products.
Introduction
Printing multiple labels at once can be a daunting task if you’re not familiar with the tools at your disposal. However, Microsoft Word simplifies this process with its built-in label templates and easy-to-use interface. Whether you’re a small business owner looking to ship out products, an office administrator tasked with mailing correspondence, or a teacher organizing classroom materials, knowing how to print multiple labels efficiently can save you time and prevent the frustration of manually writing out each label.
Step by Step Tutorial: How to Print Multiple Labels in Microsoft Word
Before we dive into the steps, let’s understand what we’re about to do. We will create a sheet of labels where each label contains different information. This could be for a mailing list, name tags, or any scenario where you need a bunch of labels.
Step 1: Open Microsoft Word
Launch Microsoft Word on your computer.
Opening Microsoft Word is your first step. This might seem obvious, but make sure you’re opening a new blank document to start fresh.
Step 2: Click on the ‘Mailings’ Tab
Select the ‘Mailings’ tab at the top of the screen.
The ‘Mailings’ tab is where all the magic happens for creating labels. This is where you will find all the tools you need for your label project.
Step 3: Select ‘Labels’
Choose ‘Labels’ from the ‘Create’ group.
By selecting ‘Labels,’ you’re telling Word that you’re looking to create multiple labels instead of a single document.
Step 4: Choose Your Label Template
Click on ‘Options’ and select the label template that matches the labels you want to print.
Microsoft Word has a variety of templates to fit different label sizes and brands. Make sure you select the one that matches your label sheets.
Step 5: Input Your Label Information
Enter the information for your labels.
This is where you will type in the content for each label. If you’re printing addresses, you might input the first one now.
Step 6: Select ‘Full Page of the Same Label’
If you want the same information on all labels, select ‘Full page of the same label.’
This option is perfect for when you need a full sheet of labels with the same content.
Step 7: Click on ‘New Document’
Create a new document to see your label layout.
After clicking ‘New Document,’ you’ll see a preview of your labels laid out on the page. This is where you can make final adjustments before printing.
Step 8: Print Your Labels
Click on ‘File’ then ‘Print’ to print out your labels.
Once you’re satisfied with the layout, load your printer with label paper and hit ‘Print.’ Just like that, you’ve got a full page of labels ready to go!
Pros
| Benefit | Explanation |
|---|---|
| Saves Time | Printing multiple labels at once is much faster than writing them out by hand or printing them individually. |
| Professional Appearance | Labels printed through Word are neat and uniform, giving a professional look to your mailings or organization efforts. |
| Customization | Microsoft Word allows you to customize your labels with different fonts, sizes, and even images, making them perfect for any need. |
Cons
| Drawback | Explanation |
|---|---|
| Printer Compatibility | Not all printers handle label sheets well, which can lead to jams or misaligned prints. |
| Template Limitations | If you can’t find a template that matches your labels, you may need to manually adjust the settings, which can be a hassle. |
| Learning Curve | Those unfamiliar with Word’s Mailings functions may require some time to learn the process. |
Additional Information
When you’re printing multiple labels in Microsoft Word, there are a few additional tips to keep in mind. First, always ensure that the label sheets are correctly loaded into your printer. It may seem like a no-brainer, but it’s a common mistake that leads to wasted labels. Also, consider doing a test print on a regular sheet of paper to check the alignment before printing on the actual label sheet. This can save you from a headache if things don’t line up as expected.
Moreover, if you’re printing labels with different information on each one (say, for a mailing list), you can use Word’s ‘Mail Merge’ feature. This allows you to import a list of addresses and automatically populate the labels, which is a massive time-saver for larger projects.
Remember to save your label document if you think you’ll use the same layout again in the future. This way, you won’t have to set up the template from scratch every time you need to print labels. Lastly, have some fun with it! Labels don’t have to be boring – with Word’s design options, you can make them as colorful and creative as you like.
Summary
- Open Microsoft Word.
- Click on the ‘Mailings’ tab.
- Select ‘Labels’ from the ‘Create’ group.
- Choose your label template.
- Input your label information.
- Select ‘Full page of the same label’ if needed.
- Click on ‘New Document’ to preview.
- Print your labels.
Can I print different labels on the same sheet?
Yes, you can print different labels on the same sheet by selecting ‘Single label’ and specifying the row and column.
How do I ensure the labels print correctly on the sheet?
Make sure to select the correct template that matches your labels and do a test print on a plain sheet of paper first.
Can I add images to my labels in Word?
Absolutely! You can insert images just like you would in any Word document.
What if my printer doesn’t align the labels correctly?
You can adjust the alignment settings in the ‘Labels’ options or manually adjust the margins in the document.
Can I save my label template for future use?
Yes, you can save your document with the labels for future use. Just open it up the next time you need to print labels and make any necessary updates.
Conclusion
Knowing how to print multiple labels in Microsoft Word is an invaluable skill that can make your life easier, whether it’s for personal or professional use. Once you master the steps, you’ll wonder how you ever managed without it. From sending out wedding invitations to mailing business flyers, the ability to print multiple labels is a timesaver and a way to add a touch of professionalism to your mailings.
For further guidance, there are plenty of online tutorials and videos that can provide visual aids to help you along. And don’t forget, practice makes perfect! The more you use the label printing feature in Word, the more efficient you’ll become. So go ahead, give it a try, and watch as those neatly printed labels come rolling out of your printer, ready to make your life a little bit easier.
Matthew Burleigh has been writing tech tutorials since 2008. His writing has appeared on dozens of different websites and been read over 50 million times.
After receiving his Bachelor’s and Master’s degrees in Computer Science he spent several years working in IT management for small businesses. However, he now works full time writing content online and creating websites.
His main writing topics include iPhones, Microsoft Office, Google Apps, Android, and Photoshop, but he has also written about many other tech topics as well.
Read his full bio here.
Featured guides and deals
Printing Avery mailing labels from Word documents is a simple task. You’ll need a Word document, Avery labels, a printer, and the Avery template that matches your labels. You can find templates on the Avery website or within Word’s label options. After setting up your document with the correct template, you can print, peel, and stick your labels onto your mailing items.
After completing the action, you will have professional-looking labels ready to attach to your mail items. This can save you time and ensure that your mail looks tidy and is properly addressed.
Introduction
When it comes to mailing, the presentation and accuracy of your labels can make all the difference. Whether you’re sending out invitations, marketing materials, or just regular correspondence, Avery mailing labels can help you achieve a professional look with minimal effort. This is particularly relevant to businesses that send out a lot of mail, as it can enhance the perceived quality of their brand. Additionally, individuals who handle event planning or bulk mailing tasks will find this skill useful.
It’s also worth noting the convenience factor; once you learn how to print Avery mailing labels from Word documents, you can do it from the comfort of your own home or office, without the need for specialized equipment or services. In today’s fast-paced world, being able to quickly and efficiently address and mail your items is crucial. Let’s dive into the process and get those labels printed!
Step by Step Tutorial on Printing Avery Mailing Labels from Word Documents
This tutorial will guide you on how to select the correct Avery template in Word, format your labels, and print them accurately.
Step 1: Open Microsoft Word
Open Microsoft Word on your computer.
In this step, you will start by opening Microsoft Word, which is the application where you will format and print your Avery labels. If you don’t have Word installed, you will need to get it before proceeding.
Step 2: Choose the Mailing Tab
Click on the “Mailings” tab in the Word ribbon.
In the Word ribbon, which is the toolbar at the top of the document, select the “Mailings” tab. This is where you’ll find all the tools you need for printing labels.
Step 3: Select Labels
Click on the “Labels” option within the “Mailings” tab.
Under the “Mailings” tab, find and select the “Labels” option. This will open a new window where you can choose your label settings.
Step 4: Choose the Correct Avery Template
Click on the “Options” button and select the Avery label number that matches your labels.
It’s important to select the right template for the Avery labels you have. Each label type has a specific number that you can match with the templates available in Word or on the Avery website.
Step 5: Enter Your Address
Type your address or other information into the address box.
Here, you will input the information you want to appear on your labels. It could be your return address, your recipient’s address, or any other text you need.
Step 6: Print a Test Page
Before printing on your Avery labels, print a test page on a plain sheet of paper.
Printing a test page helps ensure that all the alignments and formatting are correct before you print on the actual label sheets. This can save you from wasting labels due to formatting issues.
Step 7: Load Your Printer
Carefully load your Avery labels into the printer.
Make sure to load your Avery labels into your printer according to the manufacturer’s instructions. This usually involves placing them face down or face up depending on your printer model.
Step 8: Print Your Labels
Click the “Print” button to print your labels.
After checking everything is correctly set up and your test page looks good, go ahead and print your labels.
Pros
| Benefit | Explanation |
|---|---|
| Professional Look | Printing your labels using Avery templates in Word can give your mail a clean and professional appearance. This is essential for businesses looking to make a good impression. |
| Time-Saving | Once you get the hang of it, printing labels is much faster than writing them out by hand. This is a huge benefit when dealing with large quantities of mail. |
| Customization | Word allows you to customize your labels with fonts, images, and logos, which is excellent for branding or personal touches. |
Cons
| Drawback | Explanation |
|---|---|
| Printer Issues | Sometimes printers might not align labels correctly, which can lead to wastage and frustration. |
| Learning Curve | It might take some time to learn how to navigate Word’s mailing label features and find the correct template. |
| Template Availability | Not all Avery label numbers might be available in Word, which could require additional steps to download the correct template. |
Additional Information
When printing Avery mailing labels from Word documents, there are a few extra tips to keep in mind. First, ensure that your printer’s ink levels are sufficient; running out of ink mid-print can ruin a whole sheet of labels. It’s also wise to check that your label sheets are suitable for your printer type – some labels are designed specifically for laser or inkjet printers. Remember, the quality of your labels can be affected by the quality of your printer.
Another thing to consider is the potential for adhesive labels to cause issues with your printer. If a label peels off during printing, it can cause a jam or damage the printer. Always use high-quality Avery labels to minimize this risk. Additionally, storing your label sheets in a cool, dry place will help prevent them from curling or peeling.
Finally, think about how you can use Word’s features to enhance your labels. For example, you can use ‘Mail Merge’ to automatically fill in addresses from a database, which is a real time-saver for bulk mailing. And don’t forget about the design aspect – your labels don’t have to be plain! Experiment with borders, backgrounds, and other design elements to make your mail stand out.
Summary
- Open Microsoft Word
- Click on the “Mailings” tab
- Select “Labels” option
- Choose the correct Avery template
- Enter your address
- Print a test page
- Load your Avery labels into the printer
- Print your labels
How do I know which Avery template to use?
Check the label package for the product number and select the matching template in Word or download it from the Avery website.
Can I print different addresses on each label using Word?
Yes, you can use the ‘Mail Merge’ function in Word to print different addresses on each label.
What should I do if my labels aren’t printing correctly?
Double-check that you’ve selected the correct template and that your printer settings are correct. It might also help to clean your printer’s rollers or check for updates for your printer driver.
Can I save my label template for future use?
Absolutely! Once you’ve set up your labels in Word, you can save the document for future use.
Is it possible to add images or logos to my Avery labels in Word?
Yes, you can easily insert images or logos into your labels for a personalized touch.
Conclusion
Printing Avery mailing labels from Word documents may seem daunting at first, but with a bit of practice, it becomes a straightforward task. Remember, the key to success is selecting the correct template and ensuring your printer settings are accurate.
Once you’ve mastered this skill, you’ll enjoy the convenience and professionalism of custom-printed labels for all your mailing needs. For those looking to delve deeper into label printing, consider exploring Word’s ‘Mail Merge’ feature for mass mailings or playing with design elements to further customize your labels.
Matthew Burleigh has been writing tech tutorials since 2008. His writing has appeared on dozens of different websites and been read over 50 million times.
After receiving his Bachelor’s and Master’s degrees in Computer Science he spent several years working in IT management for small businesses. However, he now works full time writing content online and creating websites.
His main writing topics include iPhones, Microsoft Office, Google Apps, Android, and Photoshop, but he has also written about many other tech topics as well.
Read his full bio here.
Featured guides and deals
Printing labels from your Microsoft Word document can seem intimidating at first, but it’s actually a simple process that anyone can master. In a nutshell, you’ll need to set up a document in Word, choose the correct label size, input your label text, and print. With just a few clicks, you’ll have professional-looking labels ready to go. So, let’s dive in and demystify the process, shall we?
Step by Step Tutorial: How to Print Labels from Word
Before we jump into the steps, let’s understand what we’re aiming for. By following these detailed instructions, you’ll be able to create and print a sheet of labels. These could be address labels, name tags, or even labels for your homemade jam. Ready? Let’s go.
Step 1: Open Microsoft Word
Open Microsoft Word on your computer to start the label-making process.
When you open Word, you’ll be greeted with a variety of template options. You can start with a blank document or choose a label template if you’re looking for a quick start.
Step 2: Choose ‘Mailings’ Tab
Click on the ‘Mailings’ tab in the top menu of Word.
The ‘Mailings’ tab is where all the magic happens. This is the control center for creating labels, envelopes, and even doing mail merges.
Step 3: Select ‘Labels’
Within the ‘Mailings’ tab, find and select ‘Labels’ to begin setting up your label sheet.
After clicking ‘Labels’, a new window will pop up. This is where you’ll input the text for your labels and choose the correct label size.
Step 4: Input Label Text
Enter the text you want on your labels in the ‘Address’ box within the Labels window.
If you’re printing address labels, you can type the address here. If it’s a different kind of label, simply input the text you want to appear on each label.
Step 5: Adjust Label Settings
Click the ‘Options’ button to choose the label size and configure any other settings.
In the ‘Options’ window, you can select the brand of labels you’re using and find the corresponding size number. Make sure it matches the labels you have!
Step 6: Preview Your Labels
Click ‘OK’ and then ‘New Document’ to generate a preview of your labels in a new Word document.
This new document will show your labels laid out on the page. This is a great time to double-check your work before printing.
Step 7: Print Your Labels
Load your printer with label sheets and hit ‘Print’ to start the printing process.
Make sure your printer is set to the correct type of paper and that your label sheets are loaded in the right direction. Then, watch as your labels come to life!
After completing these steps, your printer will produce a sheet of labels just as you designed them in Word. Peel them off, and they’re ready for use!
Tips: How to Print Labels from Word
- Ensure you have the correct label sheets for your printer (laser or inkjet).
- Double-check the label size and number before printing to avoid wasting sheets.
- Use the ‘Print Preview’ function to check how your labels will look before printing.
- Save your label document so you can easily reprint or adjust in the future.
- Consider using a template if you’re making more complex labels, like those with images or different fonts.
What if I can’t find the right label size in Word?
If you can’t find your label size, you can manually set the dimensions in the ‘Options’ window.
Can I print a single label instead of a whole sheet?
Yes, select the ‘Single label’ option in the Labels window and specify which label to print on the sheet.
How do I ensure my labels print correctly aligned?
Use the ‘Print Preview’ to check alignment and make sure to feed the label sheet into your printer as instructed.
Can I save my label setup for future use?
Absolutely, just save the document like any other Word file.
What should I do if my labels are smearing when I print them?
Make sure you’re using the correct label sheets for your type of printer and check your printer’s settings for label printing.
Summary
- Open Microsoft Word.
- Choose ‘Mailings’ Tab.
- Select ‘Labels’.
- Input Label Text.
- Adjust Label Settings.
- Preview Your Labels.
- Print Your Labels.
Conclusion
Printing labels from Word doesn’t have to feel like a chore or a daunting task. With the straightforward steps we’ve covered, you’re well on your way to creating custom labels for any occasion or need. Whether you’re organizing your home, sending out invitations, or running a small business, mastering the art of label printing can save you time and add a personal touch to your items. Remember, practice makes perfect. Don’t be afraid to experiment with different templates, fonts, and layouts to find the style that works best for you. And as always, if you have any additional questions or need further assistance, there are plenty of online resources and forums where you can find help. Happy printing!
Matthew Burleigh has been writing tech tutorials since 2008. His writing has appeared on dozens of different websites and been read over 50 million times.
After receiving his Bachelor’s and Master’s degrees in Computer Science he spent several years working in IT management for small businesses. However, he now works full time writing content online and creating websites.
His main writing topics include iPhones, Microsoft Office, Google Apps, Android, and Photoshop, but he has also written about many other tech topics as well.
Read his full bio here.
Featured guides and deals
Microsoft Word is an impressively versatile program, and one of the more common ways that I find myself using it is to print address labels.
While the labels that I am printing in Word may not always necessarily be address labels, the method for creating them is identical.
Return address labels can be a lifesaver when you need to do a mass mailing.
However, if you have never done it before, or if it has been a long time, then setting them up correctly might be a bit of a challenge.
Fortunately you can learn how to print address labels from Microsoft Word 2010 , as they include a complete utility for setting up an entire label sheet filled with the information that you enter when you are initially setting up the label.
Word 2010 even includes a pretty comprehensive list of the templates that you will need for labels from some of the more common label manufacturers.
If your document editing attempts are being frustrated by random formatting, then try out our how to delete section break in Word steps and see if that helps to resolve the issue.
How to Print Labels in Microsoft Word 2010
The only information you are going to need to begin producing your address labels in Word 2010 is the type of label that you are using. In most cases this is going to be a label number in the corner of the package that contained the labels. For example, I am using a sheet of 5160 labels from Avery, which is a sheet of 30 – 1″ by 2 5/8″ labels.
Step 1: Begin by inserting the label sheet into your printer, making sure to insert it with the correct orientation so that your information will print on the side of the sheet that contains the labels.
Step 2: Launch Microsoft Word 2010.
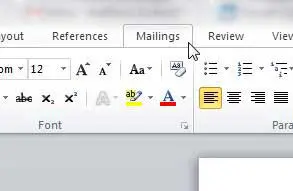
Step 3: Click the Mailings tab at the top of the window.
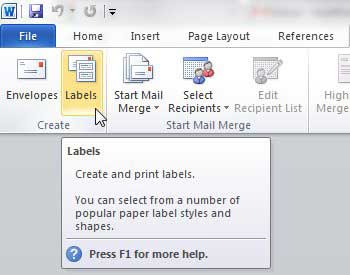
Step 4: Click the Labels button in the Create section of the ribbon at the top of the window.
Step 5: Type your address into the Address field at the center of the window.
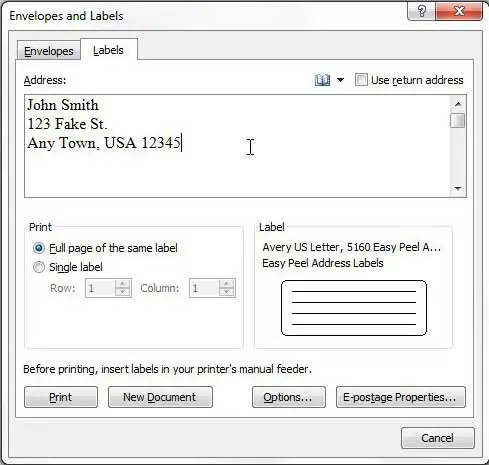
Step 6: Check the option to the left of Full page of the same label in the Print section of the window if you want to fill the entire sheet with the same address, or check the Single label option and choose which label to print it on if you only want to print one label.
Step 7: Click the Options button at the bottom of the window, then select your label from the choices on the menu.
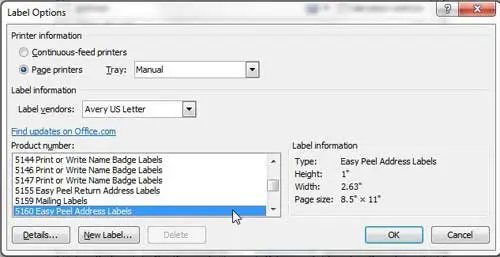
Step 8: Click the OK button to close the Label Options window.
Step 9: Click the New Document button at the bottom of the window if you want to see the sheet before you print the labels, or click the Print button if you just want to start printing.
Our guide on how to print Avery labels in Word provides additional instruction on this topic.
Summary – How to print labels in Word 2010
- Click the Mailings tab.
- Click the Labels button.
- Enter your label information, then adjust the other settings on this window.
- Click the Options button.
- Select the Label vendor and the Product number of your labels, then click the OK button.
- Click New Document if you want to see the label sheet, or click Print to print the labels.
Tip – You may need to adjust a setting on your printer if you are having difficulty getting your address labels to print. Some printer models will automatically adjust their default settings if they thing they are printing labels. For example, one printer that I work with regularly will change to the manual paper tray when it tries to print address labels from Word. You may find it helpful to print your labels as a PDF, then open the PDF and print from there if you are having difficulty.
- How to insert a check mark in Microsoft Word
- How to do small caps in Microsoft Word
- How to center text in Microsoft Word
- How to merge cells in Microsoft Word tables
- How to insert a square root symbol in Microsoft Word
Matthew Burleigh has been writing tech tutorials since 2008. His writing has appeared on dozens of different websites and been read over 50 million times.
After receiving his Bachelor’s and Master’s degrees in Computer Science he spent several years working in IT management for small businesses. However, he now works full time writing content online and creating websites.
His main writing topics include iPhones, Microsoft Office, Google Apps, Android, and Photoshop, but he has also written about many other tech topics as well.
Read his full bio here.
Creating and printing file holder labels using Microsoft Word is an easy and straightforward task. After opening Word, choose a template or create a new document, input your label content, customize the design to your liking, and print onto label sheets suitable for your file holders. With these labels, you’ll be able to easily identify and organize your documents.
After you’ve completed your labels and printed them out, you’ll be able to apply them to your file holders. This will not only give your office or workspace a more organized appearance, but it will also save you time when searching for specific files.
Introduction
In today’s fast-paced world, efficiency and organization are key to managing a successful office or personal workspace. One simple yet effective way to achieve this is by using file holder labels to categorize and identify your documents quickly. Whether you’re running a small business, managing household documents, or just trying to keep your desk tidy, knowing how to create and print your own labels can be a lifesaver.
Creating your own file holder labels not only allows you to customize them to your specific needs, but it also can be a cost-effective alternative to purchasing pre-made labels. Plus, with the widespread accessibility of Microsoft Word, anyone with a computer and a printer can tackle this task with ease. You don’t need to be a tech wizard or a graphic designer to create professional-looking labels that will streamline your filing system and spruce up your office.
Step by Step Tutorial for Creating & Printing File Holder Labels in Word
Before we jump into the steps, it’s important to understand that by following this guide, you’ll be able to create tailored labels that fit your style and organizational needs. Let’s get started!
Step 1: Open Microsoft Word
Open Microsoft Word on your computer to begin the label-making process.
When you open Word, you’ll be greeted with a variety of templates to choose from, or you can opt to start with a blank document if you prefer.
Step 2: Choose a Template or Create a New Document
Select a pre-existing label template or create a new document for your labels.
If you choose to use a template, Word offers a variety of designs that can be customized to fit your needs. Otherwise, setting up a new document allows you full creative freedom.
Step 3: Input Your Label Content
Type the text or information you want to include on your labels.
Think about what details are necessary for your filing system—this may include file names, dates, or category titles. Make sure the text is clear and concise for easy readability.
Step 4: Customize Your Design
Customize your label design by adjusting font styles, sizes, and colors.
This is your chance to get creative. Choose fonts and colors that align with your brand or personal preference, but remember to keep readability in mind.
Step 5: Print on Label Sheets
Print your completed labels onto label sheets designed for file holders.
Make sure to insert your label sheets correctly into the printer. You might want to do a test print on a regular piece of paper to ensure everything aligns properly before printing on the label sheets.
Pros
| Benefit | Explanation |
|---|---|
| Cost-Effective | Creating your own labels can save you money compared to buying pre-made labels. |
| Customizable | You have the freedom to design labels that suit your personal or brand style. |
| Organizational Efficiency | Having clearly labeled files can significantly reduce the time spent searching for documents. |
Cons
| Drawback | Explanation |
|---|---|
| Printer Issues | If your printer is not aligned properly, it can lead to misprints and wasted label sheets. |
| Time Consumption | Designing your own labels can be time-consuming, especially if you’re aiming for a specific look. |
| Software Learning Curve | Those unfamiliar with Word may find it challenging to navigate the various design tools. |
Additional Information
When creating your file holder labels, it’s essential to consider the size and layout of your labels to ensure they fit properly on your file holders. Measure your file holders and adjust the dimensions of your labels accordingly in Word’s layout settings. Additionally, consider the durability of your labels—using waterproof or heavy-duty label sheets can ensure they withstand regular handling.
Experiment with different design elements like borders, backgrounds, and images to make your labels stand out. You can also utilize Word’s mail merge feature if you need to print a large batch of labels with different information. And remember, always preview your labels in Word’s print preview before printing to catch any errors or design issues.
Lastly, don’t forget to save your label document. This allows you to revisit and reprint labels in the future, maintaining consistency in your filing system.
Summary
- Open Microsoft Word.
- Choose a label template or create a new document.
- Input the necessary text for your labels.
- Customize the design of your labels.
- Print the labels on suitable label sheets.
What type of printer do I need to print file holder labels?
You can use any standard inkjet or laser printer to print your labels, as long as it supports the size of your label sheets.
Can I use any label sheets to print my file holder labels?
It’s best to use label sheets specifically designed for file holders, as they will be the correct size and have the proper adhesive.
How can I ensure my labels are aligned correctly when printing?
Use Word’s print preview feature to check the alignment, and consider doing a test print on a regular sheet of paper first.
Can I save my label designs for future use?
Yes, saving your Word document will allow you to reprint or modify your labels in the future.
What should I do if my labels aren’t printing correctly?
Check your printer settings, ensure you’ve loaded the label sheets correctly, and verify that your document’s dimensions match your label sheets.
Conclusion
Creating and printing file holder labels using Microsoft Word is a simple yet highly effective way to keep your files organized and accessible. With the ease of customization and the ability to design labels that truly represent your brand or personal style, this task not only enhances organization but also adds a professional touch to your workspace. Remember to measure your file holders, choose the right label sheets, and always preview before printing to ensure the best results. Happy labeling!
Matthew Burleigh has been writing tech tutorials since 2008. His writing has appeared on dozens of different websites and been read over 50 million times.
After receiving his Bachelor’s and Master’s degrees in Computer Science he spent several years working in IT management for small businesses. However, he now works full time writing content online and creating websites.
His main writing topics include iPhones, Microsoft Office, Google Apps, Android, and Photoshop, but he has also written about many other tech topics as well.
Read his full bio here.
Featured guides and deals
Printing labels from Word 2019 isn’t as tough as it may seem. All you need is a computer, Word 2019, a printer, and label sheets. You’ll be creating and printing labels in no time. It’s straightforward once you know the steps. Let’s dive in!
Step by Step Tutorial: How to Print Labels from Word 2019
Before we start with the steps, it’s important to know that printing labels using Word 2019 involves creating a document that aligns with the labels you want to print. This means matching the size and layout of the labels on your sheet. Once you get that set up, the rest is a breeze.
Step 1: Open Word 2019 and Start a New Document
Open Word 2019 and create a new blank document.
Starting a new document gives you a clean slate to work with. Make sure you’re using a blank document so that no previous formatting affects your label setup.
Step 2: Go to the Mailings Tab
Navigate to the ‘Mailings’ tab in Word 2019’s top menu.
The ‘Mailings’ tab is where all the magic happens for label creation. It’s your one-stop-shop for everything you need to set up your labels.
Step 3: Click on Labels
Click on the ‘Labels’ option within the Mailings tab.
Once you click ‘Labels’, a new window will pop up. This is where you’ll input the information for your labels and choose your label layout.
Step 4: Input Your Label Information
Enter the address or information you want on your label in the address box.
If you’re creating multiple labels with the same information, you only need to do this once. Word will replicate the information across all the labels.
Step 5: Choose the Correct Label
Click on ‘Options’ and select the label brand and product number that matches your label sheets.
It’s crucial to select the correct label product number so that the layout matches your physical label sheets. Be sure to double-check the product number on your label package.
Step 6: Print a Test Page
Before printing on your label sheets, print a test page on a regular piece of paper.
Printing a test page first ensures that everything aligns properly. Hold the test page up to the light against your label sheet to see if the alignment is correct.
Step 7: Load Your Label Sheets
Place your label sheets into your printer’s paper tray.
Make sure your label sheets are positioned correctly in the printer. Check your printer’s manual if you’re unsure which side should be facing up.
Step 8: Print Your Labels
Click ‘Print’ and watch your labels come to life.
After clicking ‘Print’, your printer will do the rest. And there you have it, your very own printed labels!
Once you’ve completed these steps, your labels will be printed and ready to use. Whether you’re organizing your office, mailing out invitations, or labeling products, your custom labels will add a professional touch.
Tips for Printing Labels from Word 2019
- Double-check that you’ve selected the correct label layout.
- Always print a test page to avoid wasting label sheets.
- Ensure your printer settings match the type of labels you’re using.
- Save your label document for future use.
- Experiment with different fonts and designs to customize your labels.
How do I know which label product number to choose?
The product number is usually printed on the label package. Match this number with the options in Word.
Can I print different addresses on each label?
Yes, you can use the ‘Mail Merge’ feature for this, which is also found under the ‘Mailings’ tab.
What if my labels are not aligning properly?
Check your printer settings and make sure the paper type is set to ‘Labels’ or the specific brand you’re using.
Can I add images to my labels in Word 2019?
Absolutely, you can insert images just like you would in any Word document.
How can I save my label document for future use?
Just go to ‘File’ then ‘Save As’, and choose where you want to save it on your computer.
Summary
- Open Word 2019 and start a new document.
- Go to the Mailings tab.
- Click on Labels.
- Input your label information.
- Choose the correct label.
- Print a test page.
- Load your label sheets.
- Print your labels.
Conclusion
So there you have it, folks! Printing labels from Word 2019 is a piece of cake once you know the steps. Remember, the key is in the preparation – selecting the right label layout and printing a test page can save you a lot of hassle. With a little practice, you’ll be churning out professional-looking labels from the comfort of your home or office. And the best part? You can customize them to your heart’s content, whether it’s for your personal use or your business needs. So go ahead, give it a whirl and impress everyone with your label printing prowess!
Matthew Burleigh has been writing tech tutorials since 2008. His writing has appeared on dozens of different websites and been read over 50 million times.
After receiving his Bachelor’s and Master’s degrees in Computer Science he spent several years working in IT management for small businesses. However, he now works full time writing content online and creating websites.
His main writing topics include iPhones, Microsoft Office, Google Apps, Android, and Photoshop, but he has also written about many other tech topics as well.
Read his full bio here.
Featured guides and deals
