Fixing the blue screen on Windows 11 involves a series of troubleshooting steps to identify and resolve the issue. By following these steps, you can get your computer back to running smoothly and avoid future crashes. We’ll guide you through each step, from initial checks to more detailed troubleshooting.
Step-by-Step Tutorial on How to Fix Blue Screen Windows 11
The steps below will help you identify the cause of the blue screen (also known as the Blue Screen of Death or BSOD) and fix it. Follow these steps to troubleshoot and resolve the issue.
Step 1: Restart Your Computer
Restarting your computer can sometimes resolve temporary issues causing the blue screen.
A simple restart can clear up minor glitches and reset your system. If the blue screen reappears after restarting, proceed to the next steps.
Step 2: Check for Windows Updates
Step 2: Ensure your Windows 11 is up to date with the latest patches and updates.
Windows updates often contain fixes for bugs and security patches. Go to Settings > Windows Update and click on “Check for updates” to install any available updates.
Step 3: Update Drivers
Ensure all your device drivers are up-to-date, particularly graphics and network drivers.
Outdated or corrupted drivers can cause conflicts leading to a blue screen. Use Device Manager to check for updates or visit the manufacturer’s website for the latest drivers.
Step 4: Run a Virus Scan
Run a full system scan using Windows Defender or another reliable antivirus program.
Malware and viruses can cause system instability. Make sure your system is clean by performing a thorough scan and removing any detected threats.
Step 5: Check Hardware Components
Inspect your hardware components, such as RAM and hard drives, for any physical issues or connections.
Physical damage or loose connections can cause hardware failures. If you suspect a hardware component might be faulty, you may need to replace it or seek professional repair services.
Step 6: Use System Restore
Use System Restore to revert your system to a previous state before the issue started.
System Restore can help undo recent changes that might have caused the blue screen. Open System Restore from the Control Panel and follow the prompts to select a restore point.
Step 7: Check System Logs
Examine the Event Viewer logs for any error messages or warnings related to the blue screen.
The Event Viewer can provide detailed information about what caused the crash. Look for critical errors under “Windows Logs > System” to identify the source of the problem.
Step 8: Perform a Clean Boot
Perform a clean boot to start Windows with a minimal set of drivers and startup programs.
A clean boot can help you determine if a background program is causing the blue screen. Follow the steps for a clean boot in the System Configuration tool (msconfig).
Step 9: Run System File Checker
Use the System File Checker (sfc /scannow) to repair corrupted system files.
Corrupted system files can lead to instability. Open Command Prompt as an administrator and run the sfc /scannow command to scan and repair any corrupted files.
Step 10: Reinstall Windows
If all else fails, consider reinstalling Windows 11 to fix the issue.
Reinstalling Windows should be your last resort. This process will erase your data, so ensure you back up important files before proceeding.
After completing these steps, your computer should run smoothly without the blue screen interrupting your work.
Tips on How to Fix Blue Screen Windows 11
- Keep your system updated: Regularly check for Windows updates and install them to keep your system secure and stable.
- Backup regularly: Regular backups can save you from data loss in case you need to reinstall Windows.
- Avoid overheating: Ensure your computer’s cooling system is working efficiently to prevent overheating, which can cause hardware failures.
- Run diagnostics: Use built-in diagnostic tools to check your hardware components periodically.
- Limit startup programs: Disable unnecessary startup programs to reduce system load and potential conflicts.
What is a blue screen in Windows 11?
A blue screen in Windows 11, also known as the Blue Screen of Death (BSOD), is an error screen displayed after a system crash.
Can a virus cause a blue screen?
Yes, malware or viruses can cause system instability, leading to a blue screen.
How often should I update my drivers?
Regularly check for driver updates, especially after installing new hardware or experiencing system issues.
Is it safe to use System Restore?
Yes, System Restore is a built-in Windows feature that safely reverts your system to a previous state without affecting personal files.
What if System Restore doesn’t fix the blue screen?
If System Restore doesn’t fix the issue, proceed with other troubleshooting steps like checking hardware or performing a clean boot.
Summary
- Restart your computer.
- Check for Windows updates.
- Update drivers.
- Run a virus scan.
- Check hardware components.
- Use System Restore.
- Check system logs.
- Perform a clean boot.
- Run System File Checker.
- Reinstall Windows.
Conclusion
Fixing a blue screen in Windows 11 can seem daunting, but by following the steps outlined above, you can identify and resolve most issues causing the crashes. Remember, keeping your system updated, running regular virus scans, and checking your hardware can prevent many problems before they arise.
If you’ve tried all the steps and still face issues, don’t hesitate to seek professional help. Sometimes, the problem might be complex and require expert intervention. For more detailed guides, Microsoft’s support page is also a valuable resource. By staying proactive, you can keep your computer running smoothly and avoid the dreaded blue screen. Good luck!

Matthew Burleigh has been writing tech tutorials since 2008. His writing has appeared on dozens of different websites and been read over 50 million times.
After receiving his Bachelor’s and Master’s degrees in Computer Science he spent several years working in IT management for small businesses. However, he now works full time writing content online and creating websites.
His main writing topics include iPhones, Microsoft Office, Google Apps, Android, and Photoshop, but he has also written about many other tech topics as well.
Read his full bio here.
Featured guides and deals
Print drivers are a necessary component when you are adding a printer to your computer.
Over time as you connect to different printers, you may accumulate a surprising amount of these drivers, and it’s possible that you may end up with a driver that causes problems with another printer.
Our tutorial on how to see all of the printer drivers currently installed in Windows 7 will show you how to find a list of these drivers so that you can see more information about any of them, or even remove them from your computer.
How to View All of Your Printer Drivers in Windows
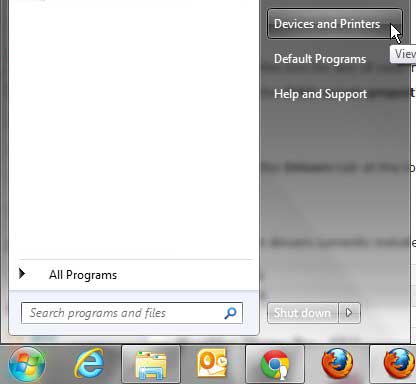
- Click Start , then Devices and Printers .
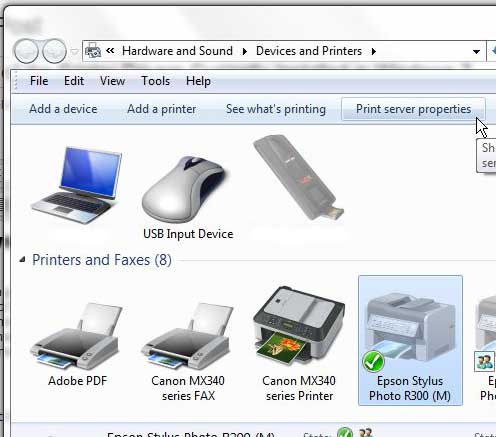
- Click once on any printer icon.
- Choose Print Server Properties in the blue bar.
- Select the Drivers tab.
Our guide continues below with additional information on how to see all of the printer drivers currently installed in Windows 7, including pictures of these steps.
Whenever you connect and install a new printer on your computer, you need a driver in order to print documents for the printer.
However, depending on how you choose to remove an old printer from your computer, you might not actually delete the print driver when you get rid of the printer.
If you ever hook the old printer back up to your computer, then the installation will probably go much quicker as the old driver is called back into action.
But if you inadvertently install the wrong driver for a printer, it can be very difficult to get that printer to install correctly while the wrong driver still exists.
That is why it is a good idea to learn how to see all of the printer drivers currently installed on your Windows 7 computer , because it can help you to troubleshoot problems that occur during a printer installation.
How to View Windows 7 Print Drivers (Guide with Pictures)
If you have been using the same computer for a while, particularly a laptop computer, then you might have had it connected to more printers than you think.
Any time that you have had to print something at a hotel, a friend’s house, or a client’s office, you might have installed a new print driver.
Viewing the installed drivers can help you to get an idea why a printer that you are currently trying to install might be giving your problems.
If you want to uninstall old print drivers, you can follow the directions found in this article .
Step 1: Click theStartbutton at the bottom-left corner of the window, then clickDevices and Printers.
Step 2: Click the icon for any of your installed printers one time so that it is highlighted.
Step 3: Click thePrint server propertiesbutton in the horizontal blue bar at the top of the window.
Step 4: Click theDriverstab at the top of the window.
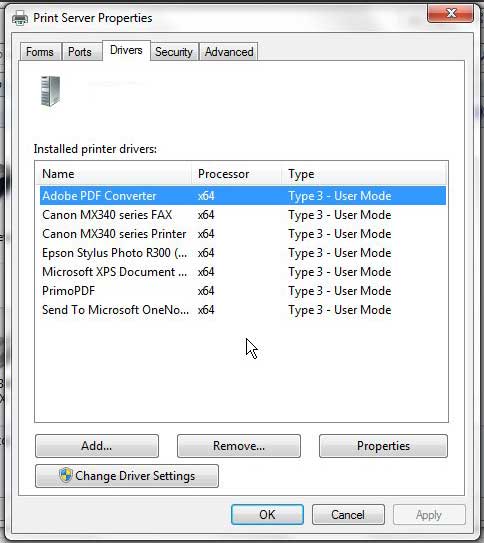
All of the print drivers currently installed on your computer will be listed in the section at the center of the window.
Now that you know how to see all of the printer drivers currently installed in Windows 7, you will be able to remove any of those drivers from your computer if you think they are causing problems.
Note that you are very likely to have trouble removing a print driver for a printer that is currently connected to your computer, so you may need ot disconnect that printer and turn it off. Sometimes you might even need to restart the computer as well.
A common problem that many people encounter involves a printer that is offline.
Luckily this can often be fixed with a short series of troubleshooting, which we will discuss below.
How to Fix an Offline Windows Printer
There are several reasons that a printer might be showing as offline in Windows 7. These can range from power and networking issues, to problems with print drivers.
For additional troubleshooting options for this problem, visit our how do I get my printer online article.
If your printer is currently showing as offline, then you can try the following series of steps.
- Click Start .
- Choose Devices and Printers .
- Right-click on the printer icon, then select See what’s printing .
- Click the Printer tab, then click Use printer offline to switch the printer to online.
If that doesn’t work, then you can attempt some other options, such as restarting the printer and your computer, disconnecting all of the cables from the printer, and reinstalling the printer, if necessary.
Matthew Burleigh has been writing tech tutorials since 2008. His writing has appeared on dozens of different websites and been read over 50 million times.
After receiving his Bachelor’s and Master’s degrees in Computer Science he spent several years working in IT management for small businesses. However, he now works full time writing content online and creating websites.
His main writing topics include iPhones, Microsoft Office, Google Apps, Android, and Photoshop, but he has also written about many other tech topics as well.
Read his full bio here.
Featured guides and deals
