Dealing with an empty sheet in your document can be annoying, but fixing it is actually quite simple. Most of the time, these pages exist because of hidden formatting marks that you cannot see with the naked eye. To get rid of them, you just need to make those invisible marks visible using the Show/Hide button on your toolbar. Once you can see the empty paragraph symbols or page breaks causing the trouble, you simply highlight them and press the Delete key on your keyboard. This clears out the space instantly.
How to Get Rid of a Blank Microsoft Word Page – Step by Step
We have all been there, staring at a document that has an extra white sheet at the end that just refuses to disappear. The steps below will help you reveal the secret code behind your text so you can see exactly what is holding that space open. It is like putting on a pair of X-ray glasses for your writing software.
Step 1: Turn on the paragraph marks to see hidden symbols
You need to find the button that looks like a backwards P on your main toolbar.
It is located in the Paragraph group right in the middle of the Home tab at the top of your window. Clicking this button will make a bunch of strange dots and symbols appear all over your text. Do not worry, as these will not print out on paper.
Step 2: Locate the unwanted blank page in your document
Scroll down through your file until you find the big empty white space that is bothering you.
You will now likely see a bunch of those backwards P symbols running down the left side of that empty page. These are called paragraph markers, and they are acting like invisible ghosts taking up space. Sometimes you might see a dotted line that says “Page Break” instead.
Step 3: Highlight the markers or breaks on the empty page
Take your mouse cursor and click and drag to select all those black paragraph symbols on the blank page.
If there is a Page Break or a Section Break line, make sure you highlight that specific line as well. You want to select everything that is sitting on that white page. It should all turn gray to show that you have grabbed it.
Step 4: Press the delete or backspace key on your keyboard
Once you have those pesky symbols highlighted, simply hit the Delete key.
If you are on a Mac, you might need to use the Backspace key or hold down Function and Delete. The symbols will vanish, and the blank page should disappear right along with them. Your document will snap back up to fill the void.
Step 5: Check the very end of the document for stubborn tables
Sometimes a blank page at the very end is caused by a table that pushes a final paragraph mark onto a new sheet.
If deleting does not work, click that last paragraph mark and make the font size extremely small, like 1 point. This shrinks the invisible line enough so it fits on the previous page. It is a clever little trick that works almost every time.
Tips for Getting Rid of a Blank Page in Word
- Use the Navigation Pane to see a thumbnail view of all your pages, which makes it easier to spot exactly where the blank ones are hiding in long documents.
- Be very careful when deleting “Section Breaks” because removing them can mess up the formatting for the headers and footers in the rest of your file.
- If you cannot select a page break, try clicking right before it and pressing Delete, or clicking right after it and pressing Backspace.
- Convert your document to a PDF file only after you have fixed the spacing issues, otherwise the blank sheet will be stuck in your final published version forever.
- Double-check your printer settings before printing, as you can often just tell the printer to skip the last page if you are in a huge rush and cannot fix the file.
Why does a blank page appear in the middle of my text?
This usually happens because someone inserted a manual “Page Break” by accident. It forces the text to jump to the next sheet even if there is plenty of room left. Deleting that specific break marker fixes the issue immediately.
Can I delete a page by just pressing backspace?
Yes, but you have to know what you are deleting. If you just keep hitting backspace without turning on the paragraph marks, you might delete text you actually wanted to keep. It is safer to see the symbols first.
What if the blank page is caused by a table?
Microsoft Word requires a paragraph mark after every table. If your table goes all the way to the bottom of the page, that mark gets pushed to a new page. Making that mark’s font size “1” is the best solution.
Does the Show/Hide button change my document?
No, that button is just a view setting for your screen. You can turn it on and off as many times as you like without hurting your work. It is purely a tool to help you see formatting.
Why can I not delete the last page of my resume?
This is often due to extra “Enter” key presses that you made while typing. You essentially created a bunch of empty paragraphs at the bottom. Highlighting and deleting those empty lines will solve the problem.
Summary
- Turn on paragraph marks.
- Locate the blank page.
- Highlight markers or breaks.
- Press delete key.
- Check for end tables.
Conclusion
Formatting documents can sometimes feel like a battle against invisible forces. We have all spent way too much time trying to figure out why our file is five pages long when we only wrote four pages of text. It is one of those little digital annoyances that can ruin your focus when you are trying to finish a project. Learning how to see the hidden structure of your document gives you back control.
Once you understand that every blank space is actually filled with hidden characters, the mystery goes away completely. You stop guessing and start fixing the problem with precision. It saves you paper when you print, and it makes your digital files look much more professional when you email them to a boss or teacher. Nobody likes scrolling through empty white space to get to the end of a report.
Keep this simple technique in your back pocket for the next time you are polishing up a resume or an essay. It is a small skill that makes a big difference in the final presentation of your work. You no longer have to struggle with the question of how to get rid of a blank page in Microsoft Word. You can just click a button, find the culprit, and delete it for good.

Matthew Burleigh has been writing tech tutorials since 2008. His writing has appeared on dozens of different websites and been read over 50 million times.
After receiving his Bachelor’s and Master’s degrees in Computer Science he spent several years working in IT management for small businesses. However, he now works full time writing content online and creating websites.
His main writing topics include iPhones, Microsoft Office, Google Apps, Android, and Photoshop, but he has also written about many other tech topics as well.
Read his full bio here.
Featured guides and deals
If you have ever explored the various settings for a document in Microsoft Word, then you probably encountered the Page Setup dialog box.
This menu contains a variety of different ways that you can customize the appearance of your document on the page. But there are some other options on the Print menu that can come in handy, especially if you want to print two or more pages on a single sheet of paper in Microsoft Word.
Everyone has different printing needs, and those needs are amplified when you are working with a program as flexible as Microsoft Word 2010.
You can print on a variety of different types of paper, you can format your documents to an impressive degree, and you can even do some light picture editing.
Microsoft Word – Print Two Pages on One Sheet
- Open your document.
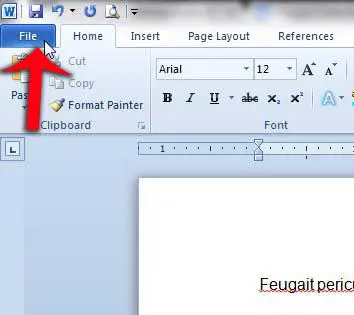
- Click the File tab.
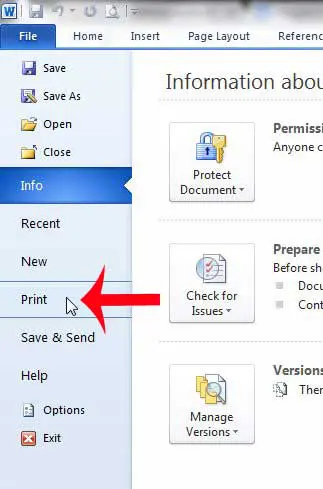
- Select the Print tab.
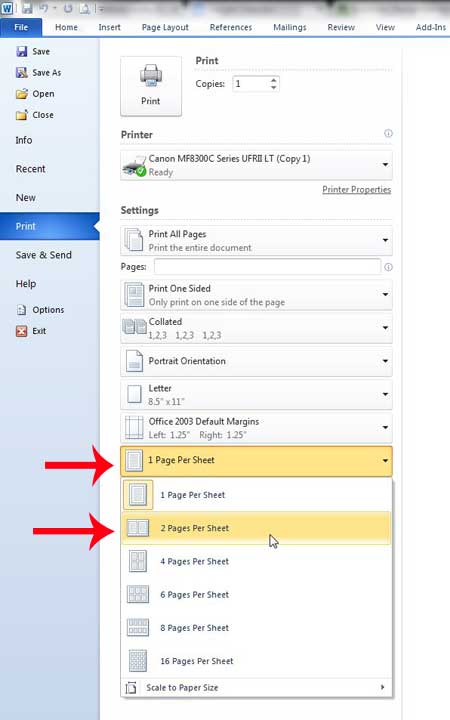
- Choose the 1 Page Per Sheet button, then select 2 Pages Per Sheet .
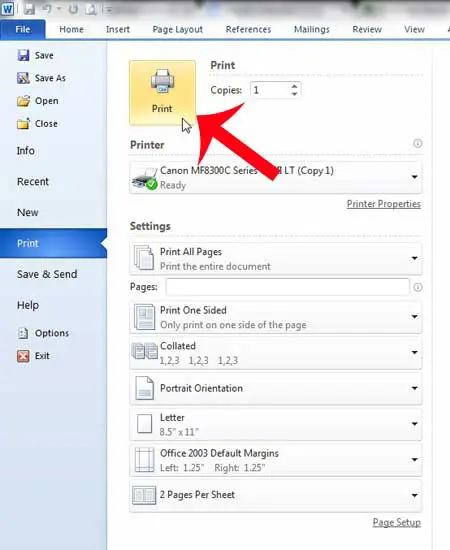
- Click Print .
Our guide continues below with additional information on printing more than one page per sheet in Microsoft Word, including pictures of these steps.
How to Print Two Pages Per Sheet in Word 2010 (Guide with Pictures)
The tutorial below will teach you how to print two pages on one sheet for the document that you are currently editing. This will not change the default settings so that every document prints this way. So any future document that you print from Word 2010 will print with one page per sheet. This is important to keep in mind if you will be switching between one and two pages per sheet with any regularity.
If you do a lot of document printing, then a black and white laser printer can save you some money on toner over time. This Brother HL-2270DW is a great option, as it is inexpensive, wireless, and easy to set up. It also has some of the best user reviews of a printer that I have ever seen.
Step 1: Open the document that you need to print in Word 2010.
Step 2: Click theFiletab at the top-left corner of the window.
Step 3: ClickPrintin the column at the left side of the window.
Step 4: Click the1 Page Per Sheetbutton at the bottom of the window, then click the2 Pages Per Sheetoption to print multiple pages on a single sheet.
Step 5: Click thePrintbutton at the center of the window.
Now that you know how to print two pages on one sheet in Word 2010, you can use this printing option to start using less paper when you need hard copies of your documents.
Our article continues with additional discussion on printing multiple pages on a single sheet of paper in Microsoft Word 2010.
What Happens When Printing Multiple Pages of a Document on a Single Sheet of Paper in Word?
While a single page document, or a document where you have elected to print just one page per sheet of paper, can print correctly with little effort, you can encounter some problems in Word’s print dialog window when you want to put multiple pages on the same sheet.
If you are only selecting two pages per sheet from the sheet drop-down list then you will have half-sized pages for the entire document.
But when you have a multi-page document and you are trying to turn it into a one-page document, then you might find that the text on your pages is becoming too small to read easily.
While you might not need to use a full-sized page on each sheet of paper, the solution to print multiple pages per sheet for a Word document is going to vary depending on the type of content in the document. You will likely need to try a couple of the different sheet per page options, or adjust the page size and see how Word displays your document.
After you make the change the print preview window should update almost immediately, allowing you to see how it will look before you select print and potentially waste a bunch of paper.
More Information on How to Print Two Pages on One Sheet – Word 2010
The steps above were performed in Microsoft Word 2010 but will work in most other versions of Microsoft Office as well, including Microsoft Word 2013, Word 2016, and Word for Office 365.
You can also use these steps if you are going to print to a PDF instead of an actual printer.
After you click the 1 Page Per Sheet button you probably noticed that there are options to print more than just two pages per sheet. In the image above, for Microsoft Word 2010, you have these options when printing multiple pages per sheet:
- 1 Page Per Sheet
- 2 Pages Per Sheet
- 4 Pages Per Sheet
- 6 Pages Per Sheet
- 8 Pages Per Sheet
- 16 Pages Per Sheet
The default paper size for your document is likely to be either Letter or A4, depending on where in the world you live. However, if you switch the paper size to something larger, like legal paper, you might be able to fit more pages on a sheet. You can find this setting by going to Page Layout > Size > then selecting the desired size. You may also want to consider switching the paper orientation, too, to see if that helps your printing situation.
Microsoft Word 2010 has some other uses, too. For example, you can use Word for some of the easiest label printing around .
Matthew Burleigh has been writing tech tutorials since 2008. His writing has appeared on dozens of different websites and been read over 50 million times.
After receiving his Bachelor’s and Master’s degrees in Computer Science he spent several years working in IT management for small businesses. However, he now works full time writing content online and creating websites.
His main writing topics include iPhones, Microsoft Office, Google Apps, Android, and Photoshop, but he has also written about many other tech topics as well.
Read his full bio here.
