Getting speaker notes on Google Slides using your iPad is pretty straightforward. First, open your presentation in the Google Slides app. Then tap on the three dots in the upper-right corner and select “Show speaker notes.” You can now add, edit, or view your speaker notes as needed. This quick guide will show you all the steps to seamlessly manage your speaker notes on an iPad.
Step by Step Tutorial: How to Get Speaker Notes on Google Slides iPad
In this tutorial, you’ll learn how to access and use speaker notes in Google Slides on your iPad. These steps will ensure you can see and manage your notes efficiently while presenting.
Step 1: Open the Google Slides App
First, open the Google Slides app on your iPad.
Make sure you have downloaded and installed the app from the App Store. If you haven’t, go ahead and do that first. Once installed, locate the app icon on your home screen and tap to open.
Step 2: Select Your Presentation
Next, select the presentation you want to work on.
Once inside the app, you’ll see a list of your presentations. Find the one you need, and tap on it to open. If your file is not listed, check your Google Drive to ensure it’s uploaded.
Step 3: Tap on the Three Dots Menu
In the upper-right corner of the screen, tap on the three dots menu.
This icon is often referred to as the “more options” menu. Tapping on it will open a dropdown list of additional features and settings.
Step 4: Choose “Show Speaker Notes”
From the dropdown menu, select “Show speaker notes.”
This action will make the speaker notes visible below each slide. You can scroll through these notes as you navigate through your presentation.
Step 5: Add or Edit Your Notes
You can now add or edit your speaker notes as needed.
Simply tap on the notes section to start typing. This feature is handy for jotting down key points or reminders that you want to mention during your presentation.
Once you’ve completed these steps, your speaker notes will be visible whenever you view your presentation in Google Slides on your iPad.
Tips for Getting Speaker Notes on Google Slides iPad
- Keep It Concise: Use bullet points or short sentences for your speaker notes to make them easy to read at a glance.
- Sync Across Devices: Ensure your Google Slides are synced across your devices so you can access your notes from anywhere.
- Practice Makes Perfect: Run through your presentation a few times to get comfortable with your notes.
- Use Different Colors: Highlight key points in different colors to make them stand out.
- Backup Your Presentation: Keep a backup of your presentation and notes in another cloud service just in case.
Can I use speaker notes while presenting on an iPad?
Yes, you can view your speaker notes while presenting on an iPad by accessing the “presenter view” in Google Slides.
Do I need internet access to view my speaker notes?
You need internet access to initially sync your presentation, but once it’s downloaded, you can view your notes offline.
Can I edit my speaker notes on the iPad?
Absolutely! You can add or edit your speaker notes directly in the Google Slides app on your iPad.
How do I hide speaker notes during my presentation?
You can hide the notes by going back to the three dots menu and selecting “Hide speaker notes.”
Are my speaker notes visible to the audience?
No, speaker notes are only visible to the presenter, not to the audience viewing the slides.
Summary
- Open the Google Slides App
- Select Your Presentation
- Tap on the Three Dots Menu
- Choose “Show Speaker Notes”
- Add or Edit Your Notes
Conclusion
Getting speaker notes on Google Slides using your iPad is a breeze. With just a few taps, you can have all the key points and reminders you need at your fingertips. Whether you’re delivering a crucial presentation at work or a project at school, having your speaker notes accessible ensures you won’t miss any important details.
Managing your notes efficiently can also help reduce anxiety and keep your presentation flowing smoothly. If you’re new to using Google Slides on an iPad, take some time to explore its features. You might find additional tools that can help enhance your presentation even further. So go ahead, give it a try, and take your presentations to the next level!

Matthew Burleigh has been writing tech tutorials since 2008. His writing has appeared on dozens of different websites and been read over 50 million times.
After receiving his Bachelor’s and Master’s degrees in Computer Science he spent several years working in IT management for small businesses. However, he now works full time writing content online and creating websites.
His main writing topics include iPhones, Microsoft Office, Google Apps, Android, and Photoshop, but he has also written about many other tech topics as well.
Read his full bio here.
Featured guides and deals
It’s common to need to print out a guide for your audience when you’re giving a presentation , but printing one slide per page may be impractical. Luckily it’s possible to print multiple slides on one page in Google Slides.
Creating and presenting a slideshow is often not the entire picture when you are giving a presentation. Whether it’s for school or for your job, it’s very likely that you will need to provide handouts to everyone attending the presentation, or at least a few people that will need a hard copy of the information you have given.
While there are several ways to do this, often the easiest way is to simply print the presentation and give them a copy.
But some presentations can be very long, and putting one slide on a printed page can be a waste of paper and ink, especially if you need to provide multiple copies. Fortunately you can change the print settings in Google Slides so that you are printing multiple slides on each page.
How to Print 4 Slides Per Page in Google Slides
- Open your presentation.
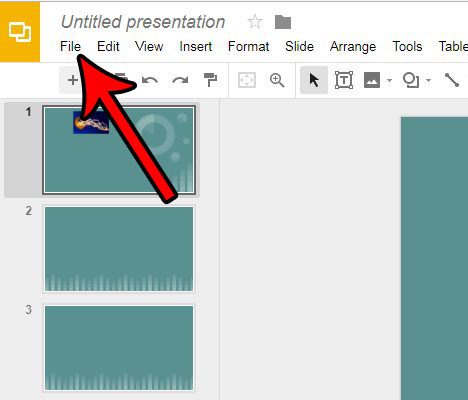
- Click File .
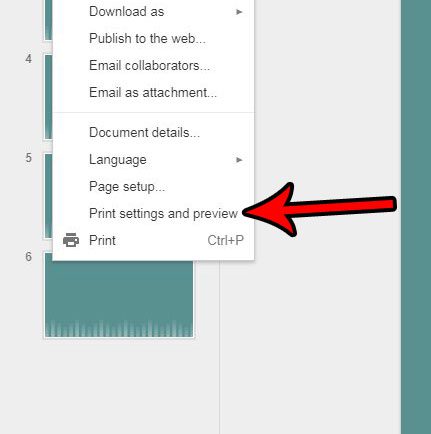
- Choose Print settings and preview .
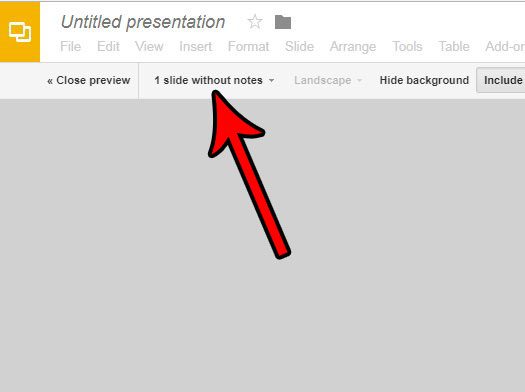
- Click 1 slide without notes .
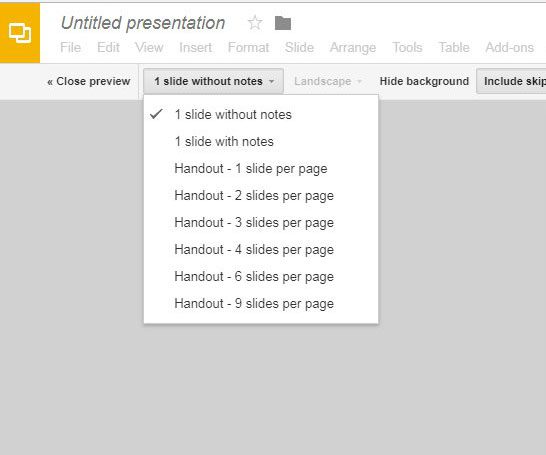
- Choose your option.
- Click Print .
Our article continues below with additional information on printing multiple slides per page in Google Slides, including pictures of each of these steps.
How to Print Multiple Slides on One Page in Google Slides
This article was written using Google Chrome, but these steps will work in other desktop and laptop Web browsers like Firefox and Internet Explorer. While this guide will specifically focus on printing four slides on one page, you actually have a number of different printing configurations available to you.
Step 1: Go to your Google Drive athttps://drive.google.com/drive/my-driveand open the presentation that you want to print.
Step 2: Click theFiletab at the top of the window.
Step 3: Select thePrint settings and previewoption near the bottom of the menu.
Step 4: Click the1 slide without notesbutton in the toolbar at the top of the window.
Step 5: Choose the printing configuration that you want to use for your presentation.
The preview on the screen will update based on your selection.
Step 6: Click thePrintbutton in the toolbar to print the slideshow.
Now that you know how to print four slides per page in Google Slides, you can significantly reduce the number of sheets of paper that get used when you print a slideshow.
Note that changing this print option is not going to affect how the presentation is displayed when you use the option to present it on your computer. This only affects the way that it prints.
This does not change the way that slideshows print by default in Google Slides. You will need to make this change again in the future for any other slideshows where you wish to print multiple slides per page in Google Slides.
Do you have a picture in Google Slides that needs to be cropped a bit? Find out how to crop pictures directly in Google Slides so that you don’t need to worry about doing it in another program.
- How to add an arrow in Google Slides
- How to add bullet points in Google Slides
- How to convert Google Slides to a PDF
- How to delete a text box in Google Slides
Matthew Burleigh has been writing tech tutorials since 2008. His writing has appeared on dozens of different websites and been read over 50 million times.
After receiving his Bachelor’s and Master’s degrees in Computer Science he spent several years working in IT management for small businesses. However, he now works full time writing content online and creating websites.
His main writing topics include iPhones, Microsoft Office, Google Apps, Android, and Photoshop, but he has also written about many other tech topics as well.
Read his full bio here.
Featured guides and deals
