Inserting PowerPoint slides into OneNote on an iPad can be a real game-changer for organizing your notes and presentations all in one place. It’s a straightforward process that involves importing the slides directly into OneNote, where you can then annotate and add additional notes as needed. By the end of this guide, you’ll be seamlessly integrating your PowerPoint slides into your OneNote notebooks.
How to Insert PowerPoint Slides into OneNote iPad
This step-by-step tutorial will walk you through how to insert PowerPoint slides into OneNote on your iPad. Each step aims to simplify the process, ensuring you can easily follow along.
Step 1: Open OneNote on your iPad
The first step is to launch the OneNote app on your iPad.
Make sure you’re logged into your Microsoft account. If you don’t have it installed yet, you can download it from the App Store. Open the app and navigate to the notebook where you want to insert the PowerPoint slides.
Step 2: Navigate to the Desired Notebook
Once you’re in OneNote, select the notebook and section where you want to add the slides.
This makes sure everything stays organized. You can create a new section or page specifically for your PowerPoint slides if you prefer.
Step 3: Tap the + (Insert) Button
On the toolbar at the top, tap the + (Insert) button.
This will bring up a menu with various options. You’ll see options like pictures, drawings, and files. We’re interested in adding a file.
Step 4: Select “File” from the Menu
From the insert menu, choose the “File” option.
This will allow you to browse through files stored on your iPad or any connected cloud storage services like OneDrive.
Step 5: Locate and Select Your PowerPoint File
Browse your files and find the PowerPoint presentation you want to insert. Tap on the file to select it.
Ensure the file is saved in a compatible format. If it’s in OneDrive, make sure you’re connected to the internet to access it.
Step 6: Insert the File into OneNote
After selecting the PowerPoint file, OneNote will give you the option to insert it as an attachment or a printout. Choose the “Insert as Printout” option.
This will display the slides as images on your OneNote page. Now, you can annotate directly on the slides!
Once you have completed these steps, your PowerPoint slides will be embedded into your OneNote page. You’ll be able to move, resize, and annotate them to fit your needs.
Tips for Inserting PowerPoint Slides into OneNote iPad
- Organize your Notebooks : Keep your OneNote notebooks well-organized by creating specific sections or pages for different subjects or projects.
- Use Cloud Storage : Store your PowerPoint files on OneDrive or another cloud service to easily access them from your iPad.
- Annotate Freely : Take advantage of OneNote’s annotation tools to add notes, drawings, or highlights to your slides.
- Sync Regularly : Ensure your OneNote app is set to sync automatically so you don’t lose any changes or annotations.
- Explore OneNote Features : Familiarize yourself with OneNote’s other features, like tagging, to enhance your productivity further.
Can I insert PowerPoint slides into OneNote on an iPad without OneDrive?
Yes, you can insert PowerPoint slides directly from your iPad’s local storage, but using OneDrive can make accessing and managing files easier.
Do I need the PowerPoint app installed on my iPad?
No, you don’t need the PowerPoint app installed. You only need the OneNote app and access to your PowerPoint files.
Can I edit the PowerPoint slides once they are in OneNote?
You cannot edit the slides directly in OneNote, but you can annotate, highlight, and add notes on top of them.
What happens if I choose to attach the file instead of inserting it as a printout?
Attaching the file will add it as a clickable attachment rather than displaying the slides as images. You’d need to open the attachment to view the slides.
Is there a limit to the number of slides I can insert?
There’s no strict limit, but inserting a large number of slides might make your OneNote page load slower.
Summary
- Open OneNote on your iPad.
- Navigate to the desired notebook.
- Tap the + (Insert) button.
- Select “File” from the menu.
- Locate and select your PowerPoint file.
- Insert the file into OneNote as a printout.
Conclusion
Inserting PowerPoint slides into OneNote on an iPad is a fantastic way to consolidate your study materials, meeting notes, or project plans. With just a few simple steps, you can transform your slides into interactive note pages where you can jot down thoughts, highlight key points, and organize your ideas efficiently.
Remember, OneNote is a powerful tool that offers a lot more than just slide integration. Explore its various features and see how it can enhance your productivity. Whether you’re a student, a professional, or just someone looking to keep everything organized, mastering OneNote on your iPad can make a world of difference.
Feel free to revisit this guide any time you need a refresher, and don’t hesitate to dive deeper into other functionalities that OneNote and PowerPoint offer. Now that you know how to insert PowerPoint slides into OneNote on your iPad, why not give it a try and see how it can simplify your life?

Matthew Burleigh has been writing tech tutorials since 2008. His writing has appeared on dozens of different websites and been read over 50 million times.
After receiving his Bachelor’s and Master’s degrees in Computer Science he spent several years working in IT management for small businesses. However, he now works full time writing content online and creating websites.
His main writing topics include iPhones, Microsoft Office, Google Apps, Android, and Photoshop, but he has also written about many other tech topics as well.
Read his full bio here.
Despite the many different uses that users have come up with for Microsoft’s Powerpoint program, it is, at heart, a presentation tool.
A Powerpoint 2010 presentation consists of slides and notes. The slides are visible to the audience while the presenter is giving their presentation, and the notes are meant to be a guideline for what should be talked about on that slide.
Due to the different roles that these items play, it is conceivable that you would want to print the notes for your presentation without needing to print the slides as well.
If you are not providing a handout of your slide presentation to your audience, but are instead showing it on an overhead projector, then printing a long, multicolored document would be an unnecessary waste of ink and paper.
Fortunately, you can print only the speaker’s notes in Powerpoint 2010.
If you’re editing a presentation in Google Sides, then our how to see speaker notes on Google Slides app tutorial will show you how to find the notes there, too.
How Do You Print Notes in Powerpoint 2010
Begin by opening the presentation that contains the notes you want to print. You can either double-click the Powerpoint file to automatically launch it in Powerpoint 2010, or you can open Powerpoint 2010 and open the presentation from within the program.
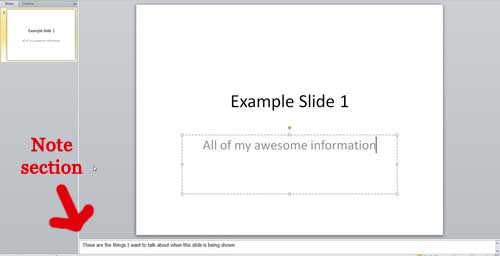
Click one of the slides in the column at the left side of the window, then confirm that there are actually notes in the Click to add notes section at the bottom of the window.
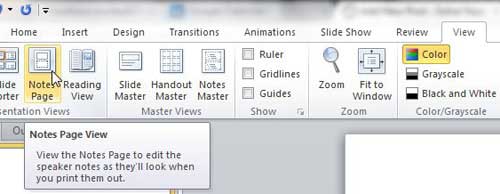
Click the View tab at the top of the window, then click the Notes Page button in the Presentation Views section of the ribbon.
You should now see a page with a small image of your slide, then the speaker notes displayed underneath it. If this is how you want your notes to be printed, then you can just proceed to the printing instructions.
However, if you want to remove the slide image from this page, you can right-click the slide image, then click Cut . You could also click the slide image to select it, then press the Delete key on your keyboard.
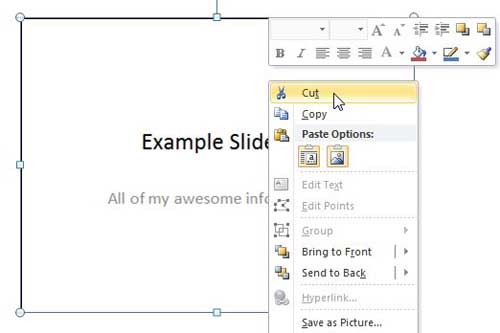
Repeat this step until you have deleted the slide image from each of your note pages.
Once your note pages are in the format that you want to print, click the File tab at the top of the window, then click Print at the left side of the menu.
Click the Full Page Slides drop-down menu at the center of the screen, then click the Notes Pages option.
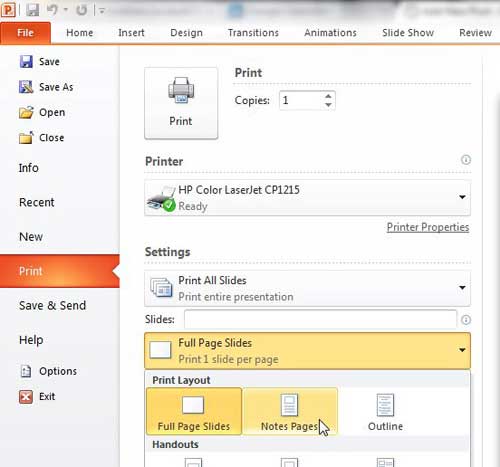
Make any other necessary changes to the printing options on this screen, such as whether to print in color or selecting the printing orientation for your notes pages, then click the Print button to print just the notes for your Powerpoint 2010 presentation.
Now that you know how to print just the notes in Powerpoint 2010, you will be able to create hard copies of that information without also printing the slides.
Summary – How to print the notes only in Powerpoint 2010
- Click the View tab.
- Click the Notes Pages button.
- Right-click the slide image, then click the Cut option. Repeat this step for each slide.
- Click the File tab.
- Click the Print button.
- Click the Full Page Slides drop-down menu, then click Notes Pages .
- Click the Print button.
Would one of the slides in your presentation be better if a picture was slightly transparent? Find out how to make transparent pictures in Powerpoint slides to give yourself some additional options when working with pictures in presentations.
Matthew Burleigh has been writing tech tutorials since 2008. His writing has appeared on dozens of different websites and been read over 50 million times.
After receiving his Bachelor’s and Master’s degrees in Computer Science he spent several years working in IT management for small businesses. However, he now works full time writing content online and creating websites.
His main writing topics include iPhones, Microsoft Office, Google Apps, Android, and Photoshop, but he has also written about many other tech topics as well.
Read his full bio here.
Featured guides and deals
