Installing Bluetooth on Windows 11 is a straightforward process that allows you to connect wireless devices like headphones, keyboards, and mice. Start by opening the Settings app and navigating to the Bluetooth & devices section. From there, you can add new devices and ensure that Bluetooth is enabled. This quick guide will have you connected in no time.
Installing Bluetooth on Windows 11
Before diving in, let’s make sure you’re ready to connect your favorite devices. Follow these steps to get Bluetooth up and running on your Windows 11 machine.
Step 1: Open Settings
Click the Start button and select the gear icon to open the Settings app.
The Settings app is the control hub for your computer. It’s where you tweak all sorts of options and get things just right.
Step 2: Go to Bluetooth & Devices
In the Settings menu, select “Bluetooth & devices” from the sidebar.
This section is like the command center for all wireless connections. It’s where you’ll manage Bluetooth, printers, and other gadgets.
Step 3: Turn on Bluetooth
Find the Bluetooth toggle and switch it to the “On” position.
If it’s already on, great! If not, just a quick flick of the switch will activate Bluetooth and make your computer visible to other devices.
Step 4: Add a Device
Click “Add device” to search for new Bluetooth devices.
Your computer will scan the area for any nearby devices that are ready to pair. Make sure your device is in pairing mode!
Step 5: Pair Your Device
Select your device from the list and click “Connect.”
Once you see your device listed, it’s time to make the connection. A few clicks and you’ll be all set to enjoy your wireless freedom.
Once you complete the installation, your Bluetooth devices should be connected and ready to use. You can now enjoy wireless audio, seamless file transfers, and more.
Tips for Installing Bluetooth on Windows 11
- Ensure your device is in pairing mode before attempting to connect.
- Keep your devices close to your computer for the best connection.
- Regularly update Windows to ensure Bluetooth compatibility.
- Disable airplane mode to ensure Bluetooth can be turned on.
- Restart your computer if you encounter connectivity issues.
Why can’t I find the Bluetooth option in Settings?
Ensure your computer has Bluetooth capabilities. If not, you might need an external adapter.
How do I know if my device is in pairing mode?
Consult the user manual for your device, as each one may have a different method for entering pairing mode.
What should I do if my device isn’t connecting?
Try turning Bluetooth off and back on, or restart your device. This often resolves minor glitches.
How can I remove a paired Bluetooth device?
Go to “Bluetooth & devices,” select the device, and click “Remove.”
Is there a way to improve Bluetooth range?
Ensure there are no obstacles between the devices and keep them within a reasonable distance.
Summary
- Open Settings.
- Go to Bluetooth & Devices.
- Turn on Bluetooth.
- Add a Device.
- Pair Your Device.
Conclusion
Installing Bluetooth on Windows 11 opens up a world of wireless possibilities. From untangling cords to adding convenience, it’s a feature that changes how we interact with our devices. Once set up, you can connect keyboards, mice, speakers, and more, making your workspace organized and efficient.
Are you facing connectivity hiccups? Don’t worry! Troubleshooting is usually as simple as turning things off and on again or moving a bit closer. The simplicity of these steps makes it accessible, even if you’re not a tech wizard.
Take some time to explore additional settings and apps that could enhance your Bluetooth experience. Maybe you’ll discover new ways to use your devices that you never considered before. So why wait? Dive into your Settings today and get connected!

Matthew Burleigh has been writing tech tutorials since 2008. His writing has appeared on dozens of different websites and been read over 50 million times.
After receiving his Bachelor’s and Master’s degrees in Computer Science he spent several years working in IT management for small businesses. However, he now works full time writing content online and creating websites.
His main writing topics include iPhones, Microsoft Office, Google Apps, Android, and Photoshop, but he has also written about many other tech topics as well.
Read his full bio here.
Featured guides and deals
Wireless printing is a great thing to have when you use a laptop or have multiple devices in your home or office that share a printer.
Not every printer has this capability, but the Brother HL2270DW is one device that does.
Our Brother hl-2270dw wireless setup tutorial below will show you how to get the printer on your wireless network so that you can print to it without needing to physically connect a printer cable to your laptop or desktop computers.
Summary – Brother hl-2270dw Wireless Setup Steps
- Insert the installation disc or download the printer software.
- Choose the HL-2270DW option.
- Select the language.
- Click Install Printer Driver , then click Yes .
- Click Yes, choose Wireless Connection , then click Next .
- Select Brother Peer-to-Peer Network Printer and click Next .
- Choose Change the Firewall port settings to enable network connection and continue with the installation and click Next.
- Select Wireless Setup .
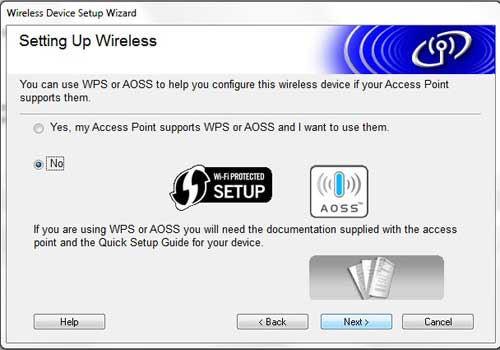
- Click No , then Next .
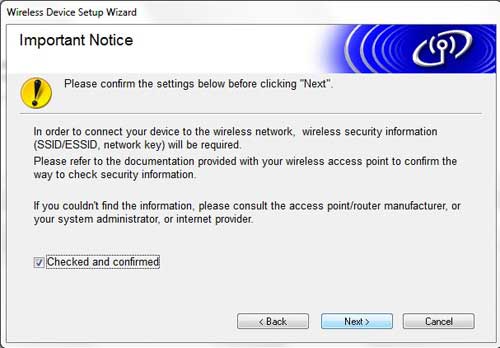
- Check the Checked and confirmed box and click Next .
- Choose Temporarily use a USB cable, and click Next .
- Connect the USB cable.
- Choose the printer and click Next .
- Select your Wi-Fi network and click Next .
- Enter the password, confirm the password, then click Next .
- Click Next , then next, then Finish .
Our guide continues below with additional information on the Brother hl-2270dw wireless setup, including pictures of these steps.
Two of the most important characteristics of a printer are the quality of its’ printouts and the speed at which each page is printed .
Brother’s line of laser printers offers both of these features, all for a relatively lower price than you will find with most other laser printers of this class.
The Brother HL2270DW steps up its level of convenience even more by offering a wireless feature in addition to the other laser printer benefits.
Some people might be intimidated by the prospects of a wireless printer, especially if they have ever encountered difficulty setting up a wireless router, but the wireless setup process for the Brother HL2270DW is very simple.
Additionally, once you have been able to set up wireless printing with the Brother HL2270DW on one computer, it is even easier to set the printer up with the rest of the computers in your home or office.
How to Complete a Wireless Setup for the Brother HL2270DW (Guide with Pictures)
The first thing to clarify when you are performing the wireless setup for this device is that your computer does not need to have wireless capabilities.
It simply needs to be connected to a network that has a wireless element. For example, I currently have this printer wirelessly connected to my desktop computer. The desktop computer does not have a wireless network card, but is connected to my wireless router using an ethernet cable.
The next point of clarification is that you will need a USB printer cable for the initial wireless setup of this device.
Since the printer does not have a way for you to manually input the settings for the wireless network, you will need to apply them to the printer from the computer.
Brother also does not include a USB cable with the printer, so you will either need to purchase one or, preferably, use the cable that was connecting your old, wired printer to your computer.
Begin the setup process by unpacking the printer from its packaging materials, then removing all of the stickers on the printer.
The toner cartridge is already in the printer , but you should take it out and shake it to reposition the toner inside. Replace the cartridge, then close the access door.
Connect the power cable to the back of the printer, then plug it in. Do NOT connect the USB cable yet . You will be prompted to do that later.
Turn on the printer, wait for it to boot up, then press the Go button on the top of the printer to print a test page.
Step 1: Insert the Brother installation disc into the disc drive on your computer, then click theSetup.exeoption in theAutoPlaywindow.
If you do not have a disc drive or you have misplaced the installation disc, you can download the driver software from here .
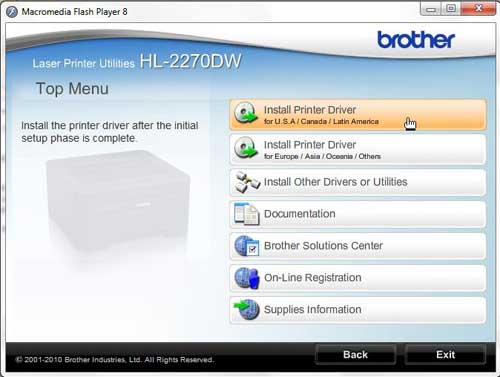
Step 2: Click theHL-2270DWbutton at the bottom of the window.

Step 3: Click your preferred language from the list.
Step 4: Click theInstall Printer Driverbutton at the top of the window. Click theYesbutton to allow this program to make changes to your computer.
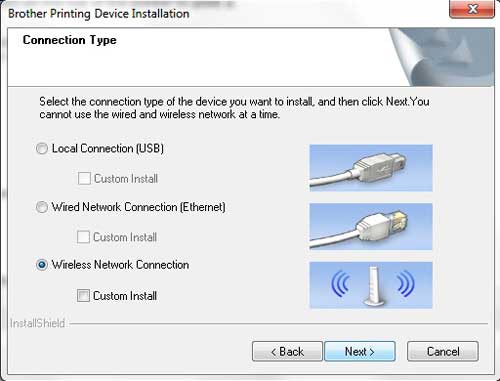
Step 5: Click theYesbutton to accept the license agreement, click theWireless Connectionoption, then click theNextbutton.
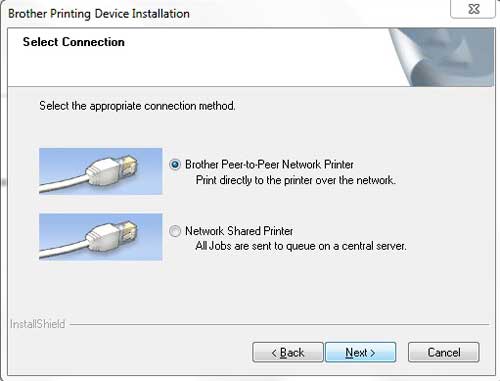
Step 6: Check theBrother Peer-to-Peer Network Printeroption, then click theNextbutton.
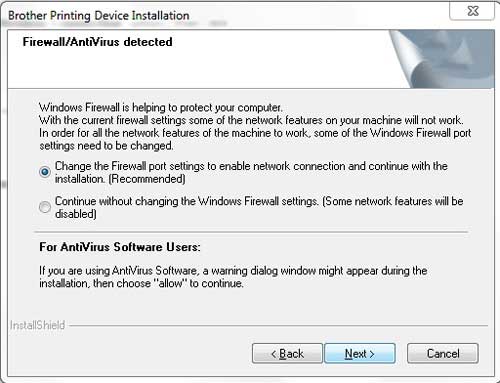
Step 7: Choose the option toChange the Firewall port settings to enable network connection and continue with the installation, then click theNextbutton.
Step 8: Click theWireless Setupoption at the bottom of the window.
Note that when installing this printer on future computers, your printer will appear on this screen, and you will select it from the list.
Step 9: Click theNooption at the center of the next window, then click Next.
Step 10: Check the box to the left ofChecked and confirmed, then click theNextbutton.
Step 11: Check theTemporarily use a USB cableoption, then click theNextbutton.
Step 12: Connect the USB cable from the back of your printer to your computer, then wait for the computer to recognize the printer.
Step 13: Click your Brother HL2270DW printer from the list of available devices, then click theNextbutton.
Step 14: Click your wireless network from the list, then clickNext.
Step 15: Type your password into theNetwork Keyfield, retype it into theConfirm Network Keyfield, then click theNextbutton.
Step 16: ClickNext, clickNextagain, then clickFinishto complete the setup.
You can then disconnect the USB cable when prompted.
Now that you have completed the Brother hl-2270dw wireless setup, you will be able to print documents to this printer over your wireless network.
Matthew Burleigh has been writing tech tutorials since 2008. His writing has appeared on dozens of different websites and been read over 50 million times.
After receiving his Bachelor’s and Master’s degrees in Computer Science he spent several years working in IT management for small businesses. However, he now works full time writing content online and creating websites.
His main writing topics include iPhones, Microsoft Office, Google Apps, Android, and Photoshop, but he has also written about many other tech topics as well.
Read his full bio here.
Featured guides and deals
