To get Google Play on Windows 11, you will need to install the Windows Subsystem for Android and make a few tweaks to get the Play Store functioning properly. In short, it involves enabling Developer Mode, downloading the necessary files, and running some commands. This guide covers everything you’ll need to know.
Step-by-Step Guide to Install Google Play on Windows 11
If you’ve ever wanted to run Android apps on your Windows 11 device, you’re in luck. Follow these steps to install Google Play on Windows 11, and you’ll be enjoying your favorite Android apps in no time.
Step 1: Enable Developer Mode
First, you need to enable Developer Mode in Windows 11 settings.
Open the Settings app, go to ‘Privacy & security,’ find ‘For developers,’ and toggle on Developer Mode. This allows your system to install apps from any source, not just the Microsoft Store.
Step 2: Install Windows Subsystem for Android
Next, you need to install the Windows Subsystem for Android from the Microsoft Store.
Search for “Windows Subsystem for Android” in the Microsoft Store and click Install. This subsystem will allow you to run Android apps on your Windows device.
Step 3: Download the Necessary Files
You will need to download a package of files to install Google Play.
Search online for “Google Play files for Windows 11” and download a zip file containing the necessary APKs and scripts. Make sure to decompress the zip file to a folder on your desktop.
Step 4: Open Windows PowerShell as Administrator
You need to run some commands, so open Windows PowerShell with admin rights.
Right-click on the Start button, select ‘Windows Terminal (Admin),’ and confirm the prompt. This opens a terminal window with administrator privileges.
Step 5: Navigate to the Downloaded Folder
Move to the folder where you extracted the Google Play files using PowerShell.
Use the ‘cd’ command followed by the path to navigate to your folder. For example, ‘cd C:UsersYourUsernameDesktopGooglePlayFiles’.
Step 6: Run the Script
Run the provided script to install Google Play.
Type ‘install.ps1’ and press Enter. This will start the installation process, which may take a few minutes. Ensure you follow any on-screen prompts.
Step 7: Reboot Your Computer
Restart your computer to finalize the installation.
A simple reboot ensures that all changes take effect and that the Google Play services are running correctly.
Step 8: Open Google Play and Sign In
Now, open Google Play from the Start menu and sign in with your Google account.
Once signed in, you can download and install apps just like you would on an Android device.
After completing these steps, you will have Google Play installed on your Windows 11 machine. You can now access and use Android apps directly from your desktop.
Tips for Installing Google Play on Windows 11
- Backup Important Data: Always back up any important data before making system changes.
- Use Trusted Sources: Only download files from reliable sources to avoid malware.
- Check for Updates: Ensure your Windows 11 is up to date to avoid compatibility issues.
- Monitor Performance: Running Android apps may affect system performance; keep an eye out for lag.
- Stay Updated: Keep your Google Play services updated for the best experience.
What is Windows Subsystem for Android?
It’s a feature that allows Windows 11 to run Android apps natively.
Do I need a special PC to run this?
No, as long as your PC meets the minimum requirements for Windows 11, it should work.
Is this method legal?
Yes, but you should only use APKs and scripts from trusted sources.
Will this slow down my computer?
It might, especially if your computer is older or has limited resources.
Can I uninstall it if I don’t like it?
Yes, you can uninstall the Windows Subsystem for Android and any associated files through the settings.
Summary of Steps
- Enable Developer Mode.
- Install Windows Subsystem for Android.
- Download necessary files.
- Open PowerShell as administrator.
- Navigate to the downloaded folder.
- Run the script.
- Reboot your computer.
- Open Google Play and sign in.
Conclusion
To wrap things up, installing Google Play on Windows 11 is quite doable, even if you’re not a tech wizard. By following these steps, you can merge the best of both worlds—Windows and Android.
Not only does this broaden the range of apps available to you, but it also brings a new level of convenience to your workflow. Imagine playing your favorite mobile games or using essential Android apps without switching devices.
If you encounter any hiccups, don’t sweat it. A quick search or a visit to forums can usually sort things out. Keep your system updated and enjoy the seamless integration of Android apps on your Windows 11 device.
This guide is just the beginning. Stay curious and explore other cool features that Windows 11 has to offer. Happy installing!

Matthew Burleigh has been writing tech tutorials since 2008. His writing has appeared on dozens of different websites and been read over 50 million times.
After receiving his Bachelor’s and Master’s degrees in Computer Science he spent several years working in IT management for small businesses. However, he now works full time writing content online and creating websites.
His main writing topics include iPhones, Microsoft Office, Google Apps, Android, and Photoshop, but he has also written about many other tech topics as well.
Read his full bio here.
Featured guides and deals
When smartphones first started to gain popularity, the prospect of printing something from them seemed like a pipe dream. Printers were already hard enough to deal with on a computer, and it seemed unlikely that it could work on a phone.
But the Google Docs app started adding new features like the ability to add small numbers in Google Docs , and it became apparent that the app was going to gain most of its desktop counterpart’s functionality.
Now we are also able to print from Google Docs on our iPhone or Android device, and it’s surprisingly accessible.
Most modern printers have some sort of network compatibility, meaning that devices on the same network as the printer can use that printer if they have that capability.
Mobile phones, but those that use the iOS and Android operating systems, are now able to print wirelessly to printers that support it. Plus, most of the apps that you would want to print from, such as creative apps and productivity apps, will usually support some type of printing functionality in addition to the other features they offer, like file sharing .
Our guide below will show you how to print through the Google Docs app on your iPhone or Android phone, plus we will address some of the common issues that might arise if you can’t make it work.
How to Print from the Google Docs Mobile App
- Open Docs.
- Choose a document.
- Tap the three dots.
- Select Share & export .
- Choose Print .
- Touch Select Printer .
- Chose a printer.
- Tap Print .
Our guide continues below with additional information on printing from the Google Docs app, including pictures of these steps.
How to Print from Google Docs on an iPhone (Guide with Pictures)
The steps in this section were performed on an iPhone 11 in iOS 14.6. These steps will also work on other iPhone models using this same version of iOS, as well as in most other versions of iOS. I am using the most current version of the Google Docs app that was available at the time this article was written.
Step 1: Open theDocsapp on your iPhone.
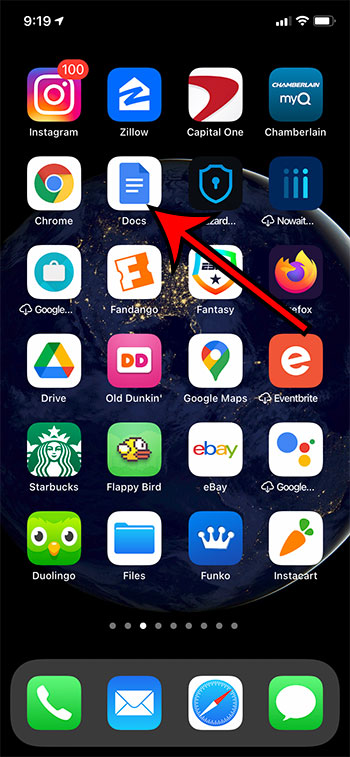
Step 2: Select the document that you want to print.
Step 3: Touch the three dots at the top-right of the screen.
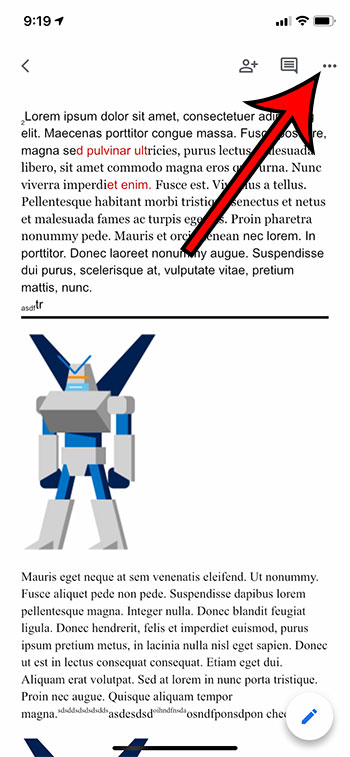
Step 4: Select theShare & exportoption.
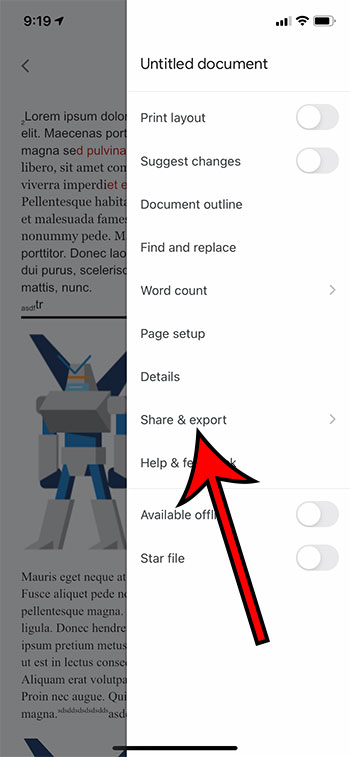
Step 5: ChoosePrint.
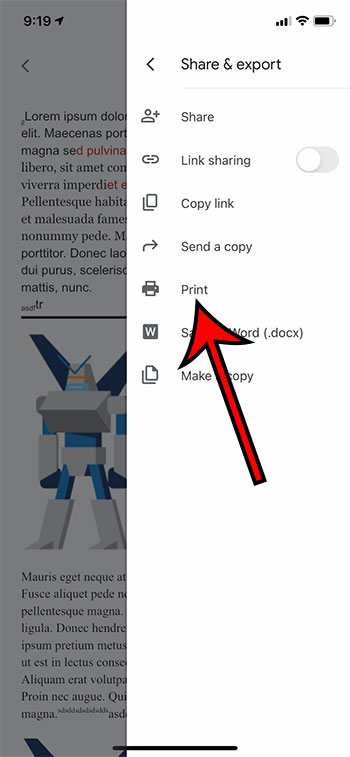
Step 6: Tap theSelect Printeroption.
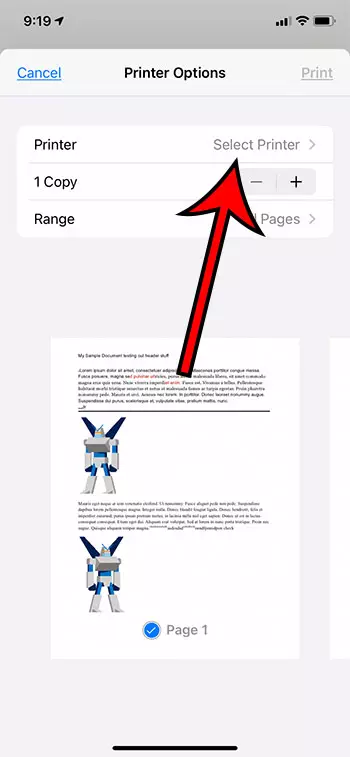
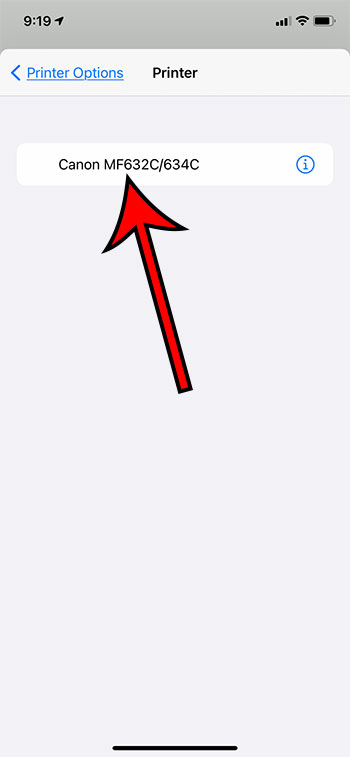
Step 7: Choose your printer.
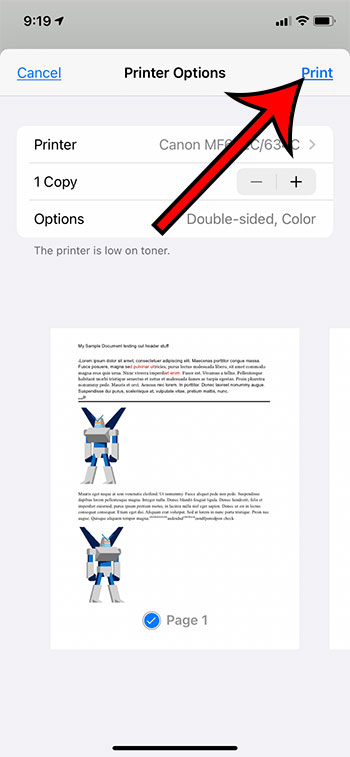
Step 8: TapPrintat the top-right corner of the screen.
Our article continues below with information on how to print from your Android device.
How to Print from Google Docs on Android (Guide with Pictures)
The steps in this section were performed on a Google Pixel 4A, using Android 11. I am using the most current version of the Docs app that was available when I wrote this article.
Step 1: Swipe up from the center of the screen.
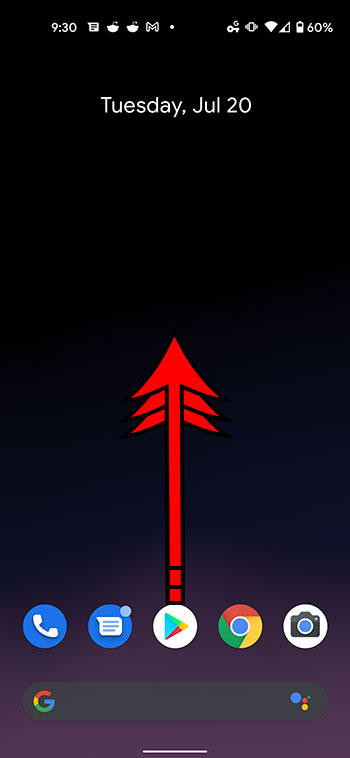
Step 2: Touch theDocsicon.
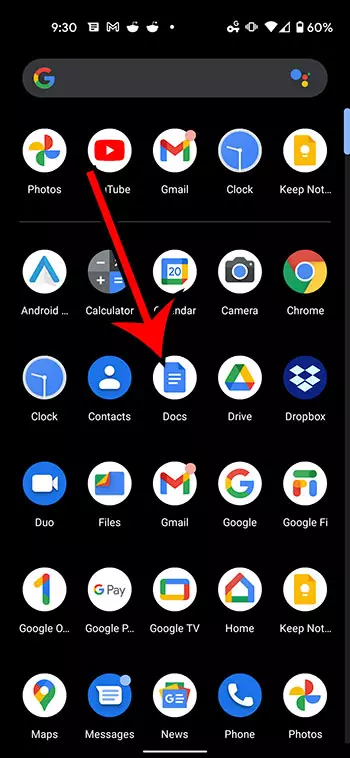
Step 3: Choose the document from your Google Drive that you want to print.
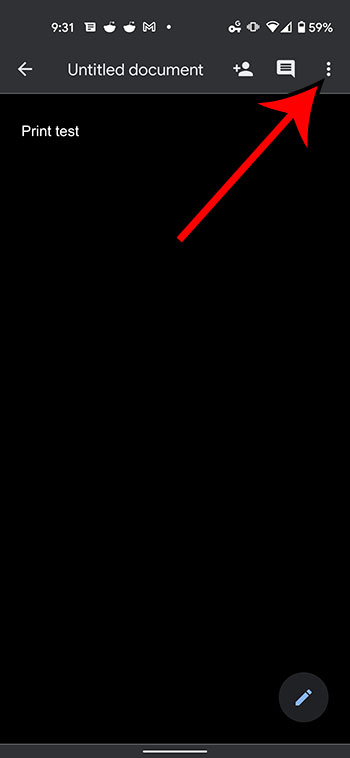
Step 4: Tap the three vertical dots at the top of the screen.
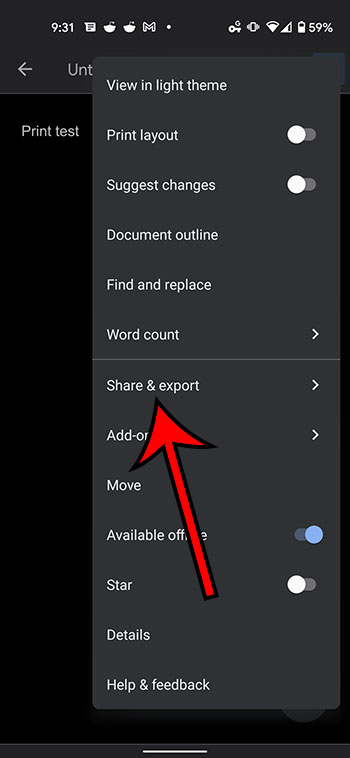
Step 5: Select theShare & exportoption from the menu on the right side of the screen.
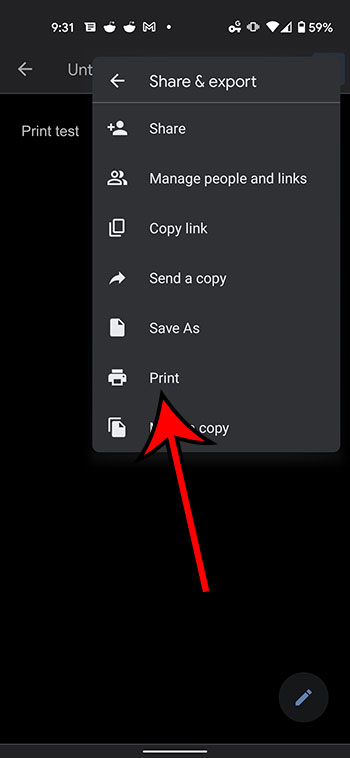
Step 6: ChosePrintfrom the list of sharing options.
Step 7: Touch theSelect a printerdropdown at the top of the screen.
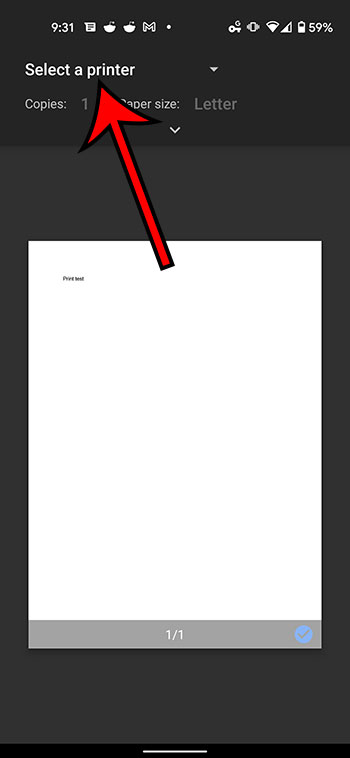
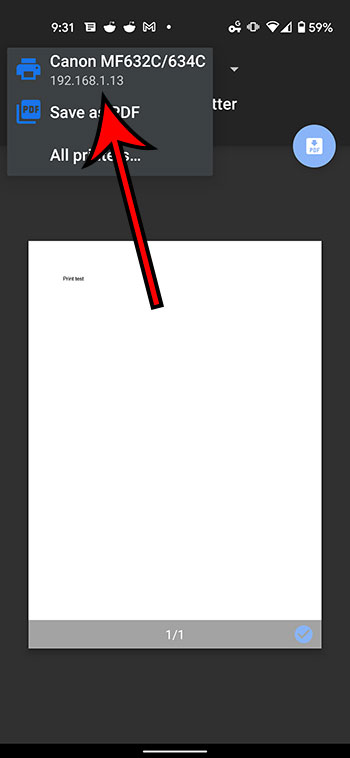
Step 8: Select the desired printer from the list of printing options.
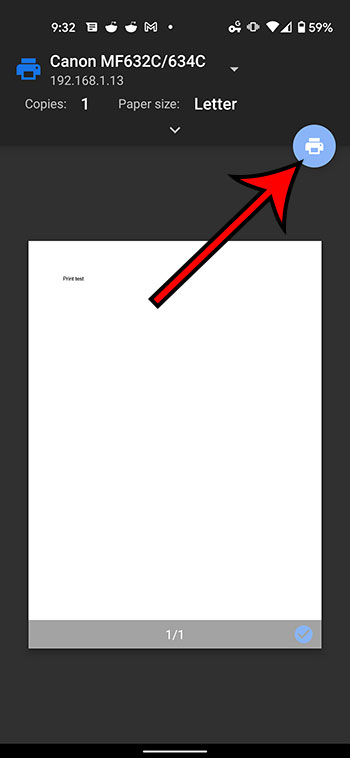
Step 9: Tap thePrinticon.
Our article continues below with additional information on printing from Google Docs.
Why Isn’t My Printer Listed?
Trying to resolve printing issues can be a tricky prospect, as printers are notoriously difficult to work with. When you combine this with the fact that you are printing from a mobile device, then there is a strong possibility that something isn’t going to work properly.
The first thing to check when you are trying to print is that your mobile device is connected to the same wireless network as the printer. If your iPhone or Android device is not on Wi-Fi, then you probably won’t see your printer.
A second consideration is that the printer may not be turned on. Many modern printers will turn off if they haven’t been used in a while. If you don’t see the printer but know that it should be there, try power cycling the printer (turning it off and on again) then wait a few minutes to see if it shows up in your mobile device’s printer list.
One final option to check is whether or not the printer is AirPrint compatible. Since you aren’t able to install print drivers on your mobile device, your printer will use a feature called AirPrint so that it can communicate with your phone. However, not all printers have this feature. Additionally, not all printers are network compatible. If your printer isn’t connected to your local network, either wirelessly or via an ethernet cable, then you probably won’t be able to communicate with the printer through your smartphone.
What is Google Cloud Print
There is a feature that is available as part of your Google Account that is called Google Cloud Print. If you have installed the Chrome browser on your computer and have added it as a printer that is available through Cloud Print, then this gives you some additional printing options.
After you select the Print option from the Share & export menu, you will see Google Cloud Print option listed there as well. If you choose that option you can follow the instructions on screen to select a printer and send it there. This means that you can even print Google Docs files on a printer that is in a completely different location.
How to Print from Google Docs on a Laptop or Desktop Computer
Printing a Google Docs document from your computer via a Web browser is a similar process to printing other documents. I am going to perform the steps below using the Chrome browser, but you can also use another browser like Firefox, Edge, or Safari.
Step 1: Navigate to https://docs.google.com and open the Google Docs file that you would like to print.
Step 2: Select File at the top-left of the window.
Step 3: Choose the Print option at the bottom of the menu.
Step 4: Adjust the print settings as needed, then click the blue Print button.
More Information on How to Print from Google Docs on iPhone or Android
The number of options that you can adjust when printing from your iPhone or Android device is pretty large.
When you have the Printer options menu open on your iPhone you will be able to specify the number of copies that you want to print, as well as the range, whether or not to print double-sided, and whether you want to print in black and white or color. Other document settings can be changed through the Page setup menu that is accessible from the menu where you selected the Share & export option.
The number of printing options on Android is greater, although you might initially have trouble locating them. After you choose the Print option from the Share & export menu, then select your printer, there will be a small downward-facing arrow in the top section. If you tap that arrow you will have these options:
- Copies
- Paper size
- Color
- Orientation
- Two-sided
- Pages
- More options
If you choose more options then you will be given the option to install additional device services, or to manage existing services.
While this article is focused specifically on printing from mobile phones, the same steps will work to print documents on an iPhone or iPad, as the Docs app and the printing process is similar for both of those iOS devices.
Additional Sources
Matthew Burleigh has been writing tech tutorials since 2008. His writing has appeared on dozens of different websites and been read over 50 million times.
After receiving his Bachelor’s and Master’s degrees in Computer Science he spent several years working in IT management for small businesses. However, he now works full time writing content online and creating websites.
His main writing topics include iPhones, Microsoft Office, Google Apps, Android, and Photoshop, but he has also written about many other tech topics as well.
Read his full bio here.
Featured guides and deals
