Creating a pamphlet in Word involves a few simple steps that can transform your ideas into a professional-looking document. You start by setting up the page layout, then you design each page with text and images, and finally, you save or print the document. This guide will walk you through the process to ensure your pamphlet is both appealing and effective.
How to Make a Pamphlet on Word
Let’s dive into the step-by-step process to make a pamphlet using Microsoft Word. By the end, you’ll have a sleek, informative pamphlet ready to share.
Step 1: Set Up Your Document
First, open Word and choose “New” to create a new document.
Once you’re in, navigate to the “Layout” tab. Here, you’ll change the orientation to “Landscape” to give your pamphlet that wide, foldable look. Then, click on “Margins” and select “Narrow” to maximize space.
Step 2: Choose Columns
Next, select “Columns” under the “Layout” tab and pick “Three” columns.
This step is crucial because each column will represent one fold of your pamphlet. Think of it as dividing a piece of paper into thirds. This setup is key to creating the classic tri-fold pamphlet.
Step 3: Add Content
Now, it’s time to fill those columns with text and images.
Click into each column and start typing or inserting images. Use the “Insert” tab to add pictures and text boxes to make your pamphlet visually appealing. Remember, the first column is the back panel, the middle is the inside left, and the last column is the front cover.
Step 4: Style Your Pamphlet
Use Word’s design tools to make your pamphlet stand out.
Apply different fonts, colors, and styles under the “Home” tab. You can also use “Design” for themes that match your content. The goal is to keep it engaging without overwhelming the reader.
Step 5: Save and Print
Finally, save your document and print it out.
Hit “File” and “Save As” to keep your work. When you’re ready to print, select “Print” and make sure to print on both sides, flipping the page on the short edge. Double-check your printer settings to ensure everything aligns correctly.
Once you finish these steps, your pamphlet will be ready for distribution. You can share it digitally or hand out physical copies. Either way, your message will be clear and professional.
Tips for Making a Pamphlet on Word
- Use high-quality images to enhance visual appeal.
- Keep text concise to maintain reader interest.
- Align text and images neatly for a professional look.
- Use bullet points for easy readability.
- Preview your pamphlet before printing to avoid errors.
What is the best paper size for a pamphlet?
Typically, using standard A4 or letter-sized paper works best for a tri-fold pamphlet.
Can I edit a saved pamphlet in Word?
Yes, you can open, edit, and save changes to your pamphlet as needed.
How do I add graphics to my pamphlet?
Go to the “Insert” tab and select “Pictures” or “Shapes” to add graphics.
Can I use templates in Word for a pamphlet?
Absolutely! Word offers templates under “File” > “New” which you can customize.
Is it possible to make a double-sided pamphlet?
Yes, choose the double-sided print option and ensure the correct page flip setting.
Summary
- Open a new document in Word.
- Set the page to landscape orientation.
- Choose three columns layout.
- Add text and images to each column.
- Style using fonts and colors.
- Save and print double-sided.
Conclusion
Creating a pamphlet in Word is like crafting a mini-masterpiece. With just a few clicks, you can transform blank pages into an eye-catching informational tool. Remember to keep your content clear and engaging—think of your pamphlet as a conversation starter. As you get comfortable, try experimenting with different styles and layouts.
Your pamphlet is more than just paper; it’s a way to share your voice, educate others, or promote an event. So, whether you’re designing for a school project, a business, or a community event, you’ve got the tools to make something truly impactful. Dive into Word today, and let your creativity shine—your audience is waiting!

Matthew Burleigh has been writing tech tutorials since 2008. His writing has appeared on dozens of different websites and been read over 50 million times.
After receiving his Bachelor’s and Master’s degrees in Computer Science he spent several years working in IT management for small businesses. However, he now works full time writing content online and creating websites.
His main writing topics include iPhones, Microsoft Office, Google Apps, Android, and Photoshop, but he has also written about many other tech topics as well.
Read his full bio here.
Featured guides and deals
Print areas in Microsoft Excel are a good solution when you need to print some of the data in a file, but not all of it. But occasionally a print area has been set and is no longer correct. Fortunately, you can use a similar process to remove a print area from your Excel spreadsheet if you don’t need it anymore.
Microsoft Excel 2010 allows you to customize most aspects of your spreadsheet, including the way that it prints. If you had previously set the print area for a document, then you know that you can force Excel to print out an area of cells that you have specified, regardless of whether there is information in those cells, or if there is additional information on the spreadsheet.
Unfortunately, while the print area is set, that is the only range of cells that you will be able to print. So if you need to learn how to clear the print area in Excel 2010 because the designated print area is either no longer accurate, or because you want to print a different area of your spreadsheet, then you can follow the instructions below.
How to Clear Print Area – Excel 2010
- Open your Excel file.
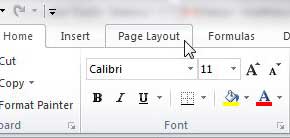
- Select the Page Layout tab at the top of the window.
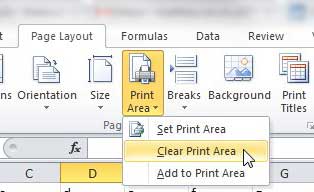
- Click the Print Area button.
- Choose the Clear Print Area option.
Our article continues below with additional information on clearing the print area in Excel, including pictures of these steps.
How to Stop Excel 2010 From Printing a Specified Print Area (Guide with Pictures)
Designating a print area in Excel 2010 is very helpful when you have a large spreadsheet and only periodically need to print a specific part of it. You do not need to remember to change your printer settings whenever you create a copy of the spreadsheet, and you can configure all of your page layout settings so that the spreadsheet prints to fit on a set number of pages. But when that print area changes and you need to remove the settings, you can clear the print area in Excel 2010.
Step 1: Open the Excel document with the set print area that you want to clear.
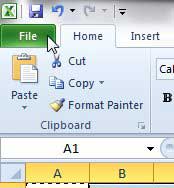
Step 2: Click thePage Layouttab at the top of the window.
Step 3: Click thePrint Areadrop-down menu in thePage Setupsection of the ribbon at the top of the window, then choose theClear Print Areaoption.
Note that after you clear the print area for your worksheet, all of the data on that sheet is going to print the next time you click the Print button. Often a worksheet that had a set print area is going to have some formatting options set which took that print area into consideration.
More Information on How to Clear the Print Area in Excel
After clearing the print area it’s a good idea to check the Print Preview before you click the Print button. This can save a lot of wasted paper, especially if you are dealing with a very large spreadsheet.
If you want to print your spreadsheet and ignore a print area this one time, while still leaving it intact for future printings you can also choose the Ignore Print Area option on the Print menu.
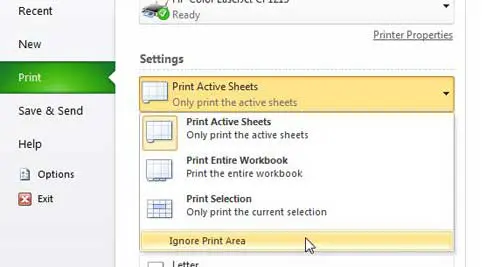
You can find this setting by clicking the File tab, clicking Print , clicking the Print Active Sheets drop-down menu, then choosing Ignore Print Area .
You can set a print area if you highlight the cells that you want to print, go the Page Setup group, click Print Area , then choose the Set Print Area option.
Additionally, if you would like to add more cells to an existing print area you can do so by choosing those cells, selecting the Page Layout tab, then clicking the Print Area button and selecting the Add to Print Area button.
You can have multiple print areas in Excel. However, if you do have multiple print areas and they aren’t connected to one another, they will print on separate pages. Creating multiple print areas is possible by either adding a selection of cells to an existing print area, or making a selection of cells, then holding down the Ctrl key before choosing another selection of cells. Once both print areas are selected you go to the Page Layout tab, go to the Page Setup group, click Print Area, then Set Print Area.
When you save the workbook in Excel, any defined print areas will be saved as well. However, print areas only apply to a worksheet, not an entire workbook. Therefore, if you go to print the entire workbook Excel will print only the print area on your worksheet, but will print the rest of the worksheets in their entirety, assuming that there are no print areas on those other sheets.
Conclusion
As we outlined above, you can clear a print area in Excel by going to Page Layout > Print Area > Clear Print Area . When there is no range of cells that is specified as a print area, Excel will print the entire worksheet.
After you have cleared a print area in Excel you can always choose to set a new area if you select the cells to include in the print area, then go to Page Layout > Print Area > Set Print Area .
- How to subtract in Excel
- How to sort by date in Excel
- How to center a worksheet in Excel
- How to select non-adjacent cells in Excel
- How to unhide a hidden workbook in Excel
- How to make Excel vertical text
Matthew Burleigh has been writing tech tutorials since 2008. His writing has appeared on dozens of different websites and been read over 50 million times.
After receiving his Bachelor’s and Master’s degrees in Computer Science he spent several years working in IT management for small businesses. However, he now works full time writing content online and creating websites.
His main writing topics include iPhones, Microsoft Office, Google Apps, Android, and Photoshop, but he has also written about many other tech topics as well.
Read his full bio here.
Microsoft Excel can be a difficult application to work with when you need to print a spreadsheet. One common problem involves getting your column to fit correctly. Fortunately, you can learn how to print all columns in Excel on one page.
How to Fit All Columns on One Page in Excel 2010
- Open your Excel file.
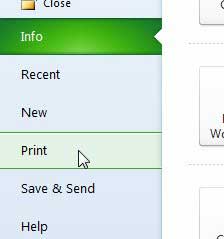
- Click the File tab.
- Select the Print button.
- Click the No Scaling button.
- Choose the Print all Columns on One Page option.
- Click Print .
Our guide continues below with additional information on how to print all columns in Excel on a single printed page, including pictures of these steps.
The Microsoft Excel Print Preview window is a useful tool when you are trying to make sure that your completed spreadsheet looks good before you print it.
One area where you can have trouble with printed pages in your spreadsheet is simply getting your Excel spreadsheet to fit on one page. It may have seemed like the Excel expand all rows option was what you needed, but that doesn’t do much to affect printing.
You may have tried using manual page breaks, or switching between the normal view and the print window to check the Print Preview screen each time you changed a column width to see if that helped.
If you need to fit an Excel sheet on one page you can go to File > Print > and click the No Scaling button, then choose the Fit All Columns on One Page option.
Excel 2010 is a perfect program for a lot of different uses, but one area that can be frustrating is when you need to print a spreadsheet.
If your spreadsheet doesn’t perfectly fit on the paper in your printer, then Excel will automatically push extra columns to their own page, which can result in a lot of confusion and wasted paper.
Manually resizing columns can also be a futile effort, as adjusting one column can end up creating another problem.
Fortunately, Excel 2010 has a print setting that allows you to automatically fit all of your columns on one page, ensuring that the data is in a more print-friendly layout.
if you aren’t focused on printing, but simply want your data to be visible, then read our guide on how to autofit all columns in Excel for a quick and easy way to resize everything.
How to Print Multiple Columns on One Page in Excel 2010 (Guide with Pictures)
One thing to keep in mind when you are doing this, however, is that the size of your cells and text will be shrunk to accommodate the reduction in print real estate.
So Excel will fit 100 columns on one page if you tell it to, but the resulting printout will likely be very difficult to read.
This is a good situation to take advantage of the Print Preview on the right side of the Print screen, as it will give you an idea of how small the text is going to become.
Step 1: Open your spreadsheet in Excel 2010.
Step 2: Click theFiletab at the top-left corner of the window.
Step 3: Click thePrintoption in the column at the left side of the window.
Step 4: Click theNo Scalingbutton.
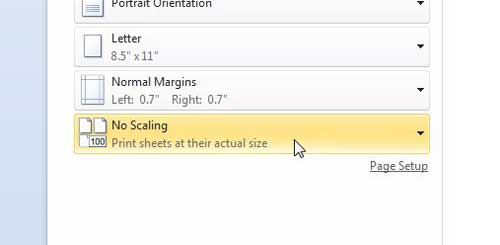
Step 5: Select theFit All Columns on One Pageoption.
If you are happy with how the preview looks, click the Print button.

Now that you know how to print all columns in Excel on one page you should be able to save yourself a lot of time and frustration in trying to configure everything manually.
Our tutorial continues below with additional discussion about using the different “fit” options on the Excel Print menu.
More Information on the Microsoft Excel “Fit All Columns on One Page” Setting
If the text is just slightly too small, consider switching to a landscape orientation instead .
You can also configure your Excel 2010 spreadsheet so that you can fit the entire spreadsheet on one page . When you click the No Scaling button on the Print menu there are options for:
- No Scaling
- Fit Sheet on One Page
- Fit All Columns on One Page
- Fit All Rows on One Page
There is also a Custom Scaling Options button at the bottom of this dropdown menu. If you select that then it will open the Page Setup menu, where you can try one of the other options found in that location.
Multi-page spreadsheets can greatly benefit when you print the top row on every page . This option is found on the Page Layout tab when you click the Print Titles button.
One other place that you can find a way to customize the print layout of your spreadsheet is the Page Setup dialog box. You can go to the Page Layout tab and click the small Page Setup dialog box launcher button at the bottom-right corner of the Page Setup group to open it.
There you will see a number of different tabs at the top of the window, including a Page tab. On this tab, you can choose the page orientation, adjust scaling, and even specify the number of pages to which you would like to fit your printed spreadsheet.
If you have tried everything you can to make your single-page worksheet look good and it’s still too small, then try hiding some of the less important columns. You can do this by right-clicking a column letter, then choosing the Hide option.
Matthew Burleigh has been writing tech tutorials since 2008. His writing has appeared on dozens of different websites and been read over 50 million times.
After receiving his Bachelor’s and Master’s degrees in Computer Science he spent several years working in IT management for small businesses. However, he now works full time writing content online and creating websites.
His main writing topics include iPhones, Microsoft Office, Google Apps, Android, and Photoshop, but he has also written about many other tech topics as well.
Read his full bio here.
Featured guides and deals
Printing from Microsoft Word for Office 365 is a simple process. Open the document you want to print, click on the ‘File’ tab, select ‘Print’, choose your printer, set your print options, and then click ‘Print’. And just like that, your document should be making its way out of your printer!
After clicking ‘Print’, your computer will send the document to the printer, and the physical printing process will begin. Make sure you have enough paper and ink in your printer to avoid any interruptions.
Introduction
So, you’ve finished drafting that all-important document in Microsoft Word for Office 365, and now it’s time to bring it into the physical world. Whether it’s a report for work, an essay for school, or a recipe for that new dish you want to try out, knowing how to print your documents is essential. In today’s digital age, we often overlook the importance of having a hard copy. However, there are numerous scenarios where a printed document is necessary or just more convenient. This process is relevant to students, professionals, and anyone who uses Microsoft Word for creating documents.
It’s one of those basic skills that, once mastered, will serve you time and time again. Printing can seem straightforward, but there are a few steps and options that you might not be aware of. This article will guide you through the process, ensuring you can print with confidence from Microsoft Word for Office 365.
Related: How to Print Multiple Word Documents at Once
Step by Step Tutorial: Printing from Microsoft Word for Office 365
The following steps will guide you through printing a document from Microsoft Word for Office 365.
Step 1: Open the document you want to print
Open the document in Microsoft Word that you wish to print.
Once you have your document open, check it over to make sure everything is exactly how you want it to appear in print. This is your last chance to catch any typos or formatting issues!
Step 2: Click on the ‘File’ tab
Click on the ‘File’ tab located in the top left corner of the Microsoft Word window.
This will take you to the backstage view, where you can access a range of document-related settings and options, including the print settings.
Step 3: Select ‘Print’
From the menu options, select ‘Print’.
This will bring up the print settings where you can choose your printer and specify the print details such as the number of copies, pages to print, and whether to print one-sided or double-sided.
Step 4: Choose your printer
Choose the printer you want to use from the list of available printers.
If you’re using a new printer for the first time, make sure it’s been correctly set up and connected to your computer or network.
Step 5: Set your print options
Set your print options, including the number of copies, pages to print, and other preferences.
Here you can also change the orientation of the paper, print in color or black and white, and adjust the size of the print. Make sure to preview your document to ensure it looks exactly how you want it to.
Step 6: Click ‘Print’
Once you’re satisfied with your print settings, click ‘Print’.
Your document will be sent to the printer and should begin printing shortly. Make sure to collect your document from the printer and check it over once more to ensure everything printed correctly.
Pros
| Benefit | Explanation |
|---|---|
| Convenience | Printing directly from Microsoft Word for Office 365 is highly convenient. It allows you to quickly and easily produce a physical copy of your document without the need for any additional software or steps. |
| Customization | The print settings in Microsoft Word for Office 365 offer a range of options to tailor the printout to your specific needs. Whether it’s selecting the number of copies, choosing specific pages, or adjusting the layout, these customizable settings ensure your document is printed just the way you need it. |
| Preview Feature | Before printing, Microsoft Word allows you to preview your document. This helps to catch any errors or formatting issues before they’re printed, saving you time, paper, and ink. |
Cons
| Drawback | Explanation |
|---|---|
| Printer Compatibility | Not all printers are compatible with Microsoft Word for Office 365’s print function. It’s important to ensure your printer is set up correctly and is compatible with the software to avoid any printing issues. |
| Resource Consumption | Printing documents, especially in large quantities or in color, can consume a significant amount of paper and ink. It’s important to consider the environmental impact and cost when deciding to print. |
| Technical Issues | Sometimes, technical issues can arise, such as printer errors, connectivity issues, or software glitches. These can disrupt the printing process and may require troubleshooting to resolve. |
Additional Information
When printing from Microsoft Word for Office 365, there are a few additional tips you should keep in mind. First, always ensure that your printer has enough ink or toner and that there is an adequate supply of paper. Nothing is more frustrating than a document that’s half-printed because you ran out of ink! If you’re printing a lengthy document, consider using the ‘Print on Both Sides’ option to save paper.
Another important aspect is to understand the different print layouts available. Depending on the nature of your document, you may want to print in portrait or landscape mode. For large documents, such as reports or manuscripts, you might want to use the ‘Print Layout’ view to see how each page will look when printed.
Don’t forget about the ‘Save Ink/Toner’ option in the print settings. This is useful if you’re printing draft documents or anything that doesn’t require high-quality print. This option reduces the amount of ink or toner used and can be a cost-effective and environmentally friendly choice.
Lastly, if you’re printing confidential or sensitive documents, be sure to collect them from the printer immediately to protect your privacy. If your printer supports it, you can also use secure print options that require a code to be entered at the printer before the document will print.
Summary
- Open the document you want to print.
- Click on the ‘File’ tab.
- Select ‘Print’.
- Choose your printer.
- Set your print options.
- Click ‘Print’.
How do I print double-sided on Microsoft Word for Office 365?
To print double-sided, go to the print settings and look for the option that says ‘Print on Both Sides’ or ‘Duplex Printing’. Select this option before clicking ‘Print’.
What should I do if my document won’t print?
First, check your printer to ensure it’s turned on and connected to your computer or network. If that’s not the issue, try restarting both your printer and computer. If the problem persists, consult your printer’s manual or contact technical support.
Can I print in color from Microsoft Word for Office 365?
Yes, if your printer supports color printing, you can print in color by selecting the color option in the print settings.
How can I save paper when printing?
To save paper, consider printing on both sides of the paper if your printer supports this feature. You can also print multiple pages on a single sheet by adjusting the ‘Pages per Sheet’ setting.
How do I cancel a print job in Microsoft Word for Office 365?
To cancel a print job, go to the print queue on your computer and select the document you want to cancel. Right-click and choose ‘Cancel’ or use the cancel button on your printer if available.
Conclusion
Printing from Microsoft Word for Office 365 is a fundamental skill that can enhance your productivity and efficiency. With the simple steps outlined in this article, you can print your documents quickly and easily, adjusting settings as needed to meet your specific requirements. Remember, while printing is convenient, always consider the environmental impact and use this feature responsibly.
Whether you’re a student printing an essay, a professional preparing a report, or someone sharing a cherished recipe, mastering the print function in Microsoft Word for Office 365 will serve you well in all your document-related endeavors. Keep these tips in mind, and happy printing!
Matthew Burleigh has been writing tech tutorials since 2008. His writing has appeared on dozens of different websites and been read over 50 million times.
After receiving his Bachelor’s and Master’s degrees in Computer Science he spent several years working in IT management for small businesses. However, he now works full time writing content online and creating websites.
His main writing topics include iPhones, Microsoft Office, Google Apps, Android, and Photoshop, but he has also written about many other tech topics as well.
Read his full bio here.
Featured guides and deals
