Making Snagit your default tool for capturing screenshots on Windows 11 is surprisingly straightforward. First, ensure that Snagit is installed on your computer. Then, you need to change a few system settings to make Snagit open whenever you hit the Print Screen (PrtScn) button. This process involves accessing your keyboard settings and designating Snagit as the default app for screen capture. Once these adjustments are made, you’ll be able to capture and edit your screenshots with Snagit instantly. Ready to dive into the details? Let’s get started!
Step-by-Step Tutorial: Make Snagit Default Print Screen on Windows 11
In this guide, we’ll walk through the necessary steps to set Snagit as the default app for capturing screenshots on Windows 11. By the end of these steps, pressing the Print Screen key will automatically launch Snagit.
Step 1: Install Snagit
Ensure Snagit is installed on your Windows 11 computer.
If you haven’t already installed Snagit, you’ll need to download it from TechSmith’s website. Follow their installation process, which typically involves downloading an installer file and running it on your computer.
Step 2: Open Keyboard Settings
Access the keyboard settings by going to the Settings app on Windows 11.
You can find the Settings app by clicking the Start menu and selecting Settings. Once you’re there, navigate to the “Devices” section and choose “Keyboard” from the left-hand menu to open the keyboard settings.
Step 3: Customize the Print Screen Shortcut
Find the option that allows you to customize what happens when the Print Screen key is pressed.
Within the Keyboard settings, look for an option labeled “Use the Print Screen button to open screen snipping.” You want to ensure this option is toggled off, as it’s typically set to open the default Windows snipping tool.
Step 4: Launch Snagit
Open Snagit and access its settings or preferences.
Once Snagit is running, click on the gear icon or go to the File menu and select Preferences. You’ll find an option there to set Snagit as the default tool for capturing screenshots whenever the Print Screen button is pressed.
Step 5: Confirm and Test
Save your settings and test whether Snagit opens when you press the Print Screen key.
After confirming the settings, try pressing the Print Screen key on your keyboard. If everything is set up correctly, Snagit should launch and be ready to capture your screen.
Once you’ve completed the above steps, every time you press the Print Screen key, Snagit will automatically open, making capturing and editing screenshots a breeze.
Tips for Making Snagit Default Print Screen on Windows 11
- Ensure Snagit is up-to-date to avoid any compatibility issues with Windows 11.
- Familiarize yourself with Snagit’s features to make the most out of your screenshots.
- Consider creating a backup of your settings in case you want to revert any changes.
- If you encounter issues, check for any conflicting software that might be intercepting the Print Screen command.
- Customize Snagit to automatically save your screenshots in a preferred format for efficiency.
How do I access Windows 11 settings?
You can access settings by clicking on the Start menu and selecting the gear icon labeled “Settings.”
What if Snagit doesn’t open when I press Print Screen?
Double-check your settings and ensure Snagit is selected as the default app for screenshots.
Can I revert to the default Windows screenshot tool later?
Yes, by going back to the Keyboard settings and enabling the “Use the Print Screen button to open screen snipping” option.
Do I need administrative rights to change these settings?
No, you shouldn’t need administrative rights, but make sure you have permission to install software on your device.
Is there a cost to use Snagit?
Yes, Snagit typically requires a one-time purchase, though a free trial is often available.
Summary
- Install Snagit.
- Open Keyboard Settings.
- Customize the Print Screen Shortcut.
- Launch Snagit.
- Confirm and Test.
Conclusion
In today’s digital age, having the right tools at your fingertips can make all the difference. Making Snagit your default Print Screen application on Windows 11 simplifies the process of capturing and editing screenshots, streamlining your workflow. With its robust editing features and user-friendly interface, Snagit transforms a simple screenshot into a tool for effective communication.
By following the steps outlined in this guide, you’ve taken a step towards enhancing your productivity. Whether you’re preparing a presentation, creating a tutorial, or just saving information for later reference, Snagit’s capabilities extend far beyond mere image capture. It’s a versatile tool that can make your tasks easier and more efficient.
For those who frequently use screenshots in their work or personal projects, this little tweak can save a lot of time and hassle. Now, every time you press that Print Screen button, you’re not just taking a shot of your screen; you’re unlocking a whole suite of options to make that image work for you.
Explore Snagit’s other features, such as video capture and panoramic scrolling, to get even more out of this powerful tool. Happy screenshotting!

Matthew Burleigh has been writing tech tutorials since 2008. His writing has appeared on dozens of different websites and been read over 50 million times.
After receiving his Bachelor’s and Master’s degrees in Computer Science he spent several years working in IT management for small businesses. However, he now works full time writing content online and creating websites.
His main writing topics include iPhones, Microsoft Office, Google Apps, Android, and Photoshop, but he has also written about many other tech topics as well.
Read his full bio here.
Featured guides and deals
- Return home
JavaScript is not available.
We’ve detected that JavaScript is disabled in this browser. Please enable JavaScript or switch to a supported browser to continue using x.com. You can see a list of supported browsers in our Help Center.
Help Center

Dengan mengeklik Lanjutkan, Anda menyetujui Perjanjian Pengguna , Kebijakan Privasi , dan Kebijakan Cookie LinkedIn.
Kami telah mengirimkan link sekali pakai ke alamat email utama Anda
Klik link untuk login langsung ke akun LinkedIn Anda.
Jika Anda tidak menemukan email tersebut di kotak pesan, periksa folder spam.
Setuju & Bergabung dengan LinkedIn
Dengan mengeklik Lanjutkan, Anda menyetujui Perjanjian Pengguna , Kebijakan Privasi , dan Kebijakan Cookie LinkedIn.
Print areas in Microsoft Excel are a good solution when you need to print some of the data in a file, but not all of it. But occasionally a print area has been set and is no longer correct. Fortunately, you can use a similar process to remove a print area from your Excel spreadsheet if you don’t need it anymore.
Microsoft Excel 2010 allows you to customize most aspects of your spreadsheet, including the way that it prints. If you had previously set the print area for a document, then you know that you can force Excel to print out an area of cells that you have specified, regardless of whether there is information in those cells, or if there is additional information on the spreadsheet.
Unfortunately, while the print area is set, that is the only range of cells that you will be able to print. So if you need to learn how to clear the print area in Excel 2010 because the designated print area is either no longer accurate, or because you want to print a different area of your spreadsheet, then you can follow the instructions below.
How to Clear Print Area – Excel 2010
- Open your Excel file.
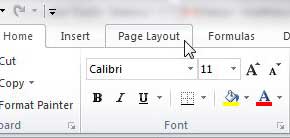
- Select the Page Layout tab at the top of the window.
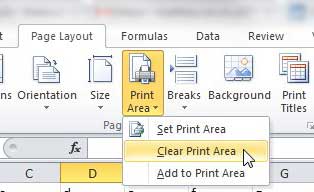
- Click the Print Area button.
- Choose the Clear Print Area option.
Our article continues below with additional information on clearing the print area in Excel, including pictures of these steps.
How to Stop Excel 2010 From Printing a Specified Print Area (Guide with Pictures)
Designating a print area in Excel 2010 is very helpful when you have a large spreadsheet and only periodically need to print a specific part of it. You do not need to remember to change your printer settings whenever you create a copy of the spreadsheet, and you can configure all of your page layout settings so that the spreadsheet prints to fit on a set number of pages. But when that print area changes and you need to remove the settings, you can clear the print area in Excel 2010.
Step 1: Open the Excel document with the set print area that you want to clear.
Step 2: Click thePage Layouttab at the top of the window.
Step 3: Click thePrint Areadrop-down menu in thePage Setupsection of the ribbon at the top of the window, then choose theClear Print Areaoption.
Note that after you clear the print area for your worksheet, all of the data on that sheet is going to print the next time you click the Print button. Often a worksheet that had a set print area is going to have some formatting options set which took that print area into consideration.
More Information on How to Clear the Print Area in Excel
After clearing the print area it’s a good idea to check the Print Preview before you click the Print button. This can save a lot of wasted paper, especially if you are dealing with a very large spreadsheet.
If you want to print your spreadsheet and ignore a print area this one time, while still leaving it intact for future printings you can also choose the Ignore Print Area option on the Print menu.
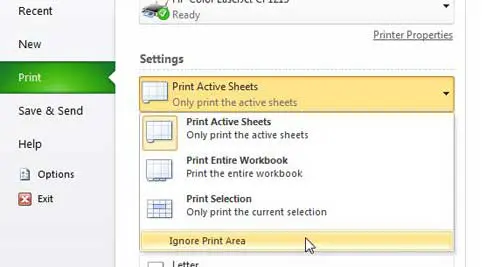
You can find this setting by clicking the File tab, clicking Print , clicking the Print Active Sheets drop-down menu, then choosing Ignore Print Area .
You can set a print area if you highlight the cells that you want to print, go the Page Setup group, click Print Area , then choose the Set Print Area option.
Additionally, if you would like to add more cells to an existing print area you can do so by choosing those cells, selecting the Page Layout tab, then clicking the Print Area button and selecting the Add to Print Area button.
You can have multiple print areas in Excel. However, if you do have multiple print areas and they aren’t connected to one another, they will print on separate pages. Creating multiple print areas is possible by either adding a selection of cells to an existing print area, or making a selection of cells, then holding down the Ctrl key before choosing another selection of cells. Once both print areas are selected you go to the Page Layout tab, go to the Page Setup group, click Print Area, then Set Print Area.
When you save the workbook in Excel, any defined print areas will be saved as well. However, print areas only apply to a worksheet, not an entire workbook. Therefore, if you go to print the entire workbook Excel will print only the print area on your worksheet, but will print the rest of the worksheets in their entirety, assuming that there are no print areas on those other sheets.
Conclusion
As we outlined above, you can clear a print area in Excel by going to Page Layout > Print Area > Clear Print Area . When there is no range of cells that is specified as a print area, Excel will print the entire worksheet.
After you have cleared a print area in Excel you can always choose to set a new area if you select the cells to include in the print area, then go to Page Layout > Print Area > Set Print Area .
- How to subtract in Excel
- How to sort by date in Excel
- How to center a worksheet in Excel
- How to select non-adjacent cells in Excel
- How to unhide a hidden workbook in Excel
- How to make Excel vertical text
Matthew Burleigh has been writing tech tutorials since 2008. His writing has appeared on dozens of different websites and been read over 50 million times.
After receiving his Bachelor’s and Master’s degrees in Computer Science he spent several years working in IT management for small businesses. However, he now works full time writing content online and creating websites.
His main writing topics include iPhones, Microsoft Office, Google Apps, Android, and Photoshop, but he has also written about many other tech topics as well.
Read his full bio here.
When smartphones first started to gain popularity, the prospect of printing something from them seemed like a pipe dream. Printers were already hard enough to deal with on a computer, and it seemed unlikely that it could work on a phone.
But the Google Docs app started adding new features like the ability to add small numbers in Google Docs , and it became apparent that the app was going to gain most of its desktop counterpart’s functionality.
Now we are also able to print from Google Docs on our iPhone or Android device, and it’s surprisingly accessible.
Most modern printers have some sort of network compatibility, meaning that devices on the same network as the printer can use that printer if they have that capability.
Mobile phones, but those that use the iOS and Android operating systems, are now able to print wirelessly to printers that support it. Plus, most of the apps that you would want to print from, such as creative apps and productivity apps, will usually support some type of printing functionality in addition to the other features they offer, like file sharing .
Our guide below will show you how to print through the Google Docs app on your iPhone or Android phone, plus we will address some of the common issues that might arise if you can’t make it work.
How to Print from the Google Docs Mobile App
- Open Docs.
- Choose a document.
- Tap the three dots.
- Select Share & export .
- Choose Print .
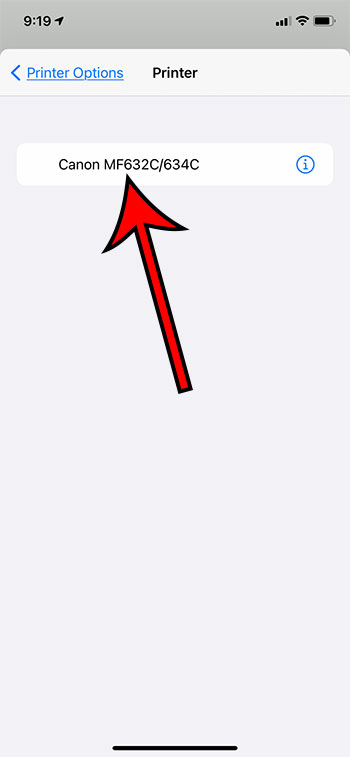
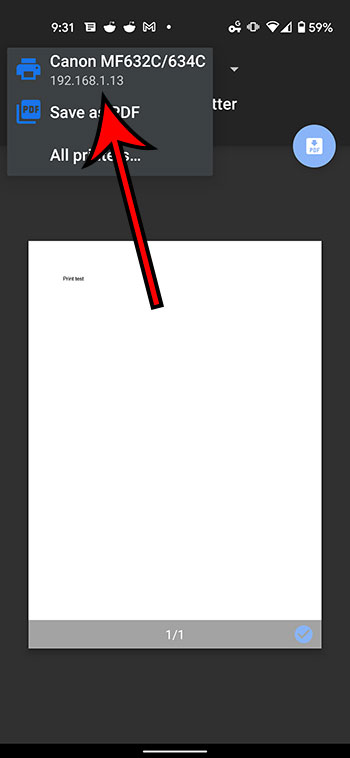
- Touch Select Printer .
- Chose a printer.
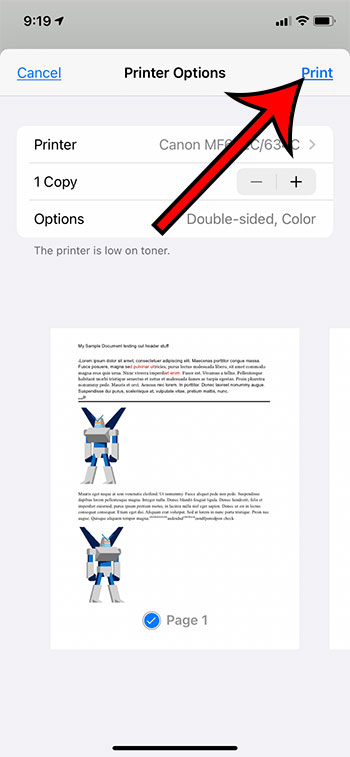
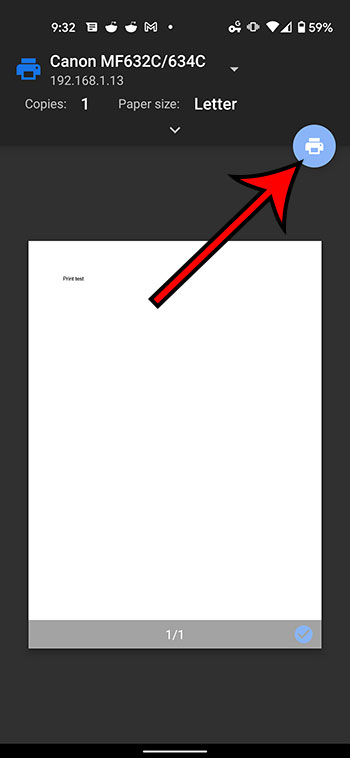
- Tap Print .
Our guide continues below with additional information on printing from the Google Docs app, including pictures of these steps.
How to Print from Google Docs on an iPhone (Guide with Pictures)
The steps in this section were performed on an iPhone 11 in iOS 14.6. These steps will also work on other iPhone models using this same version of iOS, as well as in most other versions of iOS. I am using the most current version of the Google Docs app that was available at the time this article was written.
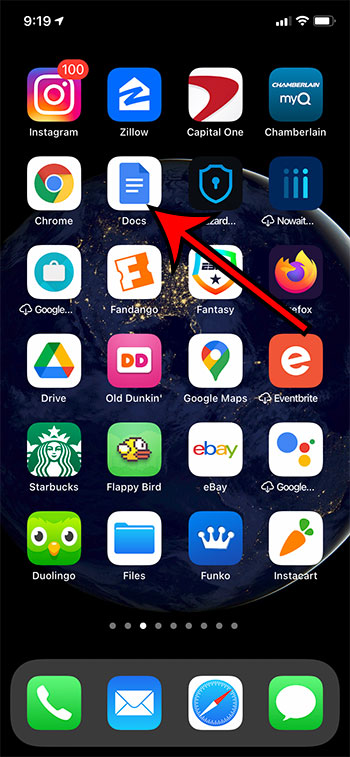
Step 1: Open theDocsapp on your iPhone.
Step 2: Select the document that you want to print.
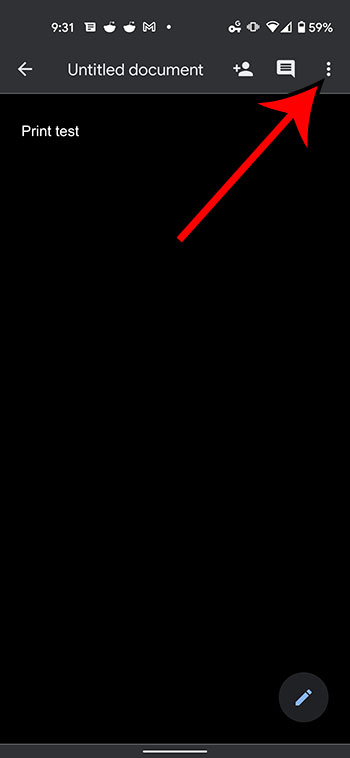
Step 3: Touch the three dots at the top-right of the screen.
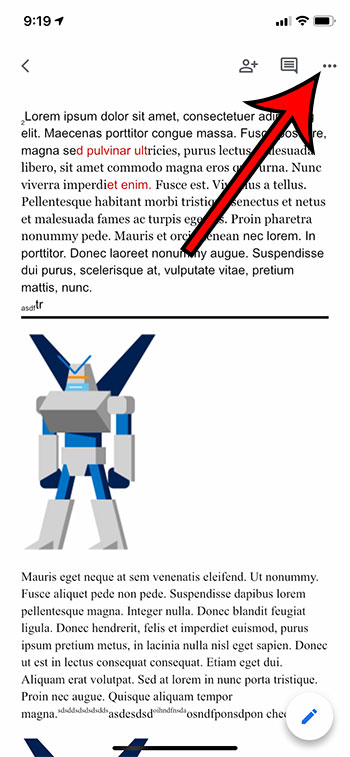
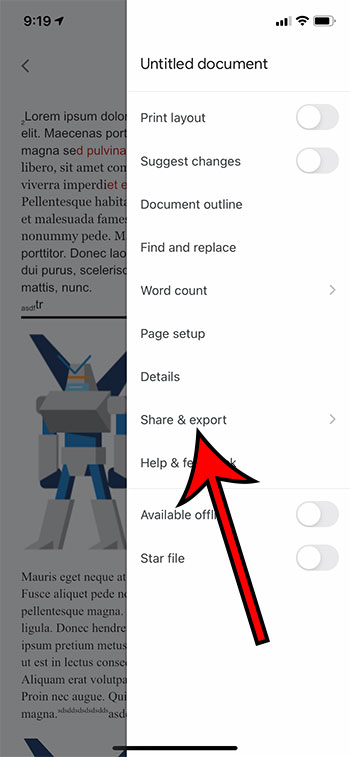
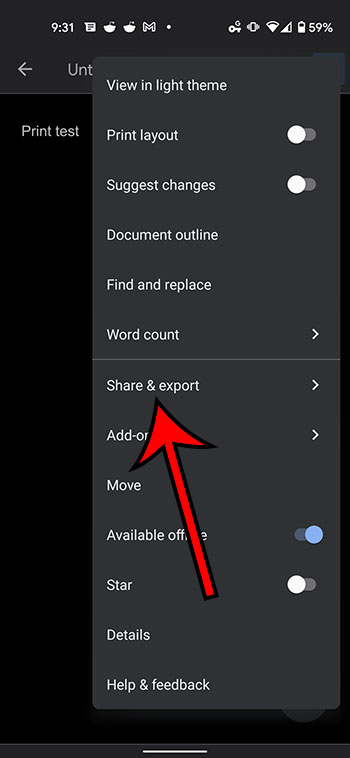
Step 4: Select theShare & exportoption.
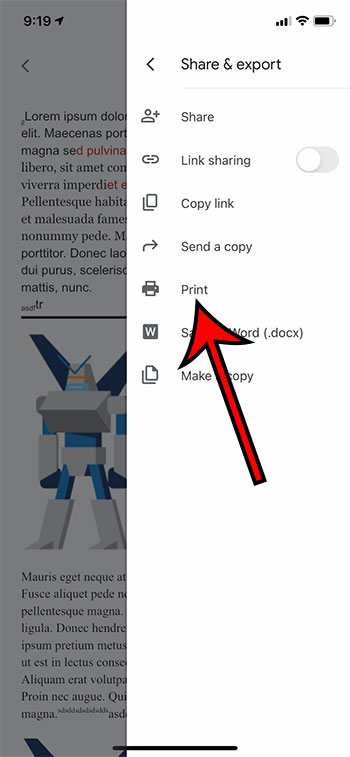
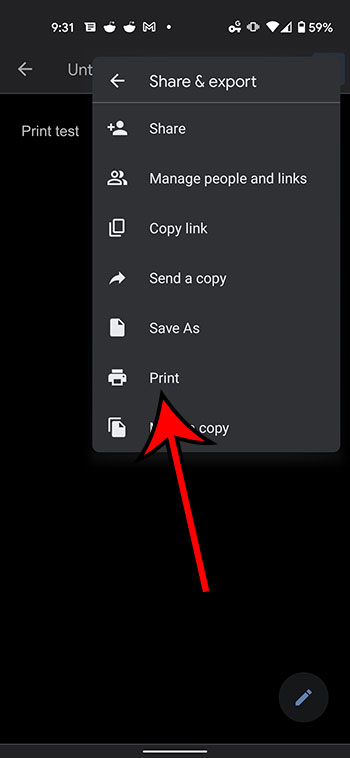
Step 5: ChoosePrint.
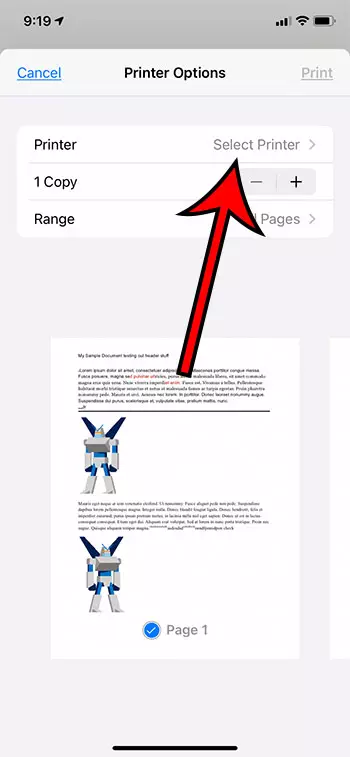
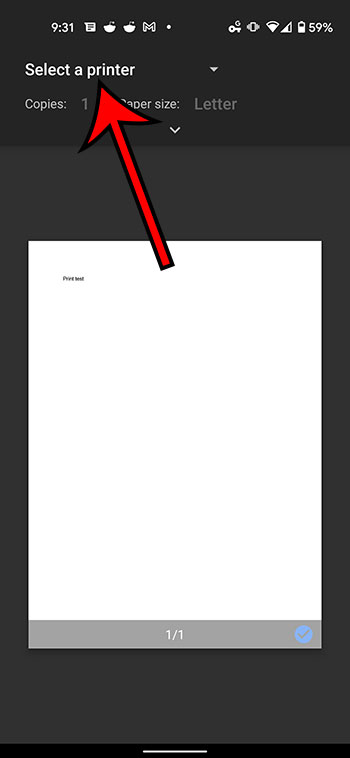
Step 6: Tap theSelect Printeroption.
Step 7: Choose your printer.
Step 8: TapPrintat the top-right corner of the screen.
Our article continues below with information on how to print from your Android device.
How to Print from Google Docs on Android (Guide with Pictures)
The steps in this section were performed on a Google Pixel 4A, using Android 11. I am using the most current version of the Docs app that was available when I wrote this article.
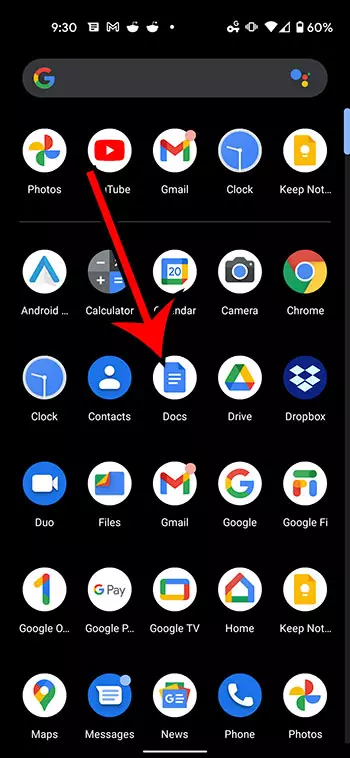
Step 1: Swipe up from the center of the screen.
Step 2: Touch theDocsicon.
Step 3: Choose the document from your Google Drive that you want to print.
Step 4: Tap the three vertical dots at the top of the screen.
Step 5: Select theShare & exportoption from the menu on the right side of the screen.
Step 6: ChosePrintfrom the list of sharing options.
Step 7: Touch theSelect a printerdropdown at the top of the screen.
Step 8: Select the desired printer from the list of printing options.
Step 9: Tap thePrinticon.
Our article continues below with additional information on printing from Google Docs.
Why Isn’t My Printer Listed?
Trying to resolve printing issues can be a tricky prospect, as printers are notoriously difficult to work with. When you combine this with the fact that you are printing from a mobile device, then there is a strong possibility that something isn’t going to work properly.
The first thing to check when you are trying to print is that your mobile device is connected to the same wireless network as the printer. If your iPhone or Android device is not on Wi-Fi, then you probably won’t see your printer.
A second consideration is that the printer may not be turned on. Many modern printers will turn off if they haven’t been used in a while. If you don’t see the printer but know that it should be there, try power cycling the printer (turning it off and on again) then wait a few minutes to see if it shows up in your mobile device’s printer list.
One final option to check is whether or not the printer is AirPrint compatible. Since you aren’t able to install print drivers on your mobile device, your printer will use a feature called AirPrint so that it can communicate with your phone. However, not all printers have this feature. Additionally, not all printers are network compatible. If your printer isn’t connected to your local network, either wirelessly or via an ethernet cable, then you probably won’t be able to communicate with the printer through your smartphone.
What is Google Cloud Print
There is a feature that is available as part of your Google Account that is called Google Cloud Print. If you have installed the Chrome browser on your computer and have added it as a printer that is available through Cloud Print, then this gives you some additional printing options.
After you select the Print option from the Share & export menu, you will see Google Cloud Print option listed there as well. If you choose that option you can follow the instructions on screen to select a printer and send it there. This means that you can even print Google Docs files on a printer that is in a completely different location.
How to Print from Google Docs on a Laptop or Desktop Computer
Printing a Google Docs document from your computer via a Web browser is a similar process to printing other documents. I am going to perform the steps below using the Chrome browser, but you can also use another browser like Firefox, Edge, or Safari.
Step 1: Navigate to https://docs.google.com and open the Google Docs file that you would like to print.
Step 2: Select File at the top-left of the window.
Step 3: Choose the Print option at the bottom of the menu.
Step 4: Adjust the print settings as needed, then click the blue Print button.
More Information on How to Print from Google Docs on iPhone or Android
The number of options that you can adjust when printing from your iPhone or Android device is pretty large.
When you have the Printer options menu open on your iPhone you will be able to specify the number of copies that you want to print, as well as the range, whether or not to print double-sided, and whether you want to print in black and white or color. Other document settings can be changed through the Page setup menu that is accessible from the menu where you selected the Share & export option.
The number of printing options on Android is greater, although you might initially have trouble locating them. After you choose the Print option from the Share & export menu, then select your printer, there will be a small downward-facing arrow in the top section. If you tap that arrow you will have these options:
- Copies
- Paper size
- Color
- Orientation
- Two-sided
- Pages
- More options
If you choose more options then you will be given the option to install additional device services, or to manage existing services.
While this article is focused specifically on printing from mobile phones, the same steps will work to print documents on an iPhone or iPad, as the Docs app and the printing process is similar for both of those iOS devices.
Additional Sources
Matthew Burleigh has been writing tech tutorials since 2008. His writing has appeared on dozens of different websites and been read over 50 million times.
After receiving his Bachelor’s and Master’s degrees in Computer Science he spent several years working in IT management for small businesses. However, he now works full time writing content online and creating websites.
His main writing topics include iPhones, Microsoft Office, Google Apps, Android, and Photoshop, but he has also written about many other tech topics as well.
Read his full bio here.
Featured guides and deals
If you’ve ever wondered how to capture what’s on your computer screen, you’re in the right place. Learning how to print screen in Windows 10 is super easy and can be done in a few steps. This quick guide will walk you through everything you need to know to take screenshots effortlessly. So let’s get started!
How to Print Screen in Windows 10
Taking a screenshot on Windows 10 is as easy as pressing a few buttons. This section will guide you through the steps to capture your screen, whether you want to save it as an image file or copy it to your clipboard.
Step 1: Find the Print Screen Key
The Print Screen key is usually located at the top row of your keyboard, labeled as “PrtScn” or something similar.
It may also be combined with another function key, so keep an eye out for it. Once you’ve located the Print Screen key, you’re halfway there.
Step 2: Press the Print Screen Key
Pressing the Print Screen key will capture the entire screen and copy it to the clipboard.
Now, you won’t see any visual confirmation, but trust me, it’s there. You can then paste this into an image editor like Paint.
Step 3: Use Windows + Print Screen
To save the screenshot automatically, press the Windows key + Print Screen.
This will save the entire screen as a PNG file in your “Pictures” folder, specifically in a folder named “Screenshots.”
Step 4: Use Alt + Print Screen
If you only want to capture the active window, press Alt + Print Screen.
This captures just the window you’re currently working in and copies it to the clipboard, making it handy for focused screenshots.
Step 5: Use the Snipping Tool or Snip & Sketch
For more control, use the Snipping Tool or Snip & Sketch application.
These tools allow you to select specific areas of your screen for more customized screenshots.
After completing these steps, your screen will be captured in the way you specified. You’ll either have it saved as a file or copied to your clipboard, ready to be pasted wherever you need it.
Tips for Printing Screen in Windows 10
- Know your shortcuts: Remember the key combinations for different types of screenshots. They save time.
- Practice makes perfect: Take a few test screenshots to get the hang of it.
- File management: Keep your screenshots organized by renaming them or moving them to specific folders.
- Editing: Use basic image editors to crop or annotate your screenshots.
- Share easily: You can drag and drop your screenshots directly into emails or chat applications.
Where is the Print Screen key on my keyboard?
The Print Screen key is usually located on the top row of your keyboard, often near the F12 key.
Is there a way to capture only a part of the screen?
Yes, you can use the Snipping Tool or Snip & Sketch to select specific portions of your screen.
Why can’t I find my screenshots?
Screenshots taken with Windows + Print Screen are saved in the “Screenshots” folder inside the “Pictures” directory.
Can I use third-party software for screenshots?
Absolutely! There are many third-party tools like Lightshot and Greenshot that offer more features.
What if my Print Screen key isn’t working?
Make sure your keyboard is connected properly and that you don’t need to press a function key (like Fn) along with Print Screen.
Summary
- Step 1: Find the Print Screen Key
- Step 2: Press the Print Screen Key
- Step 3: Use Windows + Print Screen
- Step 4: Use Alt + Print Screen
- Step 5: Use the Snipping Tool or Snip & Sketch
Conclusion
And there you have it! You’ve learned the ins and outs of how to print screen in Windows 10. Whether you’re capturing the whole screen, just a single window, or a specific part, you now have the tools you need. Screenshots can be incredibly useful for a variety of reasons, from creating tutorials to saving important information.
Feel free to experiment with different methods and find what works best for you. If you enjoyed this guide and found it helpful, why not share it with friends who might also find it useful? Happy screenshotting!
Matthew Burleigh has been writing tech tutorials since 2008. His writing has appeared on dozens of different websites and been read over 50 million times.
After receiving his Bachelor’s and Master’s degrees in Computer Science he spent several years working in IT management for small businesses. However, he now works full time writing content online and creating websites.
His main writing topics include iPhones, Microsoft Office, Google Apps, Android, and Photoshop, but he has also written about many other tech topics as well.
Read his full bio here.
Featured guides and deals
