Ever wanted to show someone exactly what you are seeing on your computer screen, maybe to explain a problem, share a funny moment, or save some important info? Learning how to take a screenshot is your go-to skill for just that. It is super simple, usually involving just a key press or two, and it instantly captures an image of your entire display or a specific window. This image then goes into your computer’s temporary memory, called the clipboard, ready for you to paste it wherever you need it, such as an email, a document, or an image-editing program. Mastering this quick trick will save you time and make communication much clearer.
Tutorial – How to Print Screen Like a Pro
Capturing what is on your screen is a fundamental computer skill, and these steps will walk you through the most common methods for taking a screenshot and using it effectively. You will learn how to capture the entire screen, a single window, and even use a more advanced tool for precise selections.
Step 1: Locate your “Print Screen” key.
This special key is usually located on the top-right side of your keyboard, often labeled “PrtSc,” “PrtScn,” or “Print Screen.”
Sometimes, this key may share a function with another key, so you may need to hold down the “Fn” (Function) key, typically near your spacebar, while pressing the “Print Screen” key. Take a moment to scan your keyboard; it is a vital part of your everyday computing toolkit, even if you have never noticed it before.
Step 2: Press the “Print Screen” key to capture your entire screen.
Just a quick tap of this key, and poof, your computer takes a snapshot of everything currently visible on your monitors.
It is like taking a quick photo of your desktop with a digital camera, but instead of saving it to a file immediately, it is stored in a hidden buffer called the clipboard. You will not see any immediate confirmation or flash, which can sometimes make people wonder if it actually worked, but rest assured, it did.
Step 3: Use the “Alt + Print Screen” combination for a specific window.
If you only want to capture the active window you are currently working in, press and hold the “Alt” key, then press the “Print Screen” key.
This method is incredibly useful when you do not want to share your entire desktop, perhaps because you have other sensitive information open or simply want to focus on one particular application. It keeps your screenshot clean and relevant, making it perfect for troubleshooting specific program issues or highlighting content from a single application.
Step 4: For more control, use “Windows Key + Shift + S” to open the Snipping Tool.
This powerful shortcut brings up a small toolbar at the top of your screen, letting you select exactly what part of the screen you want to capture, whether it is a rectangle, a free-form shape, a window, or the entire screen.
The Snipping Tool, or “Snip & Sketch” as it is now often called in Windows, is a game-changer for precision. It lets you draw a box around the exact area you need, ensuring your screenshot is perfectly cropped and captures only what you need, giving you maximum control over your visual communication.
Step 5: Open an image editor or a document where you want to paste your screenshot.
This could be a program like Microsoft Paint, Paint 3D, or Adobe Photoshop; a word processor like Microsoft Word or Google Docs; or an email composition window.
Think of the clipboard as a temporary holding area, a kind of digital waiting room for your captured image. You need a destination for it, a place where it can finally be seen, edited, or saved. Any program that allows you to insert images will work perfectly as your destination.
Step 6: Paste your screenshot using “Ctrl + V.”
Once you have your destination program open, simply press and hold the “Ctrl” key, then tap the “V” key, and your captured image will appear.
This universal paste command works almost everywhere, making the process incredibly consistent across different applications. You can even paste it multiple times if you need copies in various places, highlighting the versatility of this simple keyboard shortcut.
After you complete these steps, the captured screen image will appear in the program you pasted it into. From there, you can edit it, add notes, save it as a file, or send it to someone. It is now a tangible digital asset that you can manipulate as needed.
Print Screen Tips
- Edit Your Screenshots: After pasting into an image editor like Paint, you can crop, resize, or add annotations like arrows and text to highlight specific areas before saving or sharing.
- Save in the Right Format: When saving your screenshot, choose a suitable file type. JPEG is great for smaller file sizes, while PNG offers higher quality and supports transparency, which can be useful.
- Automatic Saving on Windows: Press “Windows Key + Print Screen” to capture your entire screen and save it as a PNG file in the “Screenshots” folder within your Pictures library, without needing to paste it first.
- Capturing Menus: If you need to screenshot a menu that disappears when you click away, try using the “Windows Key + Shift + S” method, or in some cases, the “Print Screen” key might capture it before it vanishes.
- Third-Party Tools: While built-in methods are great, consider specialized screenshot tools like ShareX or Greenshot for advanced features, such as delayed captures, scrolling screenshots, and direct uploads to cloud services.
What is the clipboard?
The clipboard is a temporary storage area in your computer’s memory where information, like text or images, is held after you copy or cut it. When you press “Print Screen,” the image of your screen is copied to the clipboard, ready to paste elsewhere. Think of it as a digital tray that holds one item at a time, ready to be transferred.
Can I take a screenshot on a Mac?
Absolutely! While the keys are different, the concept is the same. On a Mac, “Command + Shift + 3” captures the entire screen, and “Command + Shift + 4” lets you select a specific area to capture. These screenshots are usually saved directly to your desktop.
What if my Print Screen key doesn’t seem to work?
First, check if your “Print Screen” key is combined with another function. You might need to hold down the “Fn” (Function) key while pressing “Print Screen.” Also, ensure you paste the image afterward, as there is often no visual confirmation that the capture succeeded. If problems persist, try restarting your computer or updating your keyboard drivers.
How do I share a screenshot after I take it?
Once you have pasted your screenshot into an email, a messaging app, or saved it as an image file, sharing it is just like sharing any other file or image. You can attach the file to an email, upload it to a cloud storage service, or send it directly through a chat application. It is all about getting that image from your computer to someone else’s.
Can I take a screenshot of a video or a moving image?
You can definitely “print screen” a single frame of a video or a GIF, but it will only capture that one static moment. It will not capture the motion or the entire video sequence. To capture video, you need dedicated screen-recording software that records a series of frames over time rather than a single snapshot.
Summary
- Locate “Print Screen” key.
- Press “Print Screen” for full screen.
- Use “Alt + Print Screen” for active window.
- Try “Windows Key + Shift + S” for specific area.
- Open image editor or document.
- Paste with “Ctrl + V.”
Conclusion
Mastering how to print screen is more than just a neat trick; it is an essential skill in today’s digital world. Whether you are troubleshooting a software glitch, saving a fleeting online resource, or simply sharing a screenshot with a friend, the ability to capture your screen quickly and efficiently is incredibly valuable. We have explored the straightforward methods, from snapping your entire desktop to isolating a single window, and even using the more refined Snipping Tool for precise captures. Remember that the invisible step after pressing the key, where your image silently goes to the clipboard, is crucial, and knowing where to paste it next is key to making your screenshot visible and useful.
Think about all the times you have tried to explain something complicated over the phone or in text. Could a simple picture have made it clearer? Absolutely. Screenshots bridge that communication gap, offering a visual explanation that words often cannot match. They are indispensable for creating tutorials, documenting processes, or even just keeping a visual record of your digital journey. Do not underestimate the power of this simple function. It is a tool that empowers you to communicate more effectively, save information instantly, and generally navigate your computer with greater confidence. So, go ahead, practice those shortcuts, experiment with Snipping Tool, and start integrating this powerful feature into your daily workflow. You will find yourself using it far more often than you ever imagined, making your digital life just a little bit easier, one captured screen at a time.

Matthew Burleigh has been writing tech tutorials since 2008. His writing has appeared on dozens of different websites and been read over 50 million times.
After receiving his Bachelor’s and Master’s degrees in Computer Science he spent several years working in IT management for small businesses. However, he now works full time writing content online and creating websites.
His main writing topics include iPhones, Microsoft Office, Google Apps, Android, and Photoshop, but he has also written about many other tech topics as well.
Read his full bio here.
JavaScript is not available.
We’ve detected that JavaScript is disabled in this browser. Please enable JavaScript or switch to a supported browser to continue using x.com. You can see a list of supported browsers in our Help Center.
Help Center

Dengan mengeklik Lanjutkan, Anda menyetujui Perjanjian Pengguna , Kebijakan Privasi , dan Kebijakan Cookie LinkedIn.
Kami telah mengirimkan link sekali pakai ke alamat email utama Anda
Klik link untuk login langsung ke akun LinkedIn Anda.
Jika Anda tidak menemukan email tersebut di kotak pesan, periksa folder spam.
Setuju & Bergabung dengan LinkedIn
Dengan mengeklik Lanjutkan, Anda menyetujui Perjanjian Pengguna , Kebijakan Privasi , dan Kebijakan Cookie LinkedIn.
Ever wondered how to snap a picture of what’s on your computer screen? It is actually super easy to do in Windows 10, and it is a trick everyone should know. Whether you want to share a funny meme, show a tech support person an error message, or save something important, taking a screenshot is a fundamental skill. Most of the time, you can just press the “Print Screen” key on your keyboard, then paste the image into a program like Paint or Word. It instantly copies your entire screen to a hidden spot called the clipboard, ready for you to use.
Tutorial – How to Print Screen in Windows 10
Let’s dive into the easiest and most common way to grab a picture of your computer screen. This method is like your go-to move for capturing anything you see, and it works with just a few simple presses and clicks. We are going to take a screenshot and then save it somewhere useful.
Step 1: Locate and press the Print Screen key
Find the “Print Screen” key on your keyboard, which is often labeled “PrtSc”, “PrntScrn”, or something similar, and then simply press it once.
This special key usually lives near the top-right of your keyboard, often close to the F12 or Scroll Lock key, so take a quick peek around that area. When you press it, your computer quietly takes a snapshot of everything visible on all your screens and stores it temporarily in your computer’s memory, also known as the clipboard. You will not see anything happen on your screen right away, but trust me, the picture is there, just waiting for its next move.
Step 2: Open an image editing program or document
Next, open an application where you can paste your captured image, such as Microsoft Paint, Word, or a new email message.
Think of the clipboard as a secret holding area, so to actually see and save your screenshot, you need to paste it somewhere. Programs like Paint, which are usually found by typing “Paint” into your Windows search bar, are perfect because they are simple and designed for images. You could also paste it into a document if you are compiling notes or into an email if you want to send it to someone right away.
Step 3: Paste your screenshot
Once your chosen program is open, paste the image by pressing “Ctrl + V” or right-clicking inside the program and selecting “Paste”.
Boom, just like magic, your screenshot will appear in the program you opened, showing exactly what was on your screen when you pressed the Print Screen key. If you have multiple monitors, it will capture everything across all of them into a single image. You can now see what you captured and get ready to save it or make changes.
Step 4: Save your screenshot
Finally, save your image by clicking “File” then “Save As”, choosing a location on your computer, giving it a name, and picking an image format like PNG or JPG.
Saving your screenshot is super important if you want to keep it for later, because if you close the program without saving, your hard work will vanish. PNG is usually a good choice because it preserves image quality, but JPG compresses files, which is handy for sharing online. Pick a memorable spot like your “Pictures” folder and give it a clear name so you can find it easily next time you need it.
After you complete these steps, your screen capture will be saved as an image file on your computer, ready for you to share, edit, or keep for your records. It is like having a digital camera for your screen, always ready to snap a shot.
Windows 10 Print Screen Tips
Here are some extra tricks and tips to make your screenshot game even stronger in Windows 10:
- If you only want to capture the active window you are working on, press “Alt + Print Screen” instead of just “Print Screen”. This saves you from having to crop out extra desktop space later.
- To automatically save your screenshot as a file without pasting, press “Windows Key + Print Screen”. You will see your screen dim briefly, and the image will be saved directly to your “Pictures” folder, inside a subfolder called “Screenshots”.
- For more specific screenshot needs, like capturing just a part of the screen, try the “Snipping Tool” or “Snip & Sketch” app. Just type its name into the Windows search bar, and these tools let you draw a box around what you want to capture.
- Remember that screenshots are stored on your clipboard temporarily. If you copy something else, your screenshot will be replaced, so make sure to paste and save it quickly if it is important.
- After pasting into an editor like Paint, you can use the editing tools to crop, draw on, or highlight parts of your screenshot before saving it. It is a great way to highlight specific points or remove private information.
Where do my screenshots go after I press the Print Screen key?
When you press just the Print Screen key, your screenshot does not automatically save to a file. Instead, it’s copied to your computer’s clipboard, which is a temporary storage area for copied items. You then need to paste it into an application, such as Paint, Word, or an email, to view and save it permanently.
How can I take a screenshot of only one window, not my entire screen?
To capture just the active window you are currently using, press the “Alt” key and the “Print Screen” key at the same time. This action copies only that specific window to your clipboard, ignoring everything else on your desktop or other monitors. It is a super handy shortcut for focused captures.
Can I edit a screenshot after I take it in Windows 10?
Absolutely, yes. Once you have pasted your screenshot into an image editing program like Paint, or if you use the Snip & Sketch tool, you can easily edit it. You can crop it to focus on a particular area, add text or arrows to highlight information, or even blur out sensitive details before saving and sharing.
What is the best way to save a screenshot for different uses?
The “best” way to save a screenshot depends on what you plan to do with it. For high-quality images that you might print or edit further, PNG format is usually excellent. If you need a smaller file size for emailing or posting online, JPEG is a good choice. Windows will typically offer these options when you go to “Save As” in an image editor.
My Print Screen key is not working, what could be wrong?
If your Print Screen key isn’t working, there are a few possibilities. Some laptops require you to hold down the “Fn” (Function) key along with the Print Screen key. Also, make sure no other software is running that might interfere with keyboard shortcuts. Sometimes, simply restarting your computer can fix minor glitches.
Quick Summary of Windows 10 Print Screen
- Press the Print Screen key.
- Open an image editor.
- Paste the screenshot.
- Save your image.
Final Thoughts on Capturing Your Screen
Mastering the art of capturing your screen in Windows 10 is truly a game-changer for anyone who spends time on a computer. Think about it, how many times have you needed to show someone exactly what you are seeing, whether it is for a tech support issue, to highlight a piece of information, or simply to share a funny moment? Screenshots are like a visual diary of your digital life, letting you freeze-frame any moment on your desktop.
The beauty of Windows 10 is that it gives you multiple, incredibly straightforward ways to accomplish this. From the classic “Print Screen” key that copies your entire display to the clipboard, waiting for you to paste it into your favorite editor, to the “Windows Key + Print Screen” combo that instantly saves a file for you, there is a method for every scenario. And let’s not forget about the Snipping Tool or Snip & Sketch, which offer even more precision, letting you draw a box around just the part of the screen you want to keep. These tools are like having a Swiss Army knife for your screen, ready for any job.
Do not be afraid to experiment with these different methods. Try them all out, see which one feels most natural to you, and then practice a bit. You will find that taking screenshots becomes second nature, a quick reflex that saves you time and simplifies communication. Imagine explaining a complex software bug with just a few words versus sending a crystal-clear image that shows the problem exactly as you see it. The image wins every time, does it not?
So, whether you are a student, a professional, a gamer, or just someone who uses a computer daily, understanding how to print screen in Windows 10 is an invaluable skill. It empowers you to document, share, and troubleshoot with ease, making your digital interactions much smoother and more efficient. Go ahead, give these methods a try, and unlock a new level of control over your digital world. You will wonder how you ever managed without them.
Matthew Burleigh has been writing tech tutorials since 2008. His writing has appeared on dozens of different websites and been read over 50 million times.
After receiving his Bachelor’s and Master’s degrees in Computer Science he spent several years working in IT management for small businesses. However, he now works full time writing content online and creating websites.
His main writing topics include iPhones, Microsoft Office, Google Apps, Android, and Photoshop, but he has also written about many other tech topics as well.
Read his full bio here.
Featured guides and deals
Ever needed to show someone exactly what you’re seeing on your computer screen? Taking a screenshot, or “print screen,” in Windows 11 is incredibly straightforward, giving you several handy options to capture whatever you need. You can quickly snap a picture of your entire screen by pressing the Print Screen key, and grab a specific section using Windows key + Shift + S , or even open a dedicated tool for more control. Once captured, these images are saved to your clipboard, ready for you to paste them into any document, email, or image editor, making sharing information a snap.
How To Take a Print Screen In Windows 11
Alright, let’s get down to business and walk through the different ways you can capture your screen in Windows 11. These methods will help you grab full-screen images, specific windows, or even custom sections, giving you total control over what you share.
Step 1: Use the Print Screen key for a full-screen capture.
This is the classic method, a real old-school move, for taking a picture of everything visible on all your monitors.
When you press the PrtScn key, often found near the top right of your keyboard, Windows 11 immediately takes a snapshot of your entire display. It doesn’t seem like anything happens right away, but trust me, the image is now quietly sitting in your computer’s temporary memory, known as the clipboard. This means you can now paste the image into any application, such as Paint, Word, or even an email. It’s super quick for those “I need everything” moments.
Step 2: Use Windows key + Print Screen to trigger an automatic save.
Want to capture your entire screen and save it as an image file with no extra steps? This combo is your best friend.
Pressing the Windows logo key (that’s the one with four squares) and the PrtScn key at the same time will not only capture your entire screen to the clipboard, just like in Step 1, but it will also automatically save it as an image file. You’ll notice your screen briefly dims, confirming the capture. This is incredibly useful when you’re taking multiple screenshots and don’t want to manually paste each one into an editor.
Step 3: Use the Windows key + Shift + S for a custom snip.
This is probably my favorite method, giving you the power to select exactly what part of your screen you want to capture, no more, no less.
When you hit Windows key + Shift + S , your screen will dim, and a small toolbar will appear at the top. This toolbar offers four snipping modes: rectangular, free-form, window, and full-screen. You can then click and drag your mouse to outline the specific area you want to capture, making it perfect for focusing on details without including unnecessary background clutter. It’s like having a digital pair of scissors for your screen.
Step 4: Use the Snipping Tool for advanced options.
For those times when you need a bit more control, maybe a delay before the screenshot, or some basic editing right away, the Snipping Tool is your go-to application.
You can launch the Snipping Tool by searching for it in the Windows search bar, or by simply pressing the PrtScn key by itself if you’ve configured it that way in your Windows settings (we’ll cover that later). Once open, the Snipping Tool gives you options for new snips, different modes (rectangular, free-form, window, full-screen), and even a delay feature, which is super handy if you need to set something up on screen before capturing it. After taking a snip, the tool opens the image for quick annotations, saving, or sharing.
After you complete any of these actions, the captured image is placed on your clipboard or automatically saved as a file, ready for you to use. You can then paste it into an image editor like Paint, a document like Word, or directly into an email or messaging app to share your visual information.
Tips For Taking Pa rint Screen In Windows 11
- Configure your Print Screen key: You can set your PrtScn key to open the Snipping Tool directly instead of just copying the screen to the clipboard. Go to Settings > Accessibility > Keyboard and toggle “Use the Print Screen button to open screen snipping.”
- Access past snips: Windows 11 keeps a history of your clipboard. Press Windows key + V to open the Clipboard History and easily select previous screenshots you’ve taken, which is a lifesaver if you forget to paste something right away.
- Edit right after capture: When using Windows key + Shift + S , a small notification will pop up in the bottom right corner of your screen. Clicking this notification will open the captured snip in the Snipping Tool for quick editing, like cropping, highlighting, or drawing, before you save or share it.
- Capture a single active window: To capture just the currently active window, rather than the entire screen, press Alt + PrtScn . This will copy only that window to your clipboard, leaving out all other open applications and your desktop background.
- Save screenshots automatically: If you consistently use Windows key + PrtScn , remember that your screenshots are saved in your Pictures folder, specifically in a subfolder named “Screenshots.” This makes it easy to find and manage all your automatically saved captures.
Where do my screenshots go after I take them?
Most screenshots taken with PrtScn or Alt + PrtScn go to your clipboard, which is a temporary storage area. You’ll need to paste them into an application like Paint or Word to save them permanently. If you use Windows key + PrtScn , they automatically save as image files in your “Pictures” folder, inside a “Screenshots” subfolder. The Snipping Tool also lets you save the image after you’ve taken it.
Can I take a screenshot of only one monitor if I have multiple displays?
Yes, absolutely. If you use the Windows key + PrtScn method, it will capture all your connected displays. However, if you want a specific monitor, the best approach is to use Windows key + Shift + S and then use the rectangular snip mode to draw a box around the monitor you want to capture. Alternatively, you can make the window you want to capture active on that specific monitor and then use Alt + PrtScn to capture just that active window.
What if my Print Screen key doesn’t seem to work?
First, check your keyboard layout to ensure the key is correctly identified. Sometimes, on laptops, the PrtScn key might be a secondary function, meaning you need to press the Fn key (Function key) simultaneously with PrtScn . If that doesn’t help, ensure your keyboard drivers are up to date. As a last resort, using the Windows key + Shift + S shortcut will always work, as it doesn’t rely solely on the physical PrtScn key.
Can I draw or annotate on my screenshots immediately?
Yes, you can! When you use the Windows key + Shift + S In shortcut, a small notification will appear in the bottom-right corner of your screen immediately after you take the snip. If you click on this notification, it will open your captured image in the Snipping Tool’s editing interface. Here, you’ll find basic annotation tools like a pen, highlighter, and eraser, which are perfect for quickly marking up your screenshot before saving or sharing it.
Is there a way to record my screen instead of just taking a picture?
While this article focuses on static screenshots, Windows 11 does offer built-in screen recording capabilities. You can use the Xbox Game Bar, which you can open by pressing Windows key + G . Within the Game Bar, there’s a “Capture” widget that lets you record your screen, which is super useful for tutorials, gameplay, or demonstrating processes that involve motion. It’s a different beast, but equally powerful for visual communication.
Summary
- Press Print Screen for full-screen capture to the clipboard.
- Press Windows key + Print Screen to save full screen automatically.
- Press Windows key + Shift + S for custom snips.
- Use the Snipping Tool for advanced capture options.
Conclusion
Mastering the art of the screenshot in Windows 11 is more than just a neat trick; it’s an essential skill in today’s digital world. Think of it like having a superpower to instantly share visual information, making communication clearer, faster, and much more effective. Whether you’re trying to show a developer a bug, illustrate a step in a tutorial for a friend, or simply save a memorable moment from your screen, knowing your way around these print screen methods can save you a ton of time and frustration.
We’ve covered a few fantastic ways to capture your screen, from the trusty old Print Screen key that grabs everything in sight, to the precision of Windows key + Shift + S that lets you draw exactly what you want. And let’s not forget the versatile Snipping Tool, a Swiss Army knife for screenshots, with delay options, various modes, and even a quick way to mark up your images. These tools are built right into Windows 11, meaning you don’t need any extra software to get started.
The beauty of these methods lies in their simplicity and immediate utility. Once you take that snapshot, it’s either sitting on your clipboard, ready for a quick paste, or neatly filed away in your Pictures folder for later use. This seamless integration ensures your workflow isn’t interrupted, allowing you to focus on what matters most. So go ahead, experiment with these shortcuts, find the one that best fits your needs, and transform the way you communicate visually. Really, the power to perfectly capture what’s on your screen, precisely How To Take Print Screen In Windows 11 , is now firmly in your hands, ready for whatever digital challenge comes your way. Keep practicing, and you’ll be a screenshot wizard in no time, making your digital life a whole lot easier and more visual.
Matthew Burleigh has been writing tech tutorials since 2008. His writing has appeared on dozens of different websites and been read over 50 million times.
After receiving his Bachelor’s and Master’s degrees in Computer Science he spent several years working in IT management for small businesses. However, he now works full time writing content online and creating websites.
His main writing topics include iPhones, Microsoft Office, Google Apps, Android, and Photoshop, but he has also written about many other tech topics as well.
Read his full bio here.
Featured guides and deals
Ever needed to quickly grab a picture of something on your computer screen? Maybe you saw a hilarious meme, a crucial error message, or a cool game moment you wanted to share. Taking a screenshot, or “printing the screen,” is super easy in Windows 11, and knowing how to do it opens up a world of possibilities for sharing and saving visual information. You don’t need any fancy software, just a few simple key presses or clicks. By the time you’re done reading this, you’ll be a screen-capturing wizard, ready to snag anything that appears on your monitor with multiple handy methods.
How To Print Screen In Windows 11: A Step-by-Step Tutorial
This section will walk you through the most popular and effective ways to capture your screen in Windows 11, ensuring you can pick the best method for whatever you’re trying to achieve. Whether you need a quick full-screen grab or a precise crop, we’ve got you covered.
Step 1: Use the Print Screen Key for a Full Screen Shot
Find the “PrtSc” or “Print Screen” key on your keyboard, usually located near the top right, and press it once.
This action takes a picture of your entire screen and copies it directly to your computer’s clipboard. Think of the clipboard as a temporary storage area, like a digital notepad, where information waits to be pasted somewhere else. You won’t see any immediate confirmation that something happened, but trust me, it’s there.
Step 2: Paste Your Screenshot into an Application
Open an application like Paint, Word, or even an email client, and press Ctrl + V to paste your screenshot.
Since the image is on your clipboard, you need a place to put it down. Programs like Paint, Paint 3D, or even image editing software are perfect for this, but you can also paste it directly into a document or a messaging app. Once pasted, you can then save the image as a file, edit it, or share it as needed.
Step 3: Use the Windows Key + Print Screen for Auto-Saving
Press the Windows key (the one with the four squares) and the PrtSc key at the same time.
This combination is a real time-saver because it does two things at once: it captures your entire screen and automatically saves the image as a file. You’ll usually see your screen briefly dim or flash, which is your visual cue that the capture was successful.
Step 4: Find Your Auto-Saved Screenshot
Navigate to the “Pictures” folder, then open the “Screenshots” subfolder to find your image.
Windows 11 is smart enough to create a dedicated folder for these auto-saved screenshots, making them super easy to find later. Each screenshot will be named with “Screenshot” followed by a number, so you can easily keep track of them.
Step 5: Use Alt + Print Screen for the Active Window
Click on the window you want to capture to make it active, then press Alt + PrtSc.
This is a handy trick when you don’t want to capture your entire screen, but just one specific program or window that you’re currently working in. Like the basic PrtSc key, this action copies the image of only that active window to your clipboard, ready for you to paste it elsewhere.
Step 6: Use the Snipping Tool for Custom Captures
Press Windows key + Shift + S to open the Snipping Tool overlay. The Snipping Tool is incredibly versatile, letting you select exactly what part of the screen you want to capture. When you press this key combination, your screen will dim, and a small toolbar will appear at the top, offering different snip shapes.
Step 7: Select Your Snipping Tool Capture Type
Choose from rectangular, freeform, window, or full-screen snip options from the toolbar. You can draw a rectangle around an area, sketch a custom shape, capture a specific window, or still take a full-screen shot. After you make your selection, the captured image will immediately go to your clipboard, and a notification will pop up in the corner of your screen.
After you complete any of these actions, a digital image of your screen, or a portion of it, will be ready for use. Depending on the method you chose, it will either be saved as a file on your computer or copied to your clipboard, patiently waiting for you to paste it into another application, document, or email.
Windows 11 Print Screen Tips and Tricks
Here are some extra nuggets of wisdom to make your screen-capturing experience even better:
- Edit Your Snips Quickly: After using the Snipping Tool (Windows key + Shift + S), click the notification that appears in the bottom right corner of your screen. This will open the Snip & Sketch app, where you can crop, annotate, or highlight parts of your screenshot before saving or sharing it.
- Access Old Screenshots: If you’re looking for a screenshot you took with the Windows key + PrtSc method, remember it’s always in your “Pictures” folder, inside the “Screenshots” subfolder. It’s a lifesaver when you forget to paste something right away.
- Utilize the Game Bar: For gamers or anyone needing to capture a moment in an active application, press Windows key + G to open the Xbox Game Bar. You’ll see a capture widget with a camera icon to take screenshots, which are saved in your “Videos” folder, under “Captures.”
- Customize Snipping Tool Settings: Search for “Snipping Tool” in your Windows search bar and open the app. Within its settings, you can adjust things like automatically saving snips, adding a border to your captures, or even setting a delay for your snips, giving you a few seconds to set up the perfect shot.
- Consider Third-Party Tools: While Windows 11 offers robust built-in options, many free and paid third-party screenshot tools exist, like ShareX or Lightshot, that offer even more advanced features, such as cloud uploads, scrolling screenshots, and custom hotkeys. They can be great if you need more power.
Common Questions About Printing Screens in Windows 11
What if my Print Screen key doesn’t seem to work?
Sometimes, the Print Screen key needs to be used with the Function (Fn) key, especially on laptops. Try pressing Fn + PrtSc together. Also, ensure you’re trying to paste the screenshot into an application afterward, as the basic PrtSc key just copies to the clipboard without any visual confirmation.
Where do I find my screenshots if they auto-save?
When you use the Windows key + PrtSc combination, your screenshots are automatically saved as image files. You can find them by opening File Explorer, going to your “Pictures” folder, and then looking inside the “Screenshots” subfolder. They’ll be named sequentially, like “Screenshot (1).png,” “Screenshot (2).png,” and so on.
Can I capture only a small part of my screen instead of the whole thing?
Absolutely! The best way to capture a specific area is by using the Snipping Tool. Just press Windows key + Shift + S. Your screen will dim, and you can then click and drag your mouse to select the exact portion of the screen you want to capture.
Is there a way to quickly edit my screenshot right after I take it?
Yes, if you use the Windows key + Shift + S method for the Snipping Tool, a notification will appear in the bottom right corner of your screen shortly after you take the snip. Click on this notification, and it will open the Snip & Sketch app, where you can immediately crop, draw, highlight, or add text to your screenshot before saving or sharing it.
Do I need internet access to take a screenshot in Windows 11?
No, you do not need an internet connection to take screenshots using any of the built-in Windows 11 methods. All these features work offline, as they are part of your operating system. You only need internet if you plan to share the screenshot online or use a cloud-based third-party tool that requires connectivity.
Quick Summary of Printing Your Screen
- Press PrtSc key.
- Paste into an app.
- Press Windows key + PrtSc.
- Find in Pictures > Screenshots.
- Click window, press Alt + PrtSc.
- Press Windows key + Shift + S for Snipping Tool.
- Select desired capture type.
Wrapping Up Your Screen Capture Journey
Well, there you have it, folks! You’ve just unlocked a super powerful and often overlooked feature of your Windows 11 computer: the ability to take screenshots. Whether you’re a student trying to grab a slide from a lecture, a professional needing to document a software bug, or just someone who loves sharing funny moments, knowing how to print screen in Windows 11 is an invaluable skill. We’ve explored everything from the lightning-fast full-screen capture with the PrtSc key to the surgical precision of the Snipping Tool, and even touched on auto-saving and active window capturing.
Remember, practice makes perfect. Try out each of these methods a few times to see which one feels most natural for you and your specific needs. Don’t be shy about experimenting with the Snipping Tool’s different modes or checking out the handy editing features in Snip & Sketch. These tools are designed to make your digital life easier and more productive. You’re no longer limited to describing what you see on your screen; you can now show it with crystal-clear images, ready to be saved, shared, or annotated. So go forth, capture those moments, document those errors, and share those triumphs. Your Windows 11 machine is now an even more powerful canvas for your digital adventures!
Matthew Burleigh has been writing tech tutorials since 2008. His writing has appeared on dozens of different websites and been read over 50 million times.
After receiving his Bachelor’s and Master’s degrees in Computer Science he spent several years working in IT management for small businesses. However, he now works full time writing content online and creating websites.
His main writing topics include iPhones, Microsoft Office, Google Apps, Android, and Photoshop, but he has also written about many other tech topics as well.
Read his full bio here.
When smartphones first started to gain popularity, the prospect of printing something from them seemed like a pipe dream. Printers were already hard enough to deal with on a computer, and it seemed unlikely that it could work on a phone.
But the Google Docs app started adding new features like the ability to add small numbers in Google Docs , and it became apparent that the app was going to gain most of its desktop counterpart’s functionality.
Now we are also able to print from Google Docs on our iPhone or Android device, and it’s surprisingly accessible.
Most modern printers have some sort of network compatibility, meaning that devices on the same network as the printer can use that printer if they have that capability.
Mobile phones, but those that use the iOS and Android operating systems, are now able to print wirelessly to printers that support it. Plus, most of the apps that you would want to print from, such as creative apps and productivity apps, will usually support some type of printing functionality in addition to the other features they offer, like file sharing .
Our guide below will show you how to print through the Google Docs app on your iPhone or Android phone, plus we will address some of the common issues that might arise if you can’t make it work.
How to Print from the Google Docs Mobile App
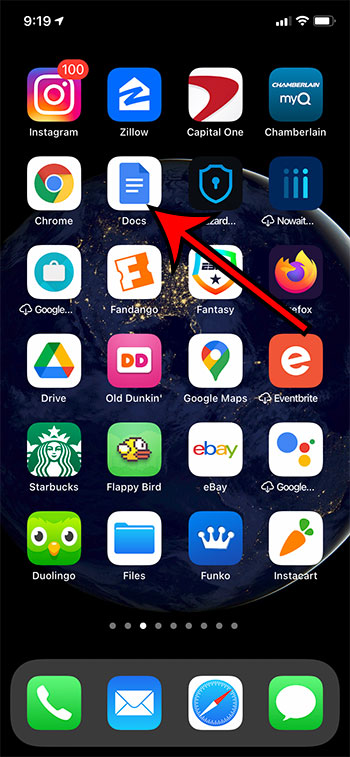
- Open Docs.
- Choose a document.
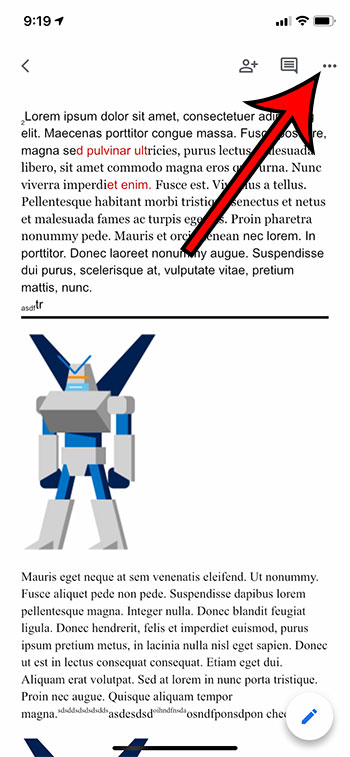
- Tap the three dots.
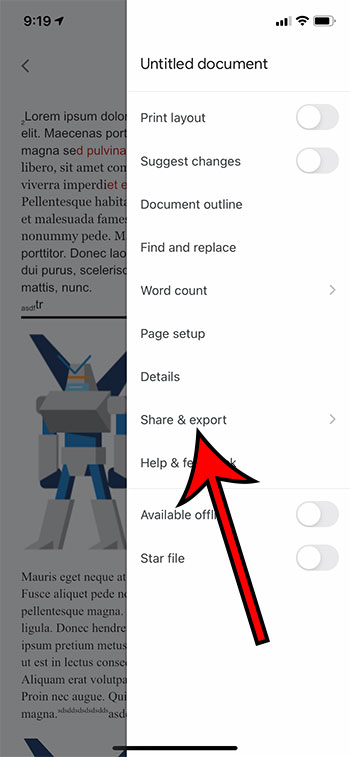
- Select Share & export .
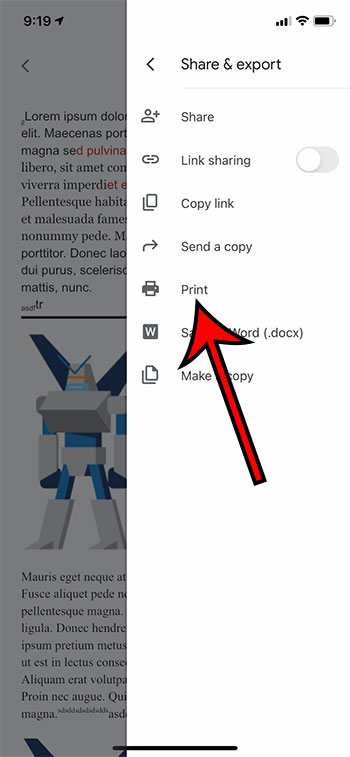
- Choose Print .
- Touch Select Printer .
- Chose a printer.
- Tap Print .
Our guide continues below with additional information on printing from the Google Docs app, including pictures of these steps.
How to Print from Google Docs on an iPhone (Guide with Pictures)
The steps in this section were performed on an iPhone 11 in iOS 14.6. These steps will also work on other iPhone models using this same version of iOS, as well as in most other versions of iOS. I am using the most current version of the Google Docs app that was available at the time this article was written.
Step 1: Open theDocsapp on your iPhone.
Step 2: Select the document that you want to print.
Step 3: Touch the three dots at the top-right of the screen.
Step 4: Select theShare & exportoption.
Step 5: ChoosePrint.
Step 6: Tap theSelect Printeroption.
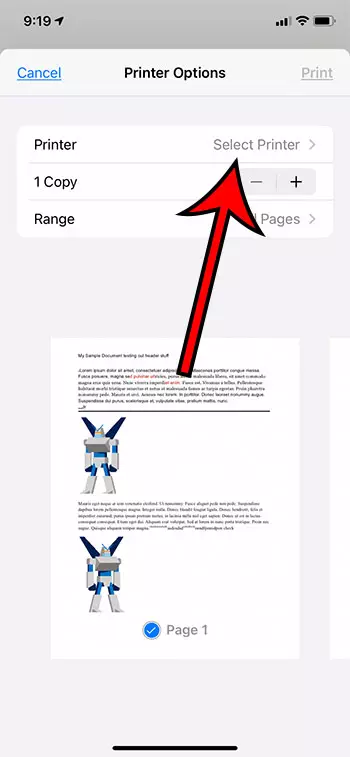
Step 7: Choose your printer.
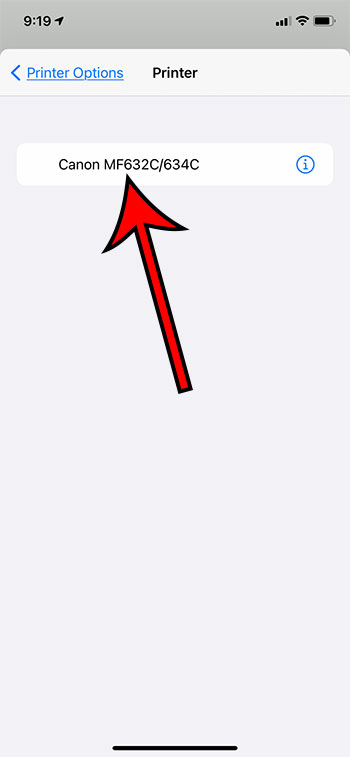
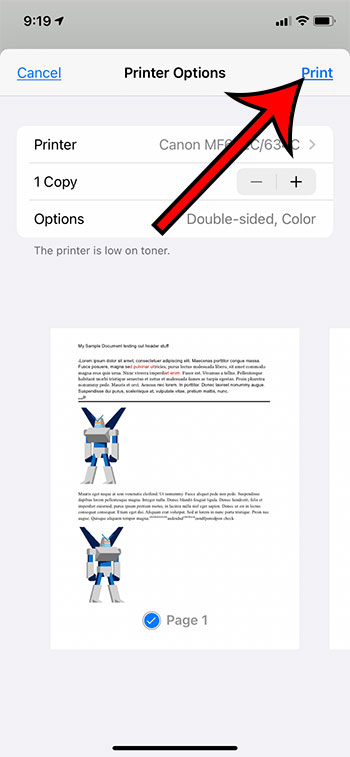
Step 8: TapPrintat the top-right corner of the screen.
Our article continues below with information on how to print from your Android device.
How to Print from Google Docs on Android (Guide with Pictures)
The steps in this section were performed on a Google Pixel 4A, using Android 11. I am using the most current version of the Docs app that was available when I wrote this article.
Step 1: Swipe up from the center of the screen.
Step 2: Touch theDocsicon.
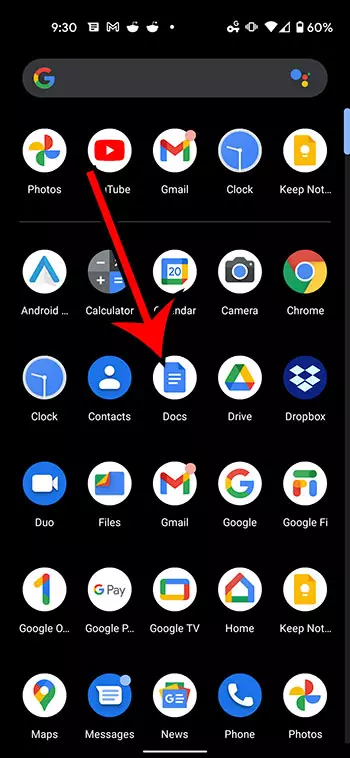
Step 3: Choose the document from your Google Drive that you want to print.
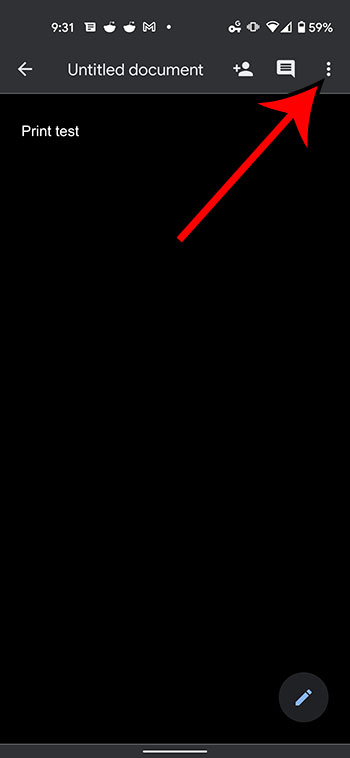
Step 4: Tap the three vertical dots at the top of the screen.
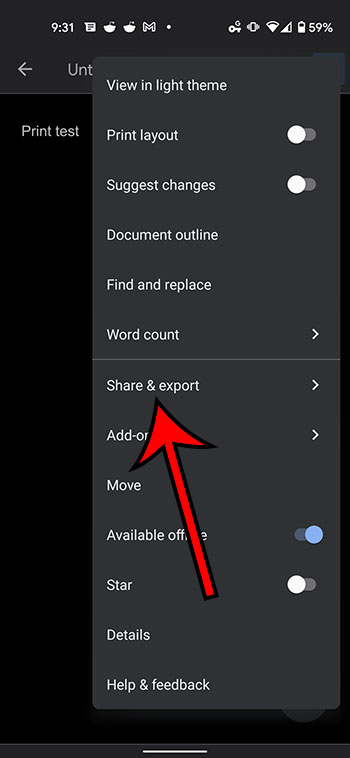
Step 5: Select theShare & exportoption from the menu on the right side of the screen.
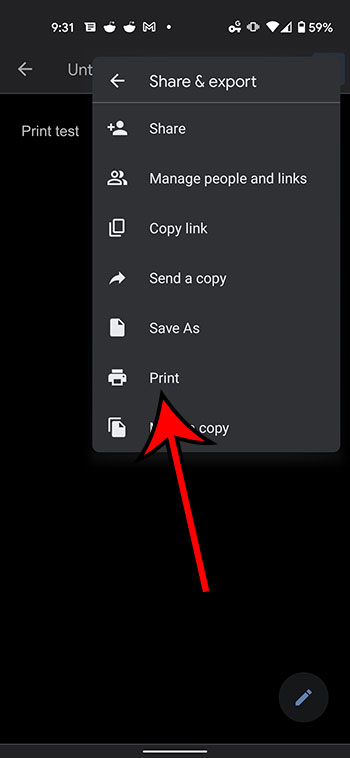
Step 6: ChosePrintfrom the list of sharing options.
Step 7: Touch theSelect a printerdropdown at the top of the screen.
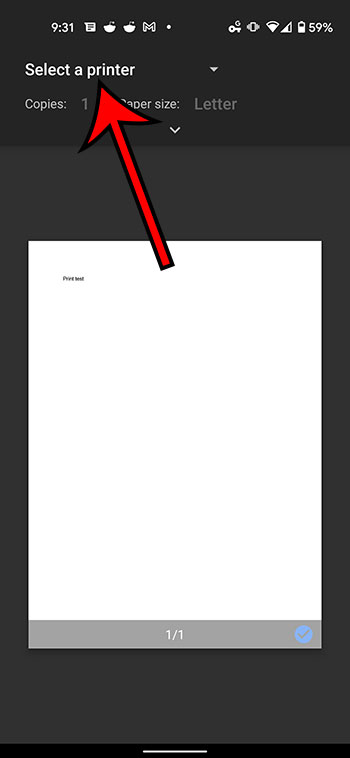
Step 8: Select the desired printer from the list of printing options.
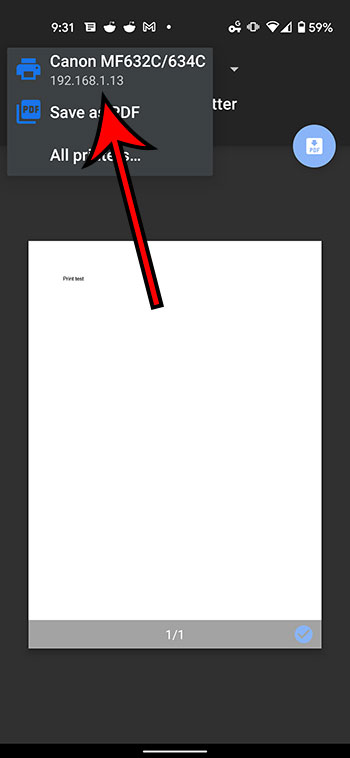
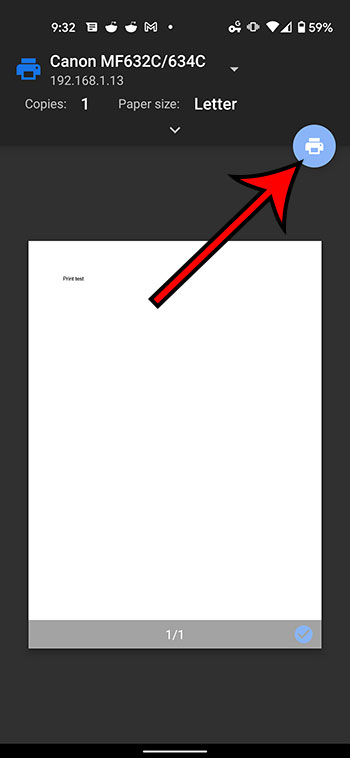
Step 9: Tap thePrinticon.
Our article continues below with additional information on printing from Google Docs.
Why Isn’t My Printer Listed?
Trying to resolve printing issues can be a tricky prospect, as printers are notoriously difficult to work with. When you combine this with the fact that you are printing from a mobile device, then there is a strong possibility that something isn’t going to work properly.
The first thing to check when you are trying to print is that your mobile device is connected to the same wireless network as the printer. If your iPhone or Android device is not on Wi-Fi, then you probably won’t see your printer.
A second consideration is that the printer may not be turned on. Many modern printers will turn off if they haven’t been used in a while. If you don’t see the printer but know that it should be there, try power cycling the printer (turning it off and on again) then wait a few minutes to see if it shows up in your mobile device’s printer list.
One final option to check is whether or not the printer is AirPrint compatible. Since you aren’t able to install print drivers on your mobile device, your printer will use a feature called AirPrint so that it can communicate with your phone. However, not all printers have this feature. Additionally, not all printers are network compatible. If your printer isn’t connected to your local network, either wirelessly or via an ethernet cable, then you probably won’t be able to communicate with the printer through your smartphone.
What is Google Cloud Print
There is a feature that is available as part of your Google Account that is called Google Cloud Print. If you have installed the Chrome browser on your computer and have added it as a printer that is available through Cloud Print, then this gives you some additional printing options.
After you select the Print option from the Share & export menu, you will see Google Cloud Print option listed there as well. If you choose that option you can follow the instructions on screen to select a printer and send it there. This means that you can even print Google Docs files on a printer that is in a completely different location.
How to Print from Google Docs on a Laptop or Desktop Computer
Printing a Google Docs document from your computer via a Web browser is a similar process to printing other documents. I am going to perform the steps below using the Chrome browser, but you can also use another browser like Firefox, Edge, or Safari.
Step 1: Navigate to https://docs.google.com and open the Google Docs file that you would like to print.
Step 2: Select File at the top-left of the window.
Step 3: Choose the Print option at the bottom of the menu.
Step 4: Adjust the print settings as needed, then click the blue Print button.
More Information on How to Print from Google Docs on iPhone or Android
The number of options that you can adjust when printing from your iPhone or Android device is pretty large.
When you have the Printer options menu open on your iPhone you will be able to specify the number of copies that you want to print, as well as the range, whether or not to print double-sided, and whether you want to print in black and white or color. Other document settings can be changed through the Page setup menu that is accessible from the menu where you selected the Share & export option.
The number of printing options on Android is greater, although you might initially have trouble locating them. After you choose the Print option from the Share & export menu, then select your printer, there will be a small downward-facing arrow in the top section. If you tap that arrow you will have these options:
- Copies
- Paper size
- Color
- Orientation
- Two-sided
- Pages
- More options
If you choose more options then you will be given the option to install additional device services, or to manage existing services.
While this article is focused specifically on printing from mobile phones, the same steps will work to print documents on an iPhone or iPad, as the Docs app and the printing process is similar for both of those iOS devices.
Additional Sources
Matthew Burleigh has been writing tech tutorials since 2008. His writing has appeared on dozens of different websites and been read over 50 million times.
After receiving his Bachelor’s and Master’s degrees in Computer Science he spent several years working in IT management for small businesses. However, he now works full time writing content online and creating websites.
His main writing topics include iPhones, Microsoft Office, Google Apps, Android, and Photoshop, but he has also written about many other tech topics as well.
Read his full bio here.
Featured guides and deals
Print areas in Microsoft Excel are a good solution when you need to print some of the data in a file, but not all of it. But occasionally a print area has been set and is no longer correct. Fortunately, you can use a similar process to remove a print area from your Excel spreadsheet if you don’t need it anymore.
Microsoft Excel 2010 allows you to customize most aspects of your spreadsheet, including the way that it prints. If you had previously set the print area for a document, then you know that you can force Excel to print out an area of cells that you have specified, regardless of whether there is information in those cells, or if there is additional information on the spreadsheet.
Unfortunately, while the print area is set, that is the only range of cells that you will be able to print. So if you need to learn how to clear the print area in Excel 2010 because the designated print area is either no longer accurate, or because you want to print a different area of your spreadsheet, then you can follow the instructions below.
How to Clear Print Area – Excel 2010
- Open your Excel file.
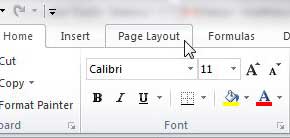
- Select the Page Layout tab at the top of the window.
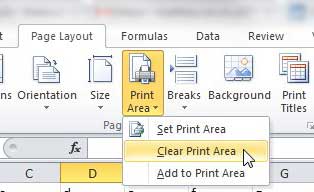
- Click the Print Area button.
- Choose the Clear Print Area option.
Our article continues below with additional information on clearing the print area in Excel, including pictures of these steps.
How to Stop Excel 2010 From Printing a Specified Print Area (Guide with Pictures)
Designating a print area in Excel 2010 is very helpful when you have a large spreadsheet and only periodically need to print a specific part of it. You do not need to remember to change your printer settings whenever you create a copy of the spreadsheet, and you can configure all of your page layout settings so that the spreadsheet prints to fit on a set number of pages. But when that print area changes and you need to remove the settings, you can clear the print area in Excel 2010.
Step 1: Open the Excel document with the set print area that you want to clear.
Step 2: Click thePage Layouttab at the top of the window.
Step 3: Click thePrint Areadrop-down menu in thePage Setupsection of the ribbon at the top of the window, then choose theClear Print Areaoption.
Note that after you clear the print area for your worksheet, all of the data on that sheet is going to print the next time you click the Print button. Often a worksheet that had a set print area is going to have some formatting options set which took that print area into consideration.
More Information on How to Clear the Print Area in Excel
After clearing the print area it’s a good idea to check the Print Preview before you click the Print button. This can save a lot of wasted paper, especially if you are dealing with a very large spreadsheet.
If you want to print your spreadsheet and ignore a print area this one time, while still leaving it intact for future printings you can also choose the Ignore Print Area option on the Print menu.
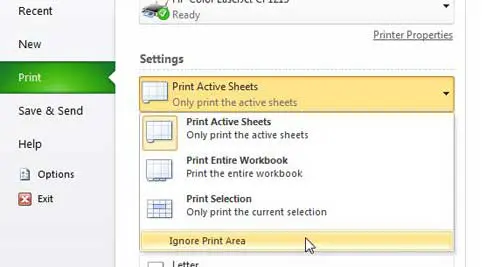
You can find this setting by clicking the File tab, clicking Print , clicking the Print Active Sheets drop-down menu, then choosing Ignore Print Area .
You can set a print area if you highlight the cells that you want to print, go the Page Setup group, click Print Area , then choose the Set Print Area option.
Additionally, if you would like to add more cells to an existing print area you can do so by choosing those cells, selecting the Page Layout tab, then clicking the Print Area button and selecting the Add to Print Area button.
You can have multiple print areas in Excel. However, if you do have multiple print areas and they aren’t connected to one another, they will print on separate pages. Creating multiple print areas is possible by either adding a selection of cells to an existing print area, or making a selection of cells, then holding down the Ctrl key before choosing another selection of cells. Once both print areas are selected you go to the Page Layout tab, go to the Page Setup group, click Print Area, then Set Print Area.
When you save the workbook in Excel, any defined print areas will be saved as well. However, print areas only apply to a worksheet, not an entire workbook. Therefore, if you go to print the entire workbook Excel will print only the print area on your worksheet, but will print the rest of the worksheets in their entirety, assuming that there are no print areas on those other sheets.
Conclusion
As we outlined above, you can clear a print area in Excel by going to Page Layout > Print Area > Clear Print Area . When there is no range of cells that is specified as a print area, Excel will print the entire worksheet.
After you have cleared a print area in Excel you can always choose to set a new area if you select the cells to include in the print area, then go to Page Layout > Print Area > Set Print Area .
- How to subtract in Excel
- How to sort by date in Excel
- How to center a worksheet in Excel
- How to select non-adjacent cells in Excel
- How to unhide a hidden workbook in Excel
- How to make Excel vertical text
Matthew Burleigh has been writing tech tutorials since 2008. His writing has appeared on dozens of different websites and been read over 50 million times.
After receiving his Bachelor’s and Master’s degrees in Computer Science he spent several years working in IT management for small businesses. However, he now works full time writing content online and creating websites.
His main writing topics include iPhones, Microsoft Office, Google Apps, Android, and Photoshop, but he has also written about many other tech topics as well.
Read his full bio here.
