Printing to PDF on an iPad is quite simple. You can do it directly from most apps by using the share or print options, which then allow you to save your document as a PDF. This is handy for archiving documents or sharing them in a universally readable format.
How to Print to PDF on iPad
The steps below will guide you on converting any document or webpage to a PDF file using your iPad. Whether you’re using Safari, Mail, or any other app with a print function, these steps will help you save your files as PDFs quickly and easily.
Step 1: Open the Document or Webpage
First, launch the app containing the document or webpage you want to convert to PDF.
For example, if you’re trying to convert a webpage, open Safari and navigate to that page. If it’s an email, open the Mail app and select the email.
Step 2: Access the Share Menu
Next, tap the Share button, usually represented by a square with an upward arrow.
This will open a menu with various sharing options. Don’t worry if it looks overwhelming; you’ll only use one or two of these options for this task.
Step 3: Choose Print
From the Share menu, scroll down and select the Print option.
This may seem odd because you’re not actually printing anything on paper. However, this step is crucial to accessing the PDF creation feature.
Step 4: Pinch Out on the Print Preview
Once the print preview opens, use a two-finger pinch-out gesture on the preview image of your document.
This gesture will expand the preview into a full-screen PDF view, enabling you to see the entire document as a PDF.
Step 5: Share or Save the PDF
Finally, tap the Share button again in the top right corner of the PDF view, and choose how you want to save or share the PDF.
You can save it to Files, send it via email, or even add it to a cloud storage service like iCloud or Dropbox.
After completing these steps, you’ll have a PDF version of your document or webpage saved on your iPad, ready to share or archive as needed.
Tips for Printing to PDF on iPad
- Check Compatibility: Ensure the app you’re using supports the Share or Print feature.
- File Management: Save your PDFs in a well-organized folder for easy access later.
- Use Cloud Storage: Utilize cloud services like iCloud or Dropbox for seamless file sharing and backup.
- Annotate PDFs: Use apps like Adobe Acrobat or Apple’s Markup tool to annotate your PDFs.
- Regular Updates: Keep your iPad and apps updated to avoid compatibility issues with the print-to-PDF feature.
Can I print to PDF from any app on my iPad?
Most apps that support printing should allow you to print to PDF, but some may not. Always check the Share or Print menu to see if the option is available.
Do I need any special apps to print to PDF?
No, the built-in iOS functions allow you to print to PDF without needing third-party apps.
Can I edit the PDF after creating it?
Yes, you can use apps like Adobe Acrobat Reader or Apple’s Markup tool to annotate or edit your PDF.
Where do I find my saved PDFs?
You can find saved PDFs in the Files app under the location you chose to save them, such as iCloud Drive or On My iPad.
Is the quality of the PDF good?
Yes, the quality of the PDF is generally excellent and retains the formatting of the original document.
Summary
- Open the document or webpage.
- Access the Share menu.
- Choose Print.
- Pinch out on the print preview.
- Share or save the PDF.
Conclusion
Printing to PDF on an iPad is a straightforward process that can be accomplished in just a few taps. This feature is incredibly useful for converting emails, web pages, and documents into a portable, universally readable format. Whether you’re a student wanting to save notes, a professional needing to archive emails, or someone who loves to keep things organized, this method has got you covered.
Remember, technology is supposed to make our lives easier. By mastering this simple skill, you’ll save time and reduce the hassle of dealing with various file formats. So go ahead, give it a try, and streamline your digital workflow. Once you’ve got the hang of it, you’ll wonder how you ever managed without it.

Matthew Burleigh has been writing tech tutorials since 2008. His writing has appeared on dozens of different websites and been read over 50 million times.
After receiving his Bachelor’s and Master’s degrees in Computer Science he spent several years working in IT management for small businesses. However, he now works full time writing content online and creating websites.
His main writing topics include iPhones, Microsoft Office, Google Apps, Android, and Photoshop, but he has also written about many other tech topics as well.
Read his full bio here.
Featured guides and deals
- Return home
JavaScript is not available.
We’ve detected that JavaScript is disabled in this browser. Please enable JavaScript or switch to a supported browser to continue using x.com. You can see a list of supported browsers in our Help Center.
Help Center

Dengan mengeklik Lanjutkan, Anda menyetujui Perjanjian Pengguna , Kebijakan Privasi , dan Kebijakan Cookie LinkedIn.
Kami telah mengirimkan link sekali pakai ke alamat email utama Anda
Klik link untuk login langsung ke akun LinkedIn Anda.
Jika Anda tidak menemukan email tersebut di kotak pesan, periksa folder spam.
Setuju & Bergabung dengan LinkedIn
Dengan mengeklik Lanjutkan, Anda menyetujui Perjanjian Pengguna , Kebijakan Privasi , dan Kebijakan Cookie LinkedIn.
Pembuat pin
When smartphones first started to gain popularity, the prospect of printing something from them seemed like a pipe dream. Printers were already hard enough to deal with on a computer, and it seemed unlikely that it could work on a phone.
But the Google Docs app started adding new features like the ability to add small numbers in Google Docs , and it became apparent that the app was going to gain most of its desktop counterpart’s functionality.
Now we are also able to print from Google Docs on our iPhone or Android device, and it’s surprisingly accessible.
Most modern printers have some sort of network compatibility, meaning that devices on the same network as the printer can use that printer if they have that capability.
Mobile phones, but those that use the iOS and Android operating systems, are now able to print wirelessly to printers that support it. Plus, most of the apps that you would want to print from, such as creative apps and productivity apps, will usually support some type of printing functionality in addition to the other features they offer, like file sharing .
Our guide below will show you how to print through the Google Docs app on your iPhone or Android phone, plus we will address some of the common issues that might arise if you can’t make it work.
How to Print from the Google Docs Mobile App
- Open Docs.
- Choose a document.
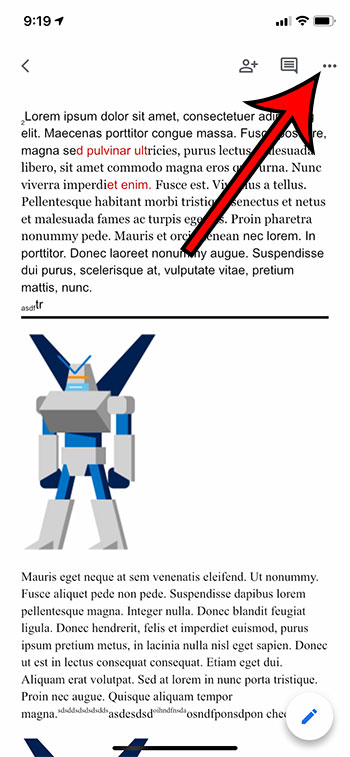
- Tap the three dots.
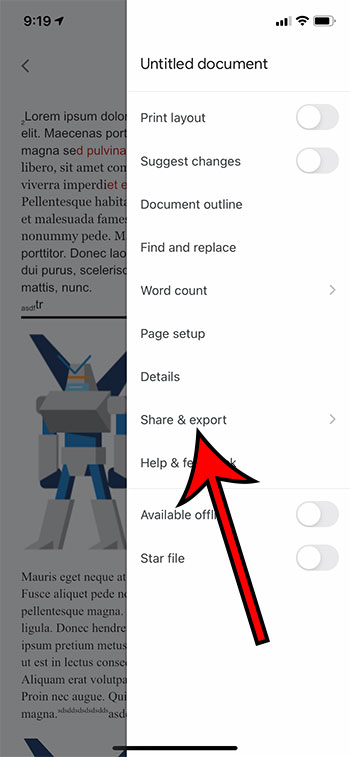
- Select Share & export .
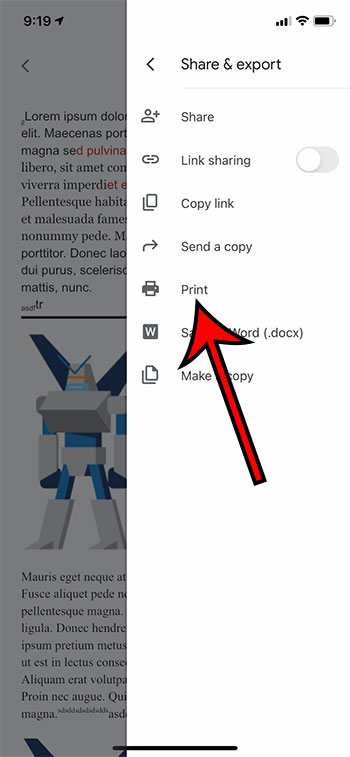
- Choose Print .
- Touch Select Printer .
- Chose a printer.
- Tap Print .
Our guide continues below with additional information on printing from the Google Docs app, including pictures of these steps.
How to Print from Google Docs on an iPhone (Guide with Pictures)
The steps in this section were performed on an iPhone 11 in iOS 14.6. These steps will also work on other iPhone models using this same version of iOS, as well as in most other versions of iOS. I am using the most current version of the Google Docs app that was available at the time this article was written.
Step 1: Open theDocsapp on your iPhone.
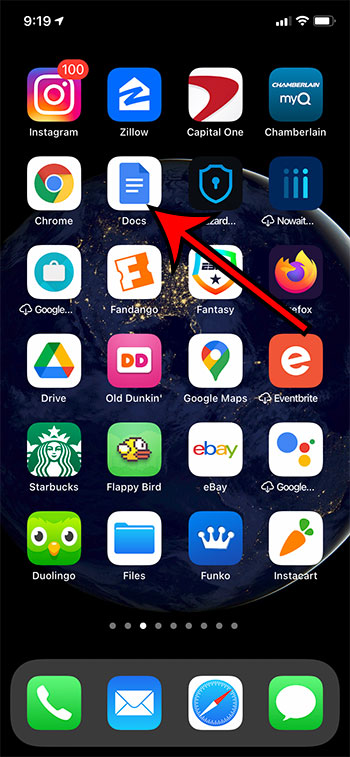
Step 2: Select the document that you want to print.
Step 3: Touch the three dots at the top-right of the screen.
Step 4: Select theShare & exportoption.
Step 5: ChoosePrint.
Step 6: Tap theSelect Printeroption.
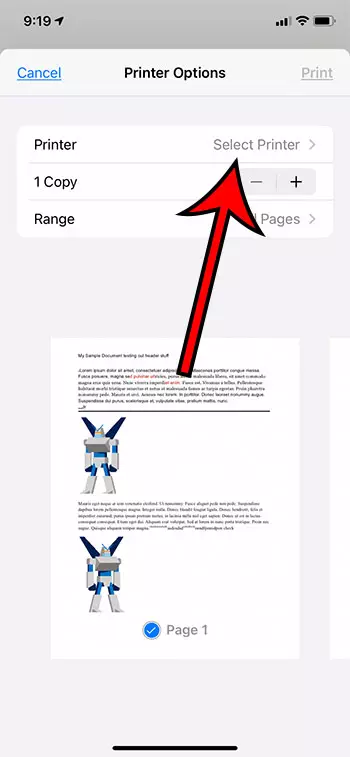
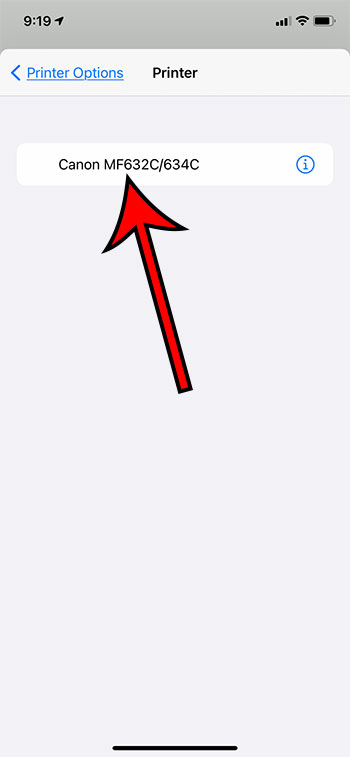
Step 7: Choose your printer.
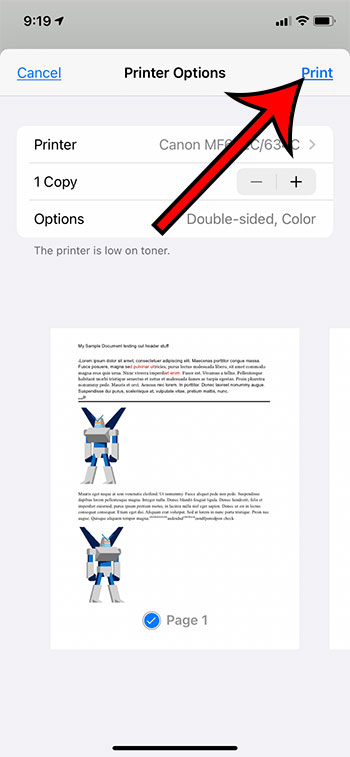
Step 8: TapPrintat the top-right corner of the screen.
Our article continues below with information on how to print from your Android device.
How to Print from Google Docs on Android (Guide with Pictures)
The steps in this section were performed on a Google Pixel 4A, using Android 11. I am using the most current version of the Docs app that was available when I wrote this article.
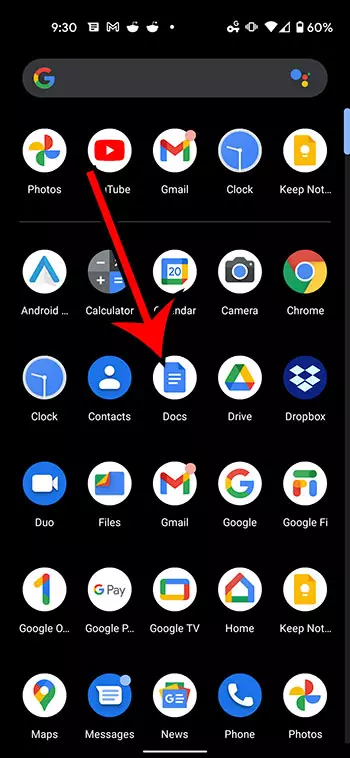
Step 1: Swipe up from the center of the screen.
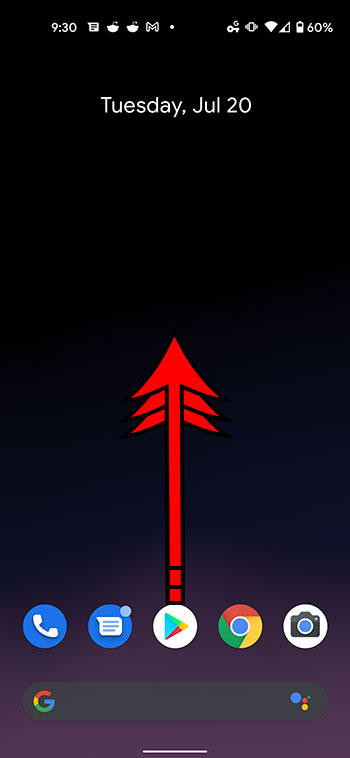
Step 2: Touch theDocsicon.
Step 3: Choose the document from your Google Drive that you want to print.
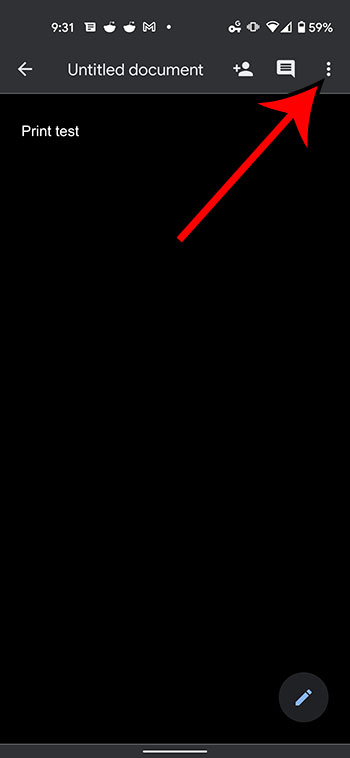
Step 4: Tap the three vertical dots at the top of the screen.
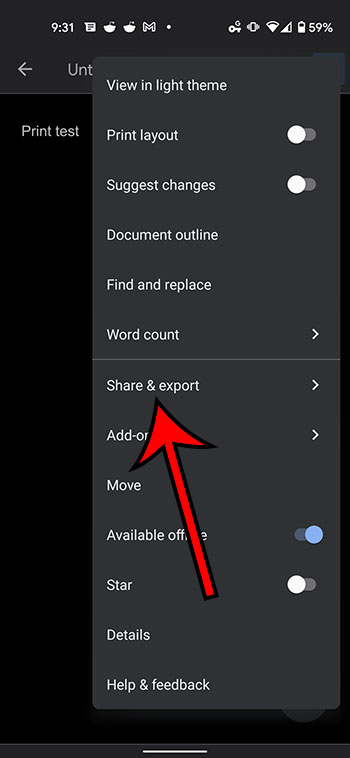
Step 5: Select theShare & exportoption from the menu on the right side of the screen.
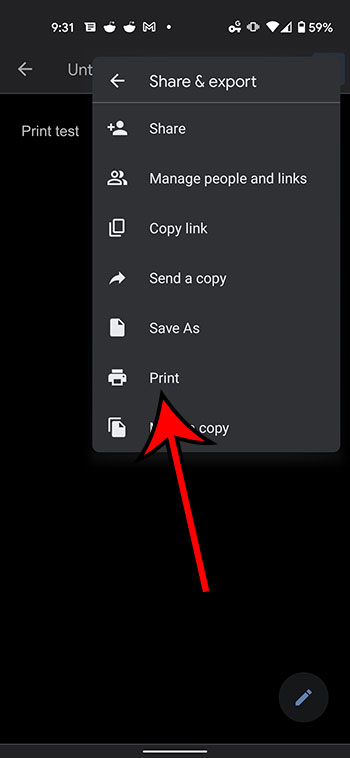
Step 6: ChosePrintfrom the list of sharing options.
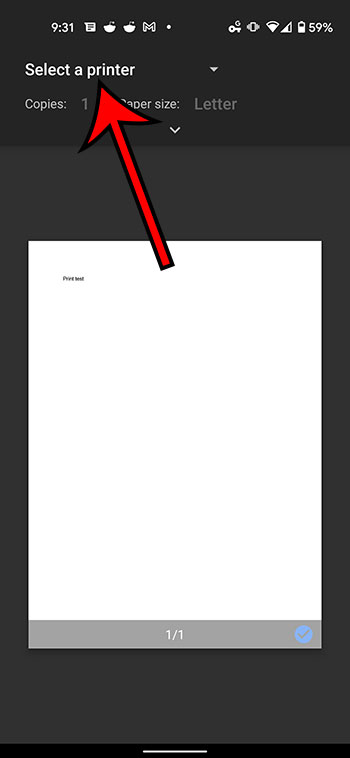
Step 7: Touch theSelect a printerdropdown at the top of the screen.
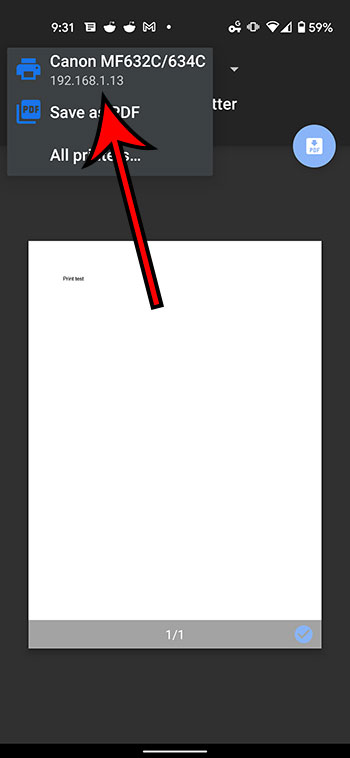
Step 8: Select the desired printer from the list of printing options.
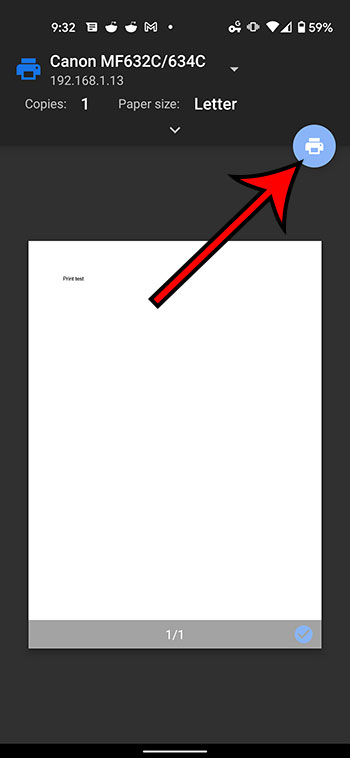
Step 9: Tap thePrinticon.
Our article continues below with additional information on printing from Google Docs.
Why Isn’t My Printer Listed?
Trying to resolve printing issues can be a tricky prospect, as printers are notoriously difficult to work with. When you combine this with the fact that you are printing from a mobile device, then there is a strong possibility that something isn’t going to work properly.
The first thing to check when you are trying to print is that your mobile device is connected to the same wireless network as the printer. If your iPhone or Android device is not on Wi-Fi, then you probably won’t see your printer.
A second consideration is that the printer may not be turned on. Many modern printers will turn off if they haven’t been used in a while. If you don’t see the printer but know that it should be there, try power cycling the printer (turning it off and on again) then wait a few minutes to see if it shows up in your mobile device’s printer list.
One final option to check is whether or not the printer is AirPrint compatible. Since you aren’t able to install print drivers on your mobile device, your printer will use a feature called AirPrint so that it can communicate with your phone. However, not all printers have this feature. Additionally, not all printers are network compatible. If your printer isn’t connected to your local network, either wirelessly or via an ethernet cable, then you probably won’t be able to communicate with the printer through your smartphone.
What is Google Cloud Print
There is a feature that is available as part of your Google Account that is called Google Cloud Print. If you have installed the Chrome browser on your computer and have added it as a printer that is available through Cloud Print, then this gives you some additional printing options.
After you select the Print option from the Share & export menu, you will see Google Cloud Print option listed there as well. If you choose that option you can follow the instructions on screen to select a printer and send it there. This means that you can even print Google Docs files on a printer that is in a completely different location.
How to Print from Google Docs on a Laptop or Desktop Computer
Printing a Google Docs document from your computer via a Web browser is a similar process to printing other documents. I am going to perform the steps below using the Chrome browser, but you can also use another browser like Firefox, Edge, or Safari.
Step 1: Navigate to https://docs.google.com and open the Google Docs file that you would like to print.
Step 2: Select File at the top-left of the window.
Step 3: Choose the Print option at the bottom of the menu.
Step 4: Adjust the print settings as needed, then click the blue Print button.
More Information on How to Print from Google Docs on iPhone or Android
The number of options that you can adjust when printing from your iPhone or Android device is pretty large.
When you have the Printer options menu open on your iPhone you will be able to specify the number of copies that you want to print, as well as the range, whether or not to print double-sided, and whether you want to print in black and white or color. Other document settings can be changed through the Page setup menu that is accessible from the menu where you selected the Share & export option.
The number of printing options on Android is greater, although you might initially have trouble locating them. After you choose the Print option from the Share & export menu, then select your printer, there will be a small downward-facing arrow in the top section. If you tap that arrow you will have these options:
- Copies
- Paper size
- Color
- Orientation
- Two-sided
- Pages
- More options
If you choose more options then you will be given the option to install additional device services, or to manage existing services.
While this article is focused specifically on printing from mobile phones, the same steps will work to print documents on an iPhone or iPad, as the Docs app and the printing process is similar for both of those iOS devices.
Additional Sources
Matthew Burleigh has been writing tech tutorials since 2008. His writing has appeared on dozens of different websites and been read over 50 million times.
After receiving his Bachelor’s and Master’s degrees in Computer Science he spent several years working in IT management for small businesses. However, he now works full time writing content online and creating websites.
His main writing topics include iPhones, Microsoft Office, Google Apps, Android, and Photoshop, but he has also written about many other tech topics as well.
Read his full bio here.
Featured guides and deals
Printing from Microsoft Word for Office 365 is a simple process. Open the document you want to print, click on the ‘File’ tab, select ‘Print’, choose your printer, set your print options, and then click ‘Print’. And just like that, your document should be making its way out of your printer!
After clicking ‘Print’, your computer will send the document to the printer, and the physical printing process will begin. Make sure you have enough paper and ink in your printer to avoid any interruptions.
Introduction
So, you’ve finished drafting that all-important document in Microsoft Word for Office 365, and now it’s time to bring it into the physical world. Whether it’s a report for work, an essay for school, or a recipe for that new dish you want to try out, knowing how to print your documents is essential. In today’s digital age, we often overlook the importance of having a hard copy. However, there are numerous scenarios where a printed document is necessary or just more convenient. This process is relevant to students, professionals, and anyone who uses Microsoft Word for creating documents.
It’s one of those basic skills that, once mastered, will serve you time and time again. Printing can seem straightforward, but there are a few steps and options that you might not be aware of. This article will guide you through the process, ensuring you can print with confidence from Microsoft Word for Office 365.
Related: How to Print Multiple Word Documents at Once
Step by Step Tutorial: Printing from Microsoft Word for Office 365
The following steps will guide you through printing a document from Microsoft Word for Office 365.
Step 1: Open the document you want to print
Open the document in Microsoft Word that you wish to print.
Once you have your document open, check it over to make sure everything is exactly how you want it to appear in print. This is your last chance to catch any typos or formatting issues!
Step 2: Click on the ‘File’ tab
Click on the ‘File’ tab located in the top left corner of the Microsoft Word window.
This will take you to the backstage view, where you can access a range of document-related settings and options, including the print settings.
Step 3: Select ‘Print’
From the menu options, select ‘Print’.
This will bring up the print settings where you can choose your printer and specify the print details such as the number of copies, pages to print, and whether to print one-sided or double-sided.
Step 4: Choose your printer
Choose the printer you want to use from the list of available printers.
If you’re using a new printer for the first time, make sure it’s been correctly set up and connected to your computer or network.
Step 5: Set your print options
Set your print options, including the number of copies, pages to print, and other preferences.
Here you can also change the orientation of the paper, print in color or black and white, and adjust the size of the print. Make sure to preview your document to ensure it looks exactly how you want it to.
Step 6: Click ‘Print’
Once you’re satisfied with your print settings, click ‘Print’.
Your document will be sent to the printer and should begin printing shortly. Make sure to collect your document from the printer and check it over once more to ensure everything printed correctly.
Pros
| Benefit | Explanation |
|---|---|
| Convenience | Printing directly from Microsoft Word for Office 365 is highly convenient. It allows you to quickly and easily produce a physical copy of your document without the need for any additional software or steps. |
| Customization | The print settings in Microsoft Word for Office 365 offer a range of options to tailor the printout to your specific needs. Whether it’s selecting the number of copies, choosing specific pages, or adjusting the layout, these customizable settings ensure your document is printed just the way you need it. |
| Preview Feature | Before printing, Microsoft Word allows you to preview your document. This helps to catch any errors or formatting issues before they’re printed, saving you time, paper, and ink. |
Cons
| Drawback | Explanation |
|---|---|
| Printer Compatibility | Not all printers are compatible with Microsoft Word for Office 365’s print function. It’s important to ensure your printer is set up correctly and is compatible with the software to avoid any printing issues. |
| Resource Consumption | Printing documents, especially in large quantities or in color, can consume a significant amount of paper and ink. It’s important to consider the environmental impact and cost when deciding to print. |
| Technical Issues | Sometimes, technical issues can arise, such as printer errors, connectivity issues, or software glitches. These can disrupt the printing process and may require troubleshooting to resolve. |
Additional Information
When printing from Microsoft Word for Office 365, there are a few additional tips you should keep in mind. First, always ensure that your printer has enough ink or toner and that there is an adequate supply of paper. Nothing is more frustrating than a document that’s half-printed because you ran out of ink! If you’re printing a lengthy document, consider using the ‘Print on Both Sides’ option to save paper.
Another important aspect is to understand the different print layouts available. Depending on the nature of your document, you may want to print in portrait or landscape mode. For large documents, such as reports or manuscripts, you might want to use the ‘Print Layout’ view to see how each page will look when printed.
Don’t forget about the ‘Save Ink/Toner’ option in the print settings. This is useful if you’re printing draft documents or anything that doesn’t require high-quality print. This option reduces the amount of ink or toner used and can be a cost-effective and environmentally friendly choice.
Lastly, if you’re printing confidential or sensitive documents, be sure to collect them from the printer immediately to protect your privacy. If your printer supports it, you can also use secure print options that require a code to be entered at the printer before the document will print.
Summary
- Open the document you want to print.
- Click on the ‘File’ tab.
- Select ‘Print’.
- Choose your printer.
- Set your print options.
- Click ‘Print’.
How do I print double-sided on Microsoft Word for Office 365?
To print double-sided, go to the print settings and look for the option that says ‘Print on Both Sides’ or ‘Duplex Printing’. Select this option before clicking ‘Print’.
What should I do if my document won’t print?
First, check your printer to ensure it’s turned on and connected to your computer or network. If that’s not the issue, try restarting both your printer and computer. If the problem persists, consult your printer’s manual or contact technical support.
Can I print in color from Microsoft Word for Office 365?
Yes, if your printer supports color printing, you can print in color by selecting the color option in the print settings.
How can I save paper when printing?
To save paper, consider printing on both sides of the paper if your printer supports this feature. You can also print multiple pages on a single sheet by adjusting the ‘Pages per Sheet’ setting.
How do I cancel a print job in Microsoft Word for Office 365?
To cancel a print job, go to the print queue on your computer and select the document you want to cancel. Right-click and choose ‘Cancel’ or use the cancel button on your printer if available.
Conclusion
Printing from Microsoft Word for Office 365 is a fundamental skill that can enhance your productivity and efficiency. With the simple steps outlined in this article, you can print your documents quickly and easily, adjusting settings as needed to meet your specific requirements. Remember, while printing is convenient, always consider the environmental impact and use this feature responsibly.
Whether you’re a student printing an essay, a professional preparing a report, or someone sharing a cherished recipe, mastering the print function in Microsoft Word for Office 365 will serve you well in all your document-related endeavors. Keep these tips in mind, and happy printing!
Matthew Burleigh has been writing tech tutorials since 2008. His writing has appeared on dozens of different websites and been read over 50 million times.
After receiving his Bachelor’s and Master’s degrees in Computer Science he spent several years working in IT management for small businesses. However, he now works full time writing content online and creating websites.
His main writing topics include iPhones, Microsoft Office, Google Apps, Android, and Photoshop, but he has also written about many other tech topics as well.
Read his full bio here.
Printing a PDF from Word is a straightforward process. First, open the Word document you want to convert. Then, click on ‘File’ and select ‘Save As.’ In the Save As dialog box, choose PDF from the dropdown menu, and click ‘Save.’ Your Word document is now a PDF!
After completing this action, you will have a PDF version of your Word document. This PDF can be shared, printed, or stored as a digital file.
Introduction
Have you ever needed to share a document with someone, but they don’t have Microsoft Word? Or maybe you want to make sure the formatting stays exactly the same, no matter what device it’s viewed on. One solution is to convert your Word document into a PDF. This format is universally accessible and retains the layout and formatting of your document.
Converting Word documents to PDFs is a valuable skill for students, professionals, and anyone who shares documents online. Whether you’re submitting a paper, sending a resume, or sharing a report, a PDF ensures your document appears the same for everyone. Plus, PDFs are less easily altered than Word documents, providing an added layer of security for sensitive information.
Step by Step Tutorial: How to Print a PDF from Word
Before we dive into the steps, it’s important to understand that converting a Word document to a PDF is beneficial because it maintains the original formatting and is widely accepted for professional documents. Now, let’s get started.
Step 1: Open your Word document
Open the Word document that you want to convert to a PDF.
This is the document that contains the content you wish to print as a PDF. Make sure you’ve saved any changes before proceeding.
Step 2: Click on ‘File’
Go to the top left corner of the screen and click on the ‘File’ tab.
This will open the backstage view, where you can access various options for managing your document.
Step 3: Select ‘Save As’
In the ‘File’ menu, find and select the ‘Save As’ option.
This allows you to save a copy of your document, potentially in a different format.
Step 4: Choose PDF from the dropdown menu
In the ‘Save As’ dialog box, look for the ‘Save as type’ dropdown menu and select PDF.
PDF is listed among other file types like Word Document (.docx) and Plain Text (.txt).
Step 5: Click ‘Save’
After selecting PDF from the dropdown menu, click the ‘Save’ button.
Your Word document will now be converted and saved as a PDF file.
Pros
| Benefit | Explanation |
|---|---|
| Universally Accessible | PDF files can be opened on any device with a PDF reader, making sharing documents hassle-free. |
| Maintains Formatting | Converting to PDF ensures the document’s layout and formatting remain intact, regardless of where it’s opened. |
| Security | PDFs can be password protected and are more difficult to alter without leaving an electronic footprint. |
Cons
| Drawback | Explanation |
|---|---|
| Requires PDF Reader | To view a PDF, you must have a PDF reader installed on your device, which may be an extra step for some users. |
| Limited Editability | Once a document is saved as a PDF, it’s more challenging to make edits than in a Word document. |
| File Size | PDFs can sometimes have a larger file size than Word documents, which might be an issue when sharing via email. |
Additional Information
When you print a PDF from Word, you’re creating a secure and reliable copy of your document that can be easily shared and accessed on various devices. But remember, while PDFs are great for viewing a document as intended, they are not ideal if you need to make future edits. If you anticipate needing to update the document, it’s wise to keep the original Word file.
Another tip is to use the ‘Print’ option instead of ‘Save As’ if you want to directly print the document as a PDF. This can be particularly useful when working with a printer that supports direct PDF printing. Additionally, if you’re dealing with sensitive information, consider encrypting your PDF or adding a watermark before sharing it.
Lastly, keep in mind that while most modern Word processors can save documents as PDFs, the specific steps may vary slightly depending on your software version. The process outlined here is based on the most recent versions of Microsoft Word.
Summary
- Open your Word document
- Click on ‘File’
- Select ‘Save As’
- Choose PDF from the dropdown menu
- Click ‘Save’
Can I convert a Word document to PDF on a Mac?
Yes, the steps are similar to those on a Windows PC. Use the ‘File’ menu and choose ‘Export to PDF’ on a Mac.
Will my hyperlinks work in the PDF?
Generally, yes. Most PDF readers support active hyperlinks, but it’s always a good idea to test your PDF after conversion to ensure everything works as expected.
Can I convert a Word document to PDF without Microsoft Word?
Yes, there are online converters and other software options available that can convert Word documents to PDF.
Can I save multiple Word documents as one PDF?
Yes, you can combine multiple Word documents into one PDF using the ‘Combine’ feature in Adobe Acrobat or similar PDF editing software.
Is it possible to convert a PDF back into a Word document?
Yes, there are tools available that can convert PDFs back into editable Word documents, though the formatting may not be perfectly preserved.
Conclusion
Printing a PDF from Word is a simple yet powerful way to ensure your documents maintain their formatting, are easily shareable, and secure. Whether you’re a student turning in a paper, a professional sharing a report, or just need to send a document to someone without Word, knowing how to convert your files to PDF is a game-changer.
With this skill in your repertoire, you’re well-equipped to handle a range of document sharing needs. So go ahead, give it a try, and see how this trick can streamline your workflow!
Matthew Burleigh has been writing tech tutorials since 2008. His writing has appeared on dozens of different websites and been read over 50 million times.
After receiving his Bachelor’s and Master’s degrees in Computer Science he spent several years working in IT management for small businesses. However, he now works full time writing content online and creating websites.
His main writing topics include iPhones, Microsoft Office, Google Apps, Android, and Photoshop, but he has also written about many other tech topics as well.
Read his full bio here.
Featured guides and deals
Printing from an iPad to an Epson or Brother printer is quite simple and can be done in a few steps. Make sure your printer and iPad are connected to the same Wi-Fi network, download the appropriate printer app (Epson iPrint or Brother iPrint&Scan), select the document or image you want to print, choose your printer, adjust the print settings if needed, and then hit the print button. Voila! Your document or image will start printing.
After printing, you should have a physical copy of your document or image that came straight from your iPad. If there were any issues, you might need to check your Wi-Fi connection, printer settings, or update the printer app.
Introduction
Printing documents and images from an iPad might seem like a task for tech wizards, but it’s something anyone can do with just a few taps. With the world becoming increasingly mobile, the ability to print from a handheld device like an iPad is crucial. Whether you’re a student needing to print an assignment, a professional preparing for a meeting, or someone who wants to print out photos for a scrapbook, knowing how to print from an iPad will save you time and hassle.
But why is this topic important, and who is it relevant to? Well, for starters, iPads have become commonplace in both personal and professional settings. They’re portable, versatile, and packed with features that make them nearly as powerful as traditional computers. As more people use iPads for work and leisure, the need to print directly from these devices grows. Epson and Brother printers are popular choices due to their reliability and quality. By learning how to print from an iPad to these printers, you can unlock a new level of convenience and productivity. Plus, it’s a skill that will come in handy more often than you think.
Step-by-Step Tutorial: Printing from an iPad
This section will guide you through the steps needed to print from your iPad using an Epson or Brother printer.
Step 1: Connect to Wi-Fi
Ensure your iPad and printer are connected to the same Wi-Fi network.
Connecting to the same Wi-Fi network is crucial for communication between your iPad and printer. Without this, your devices won’t be able to find each other, let alone print anything.
Step 2: Download the Printer App
Download the Epson iPrint app for Epson printers or the Brother iPrint&Scan app for Brother printers from the App Store.
These apps act as a bridge between your iPad and printer, giving you control over printing options and helping you manage your print jobs easily.
Step 3: Select Your Document
Open the document or image you want to print on your iPad.
You can print from various apps like Photos, Mail, or Safari. If the app supports printing, you’ll find a share or print option in the app’s menu.
Step 4: Choose Your Printer
Tap the share icon and select the ‘Print’ option, then choose your printer from the list of available printers.
Your iPad will search for nearby printers connected to the same Wi-Fi network. Select your Epson or Brother printer from the list.
Step 5: Adjust Settings
Adjust print settings like the number of copies, color options, and paper size if needed.
These settings help you customize your print job to your specific needs. You might want to print in black and white to save ink or choose a specific paper size for a project.
Step 6: Print
Tap ‘Print’ to send your document or image to the printer.
Once you tap ‘Print,’ your document or image will start printing. You’ll be able to pick up your physical copy in a matter of seconds or minutes, depending on the length of the document.
Pros
| Benefit | Explanation |
|---|---|
| Convenience | Printing from an iPad is incredibly convenient. You don’t need to transfer files to a computer or deal with complicated setups. Simply tap a few buttons and you’re good to go. It’s perfect for when you’re on the move or in a rush. |
| Efficiency | It saves time and increases productivity. No more waiting to use a shared computer or dealing with printer cables. You can print documents while you’re in a meeting, waiting at the airport, or at a coffee shop. |
| Eco-Friendly | By printing directly from your iPad, you can reduce wasted prints. You have more control over what you print and can easily select specific pages or sections, leading to less paper and ink consumption. |
Cons
| Drawback | Explanation |
|---|---|
| Compatibility Issues | Not all printers are compatible with iOS devices. You need to make sure you have an Epson or Brother printer that supports mobile printing. Otherwise, you might need to look for workarounds or alternative solutions. |
| Wi-Fi Dependency | You need a stable Wi-Fi connection to print from an iPad. If your network is down or unreliable, it could disrupt the printing process, which can be frustrating if you’re in a hurry. |
| Limited Printing Options | While printing from an iPad offers convenience, it may not provide all the advanced features and settings you could access from a computer. This could be limiting for complex printing tasks. |
Additional Information
While the main steps to print from an iPad are straightforward, there are some additional tips and insights that can help you get the most out of your printing experience. For instance, regularly updating your printer app will ensure compatibility with the latest iOS updates and provide you with new features and bug fixes.
It’s also important to know that you can print from different apps, not just the printer’s app. Apps like Microsoft Word, Google Docs, and even some third-party apps offer printing features. Just look for the share icon, usually a square with an upward arrow, to find the print option.
What if you don’t have a Wi-Fi network available? Some printers offer Wi-Fi Direct or Bluetooth connectivity, which doesn’t require a traditional network. Check your printer’s manual to see if these options are available and how to set them up.
And what about double-sided printing or printing in different sizes? Most printer apps allow you to adjust these settings before you print, so you can save paper or ensure your document fits correctly on the page.
Remember to check your printer’s ink levels and paper supply before printing. There’s nothing more annoying than starting a print job only to find out you’re out of ink halfway through.
Summary
- Ensure both the iPad and printer are on the same Wi-Fi network.
- Download the appropriate printer app from the App Store.
- Open the document or image you wish to print.
- Select your printer from the list of available devices.
- Adjust print settings as necessary.
- Tap ‘Print’ to start printing your document or image.
Can I print from any app on my iPad?
Most apps that support sharing or exporting content will allow you to print. Look for the share icon in the app.
What if my printer isn’t showing up on the list of available printers?
Make sure both devices are on the same Wi-Fi network. If they are and it’s still not showing up, try restarting both your iPad and printer.
Can I print without a Wi-Fi network?
Some printers support Wi-Fi Direct or Bluetooth printing, which doesn’t require a traditional Wi-Fi network.
How do I update my printer app?
You can update your printer app through the App Store, just like any other app on your iPad.
What should I do if the print quality is poor?
Check your printer’s ink levels and make sure you have enough paper. Also, clean the printer heads if necessary, which can usually be done through the printer’s app.
Conclusion
Printing from an iPad to an Epson or Brother printer is not only possible but also remarkably simple once you know the steps. It’s a skill that aligns with the modern need for mobility and efficiency. Whether you’re printing work documents, school assignments, or cherished photos, the ability to print directly from your iPad is a game-changer.
For those who are yet to dive into this convenient world, now’s the perfect time to start. And for those who are already printing from their iPads, there’s always something new to learn or an update to catch up on to ensure a smooth printing experience. So, go ahead, give it a try, and embrace the ease of mobile printing!
Matthew Burleigh has been writing tech tutorials since 2008. His writing has appeared on dozens of different websites and been read over 50 million times.
After receiving his Bachelor’s and Master’s degrees in Computer Science he spent several years working in IT management for small businesses. However, he now works full time writing content online and creating websites.
His main writing topics include iPhones, Microsoft Office, Google Apps, Android, and Photoshop, but he has also written about many other tech topics as well.
Read his full bio here.
Connecting your iPad to a wireless printer is a breeze! First, ensure your printer is Wi-Fi enabled and connected to the same network as your iPad. Next, open the document or image you’d like to print on your iPad, tap the share icon, and select ‘Print.’ Choose your printer from the list, adjust your print settings, and hit ‘Print’ again.
Once you’ve completed these steps, your iPad will send the print job to your wireless printer, and you’ll have your document or image in no time!
Introduction
In today’s fast-paced world, efficiency is key. Whether you’re a busy professional, a student juggling multiple assignments, or just someone who loves the convenience of modern technology, knowing how to connect your devices seamlessly is a must. This is especially true when it comes to printing documents and images from your iPad. After all, who has the time to transfer files to a computer just to print them?
Connecting an iPad to a wireless printer is not only a time-saver but also adds a layer of convenience to your workflow. This capability is crucial for those who rely on their iPads for work, education, or personal use. Imagine being able to print your boarding pass right from your couch, or sending your homework to the printer without having to boot up your PC. That’s the kind of simplicity and effectiveness we’re talking about!
Moreover, with the rise of the paperless trend, many might not see the relevance of printing. However, there are still plenty of situations where a hard copy is necessary, be it for legal documents, art projects, or just personal preference. This is where the ability to connect your iPad to a printer becomes invaluable.
Step by Step Tutorial to Connect My iPad to a Wireless Printer
Before we dive into the steps, it’s important to understand what we’re achieving here. By following these steps, you’ll be able to send print jobs directly from your iPad to your wireless printer, without the need for cables or transferring files to another device. Let’s get started!
Step 1: Check Printer Compatibility
Ensure that your printer supports AirPrint, Apple’s wireless printing technology.
Many modern printers come with AirPrint compatibility, which makes them perfect for printing from iOS devices. If your printer supports AirPrint, you’re already halfway there!
Step 2: Connect Your Printer to Wi-Fi
Make sure your printer is connected to the same Wi-Fi network as your iPad.
This step is crucial since the wireless printing process relies on both your iPad and printer being on the same network. Check your printer’s manual for specific instructions on connecting it to Wi-Fi.
Step 3: Open the Document or Image
On your iPad, open the document, photo, or webpage you want to print.
Whether it’s a PDF, a photo album, or an email, most content on your iPad can be printed as long as it offers a share or print option.
Step 4: Access the Share Icon
Tap on the share icon, which is typically represented by a square with an upward arrow.
The share icon is your gateway to connecting with other devices and services, including your wireless printer.
Step 5: Select ‘Print’
In the sharing options, scroll down if necessary and select ‘Print.’
This will bring up the print options where you’ll select your printer and set your preferences.
Step 6: Choose Your Printer
Choose your printer from the list of available printers.
If your printer isn’t showing up, double-check that it’s connected to the same Wi-Fi network as your iPad.
Step 7: Adjust Print Settings
Adjust settings such as the number of copies, pages to print, and color options if necessary.
This step allows you to customize the print job to your needs, whether you’re printing a single image or a multi-page document.
Step 8: Print!
Once you’re happy with your settings, tap ‘Print’ to send the job to your wireless printer.
And just like that, your print job is on its way, all without wires or complicated setups!
Pros
| Benefit | Explanation |
|---|---|
| Convenience | There’s no denying the convenience of wireless printing. No more fumbling with cables or transferring files between devices. Just a few taps on your iPad and you’re good to go. |
| Time-Saving | By connecting your iPad to a wireless printer, you’re saving valuable time. Instead of going through a multi-step process to print from a desktop, you can do it directly from your iPad, even while multitasking. |
| Mobility | With a wireless printer, you’re not tied to a desk. You can move around freely with your iPad, print from different rooms, or even from outside your home, as long as you’re connected to the same network. |
Cons
| Drawback | Explanation |
|---|---|
| Dependence on Wi-Fi | Wireless printing relies heavily on a stable Wi-Fi connection. If your network is down or spotty, it could disrupt your printing process. |
| Printer Compatibility | Not all printers support AirPrint or wireless printing. This means you might need to invest in a new printer if your current one isn’t compatible. |
| Limited Features | Some printing features available on desktop software may not be available when printing from an iPad. This could be a limitation for those needing advanced printing options. |
Additional Information
While connecting your iPad to a wireless printer is straightforward, there are a few additional tips to keep in mind. First, make sure your iPad’s operating system is up to date, as this can affect compatibility with your printer. Additionally, if you encounter any issues with AirPrint, try restarting both your iPad and printer, as this can resolve many connectivity problems.
Another handy tip is to use printer-specific apps if available. Many printer manufacturers offer their own apps for iOS, which can provide more features and a smoother printing experience. These apps can be particularly useful if you’re trying to print something beyond basic documents and images.
Finally, remember to consider your printing needs when choosing a printer. If you’re someone who prints frequently or in large volumes, look for a printer with high-speed printing capabilities and economical ink usage. On the other hand, if you print infrequently, a more basic model may be sufficient.
Summary
- Check Printer Compatibility
- Connect Your Printer to Wi-Fi
- Open the Document or Image
- Access the Share Icon
- Select ‘Print’
- Choose Your Printer
- Adjust Print Settings
- Print!
What if my printer isn’t AirPrint compatible?
If your printer isn’t AirPrint compatible, you might still be able to print from your iPad using the manufacturer’s app or third-party printing apps available on the App Store.
Can I print from any app on my iPad?
Most apps that support sharing or exporting content will allow you to print, but it ultimately depends on the app. Look for the share icon or a print option within the app.
Do I need to install any drivers on my iPad?
No, one of the benefits of AirPrint is that it doesn’t require drivers. As long as your printer is AirPrint compatible, it should work seamlessly with your iPad.
Can I print double-sided from my iPad?
Yes, if your printer supports duplex printing and it’s an option within the app you’re printing from, you can print double-sided from your iPad.
How can I troubleshoot if my iPad can’t find my wireless printer?
Make sure both devices are on the same Wi-Fi network. Restart both your iPad and printer. If the issue persists, check for updates for your iPad’s operating system and your printer’s firmware.
Conclusion
Connecting your iPad to a wireless printer is a game-changer in terms of convenience and efficiency. Whether you’re printing out a last-minute report, a cherished photo, or an important document, the ability to do so directly from your iPad makes life just that little bit easier.
Remember to check your printer’s compatibility with AirPrint, ensure both devices are on the same Wi-Fi network, and follow the simple steps outlined in this article. With this knowledge, you’ll be able to enjoy the benefits of wireless printing without any hassles. Happy printing!
Matthew Burleigh has been writing tech tutorials since 2008. His writing has appeared on dozens of different websites and been read over 50 million times.
After receiving his Bachelor’s and Master’s degrees in Computer Science he spent several years working in IT management for small businesses. However, he now works full time writing content online and creating websites.
His main writing topics include iPhones, Microsoft Office, Google Apps, Android, and Photoshop, but he has also written about many other tech topics as well.
Read his full bio here.
