Resizing an image in Notion on an iPad is a straightforward process. Simply tap on the image, drag the handles to resize it, and adjust it to fit your content. Whether you want to make an image larger for better visibility or smaller to fit more text, this guide will walk you through the steps.
How to Resize an Image in Notion on iPad
In this section, we’ll go through the steps to help you resize an image in Notion using your iPad. By the end of these steps, you’ll have the perfect-sized image for your content.
Step 1: Open Notion and Your Page
First, open the Notion app on your iPad and navigate to the page with the image you want to resize.
Make sure your iPad is connected to the internet for any syncs that need to happen. Opening Notion is as simple as tapping its icon on your home screen.
Step 2: Tap on the Image
Second, locate the image you want to resize and tap on it. This will bring up the handles.
Tapping on the image activates the editing mode, which allows you to make changes such as resizing.
Step 3: Drag the Handles
Third, drag the handles on the corners of the image to resize it to your liking.
You can drag the handles inward to make the image smaller or outward to enlarge it. The aspect ratio will stay the same unless you use the side handles.
Step 4: Adjust the Image
Fourth, fine-tune the size and position of the image if necessary.
Make sure the image looks good within the context of your page. You want it to be neither too big nor too small.
Step 5: Save Your Changes
Lastly, save your changes by tapping outside the image. This will finalize your resizing.
Tapping outside the image will exit the editing mode and save the changes you’ve made.
After completing these steps, your image will be resized and properly positioned on your Notion page. This allows for a cleaner and more organized look for your notes or projects.
Tips for Resizing an Image in Notion on iPad
- Keep Aspect Ratio: Use the corner handles to maintain the aspect ratio of the image.
- Fine-Tune with Side Handles: Use the side handles if you need to stretch the image.
- Check Layout: Always check the layout of your page after resizing.
- Use High-Quality Images: Higher resolution images are easier to resize without losing quality.
- Experiment: Don’t be afraid to experiment with different sizes to see what fits best.
Why can’t I see the handles when I tap the image?
Make sure the image is fully loaded and that you are in editing mode. Sometimes a quick tap outside and back on the image will help.
How do I reset the image to its original size?
To reset the image size, you may need to delete it and reinsert it from your files or copy-paste it again from its source.
Will resizing an image affect its quality?
Resizing an image can affect its quality, especially if it’s a low-resolution image. High-resolution images retain quality better.
Can I resize multiple images at once?
Currently, you need to resize each image individually in Notion on iPad.
Is there a maximum size limit for images in Notion?
Notion does not specify a maximum image size, but very large images can slow down the app.
Summary
- Open Notion and your page.
- Tap on the image.
- Drag the handles.
- Adjust the image.
- Save your changes.
Conclusion
Resizing images in Notion on an iPad is a piece of cake once you get the hang of it. By following the steps outlined in this guide, you can easily adjust your images to fit perfectly within your content. Remember, the key is to experiment and find the best fit for your needs.
If you found this guide helpful, why not explore more of Notion’s features? The more you know, the more you can get out of this versatile tool. Whether you’re organizing your studies, managing a project, or just keeping track of your personal tasks, Notion can help you do it all.
Happy Notion-ing!

Matthew Burleigh has been writing tech tutorials since 2008. His writing has appeared on dozens of different websites and been read over 50 million times.
After receiving his Bachelor’s and Master’s degrees in Computer Science he spent several years working in IT management for small businesses. However, he now works full time writing content online and creating websites.
His main writing topics include iPhones, Microsoft Office, Google Apps, Android, and Photoshop, but he has also written about many other tech topics as well.
Read his full bio here.
Featured guides and deals
Microsoft Excel is a great way to manage and edit large amounts of data.
The row and column structure, combined with all of the different formulas and comparison tools, make it one of the more useful applications that you will use in school or work.
But one area where people have difficulty with Excel involves printing.
Our Microsoft Excel print guide below will show you some of the options that you can adjust in your spreadsheet so that your printed spreadsheets look better, are easier to read, and don’t waste as much paper.
Printing spreadsheets in Excel 2010 can be frustrating, especially if your spreadsheet is going to print on more than one page.
Extra columns can run into their own page, column headings only print on the first page, and it can generally be difficult to visually associate a cell with a row or column.
Working in an office and interacting with a number of people who all use Excel at different levels of proficiency, I can say that one of the biggest problems most people have involves the way that their spreadsheet looks when they are done with it and making a physical copy.
The default print settings are rarely ideal for what they want, and there are a lot of Excel terms that are very similar to one another and can be confusing.
But there are some simple changes that you can apply to your Excel spreadsheet so that it prints better and is easier for your readers to understand.
How to Improve Your Excel 2010 Spreadsheet Printing
This tutorial is going to address a few of the key areas that can be most helpful for improving a printed Excel spreadsheet. These areas include:
- Hiding rows in Excel
- Including page numbers in your spreadsheet
While this may seem like a lot, you can actually make almost all of these changes from one menu. And once you get comfortable with it, you can apply all of these changes in just a few seconds. The result will be a spreadsheet that displays column headers at the top of every page, is easy to read, and won’t require you to manually adjust column sizes to prevent an extra column from printing on its’ own page.
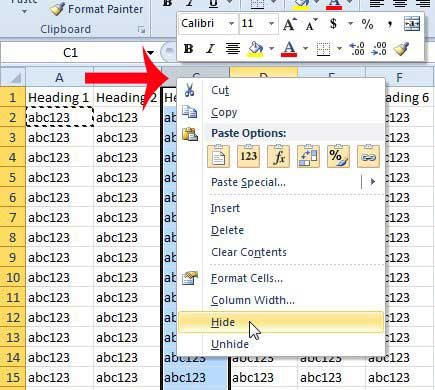
Hiding Unnecessary Columns and Rows in Excel
I usually like to start here, especially when I am dealing with a spreadsheet that someone else created. It often includes information that is not relevant for the reason that the spreadsheet is being printed, and only aids in creating confusion.
You can hide a row or column by right-clicking on the column letter or the row number, then clicking the Hide option.
Adding Page Numbers at the Bottom of the Page in Excel
This may not be something that everyone will need to do with their spreadsheets, but I have found that large spreadsheets can often look very similar from page to page. Readers also have the habit of removing staples and focusing on individual pages, which can make it almost impossible to put a spreadsheet back in order.
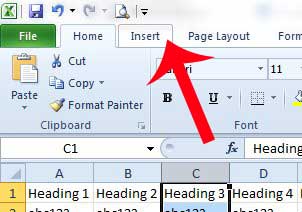
Step 1: Click Insert at the top of the window.
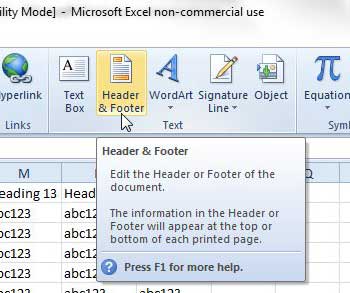
Step 2: Click Header & Footer in the Text section of the navigational ribbon.
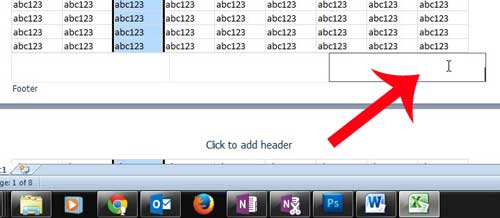
Step 3: Click inside the footer section at the bottom of the page where you want to add the page number.
Step 4: Click the Page Number button in the Header & Footer Elements section of the navigational ribbon.
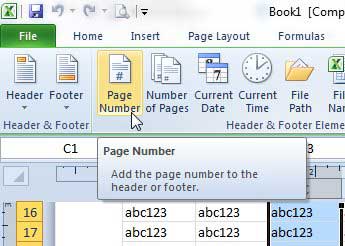
While you are in this view, now might be a good time to add a header. You can do so by simply clicking inside the header section where you want to add your information. Anything that you add to the header repeats on every page, so this is a good place to put a title for the spreadsheet.
For additional information on adding page numbers in Excel 2010, you can read here .
Adjusting the Page Orientation in Excel
This section of the tutorial is when we are going to open the Page Setup menu, which contains a number of the different printing options that we want to adjust.
I find that most of the spreadsheets that I print look much better when they are printed in landscape orientation. This is obviously a choice that will vary depending upon your own needs, but is something that is simple to change as needed.
Step 1: Click the Page Layout tab at the top of the window.

Step 2: Click the Page Setup button at the bottom-right corner of the Page Setup section of the navigational ribbon.
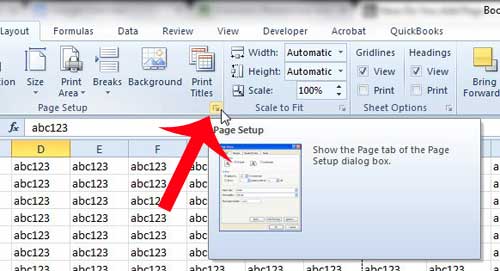
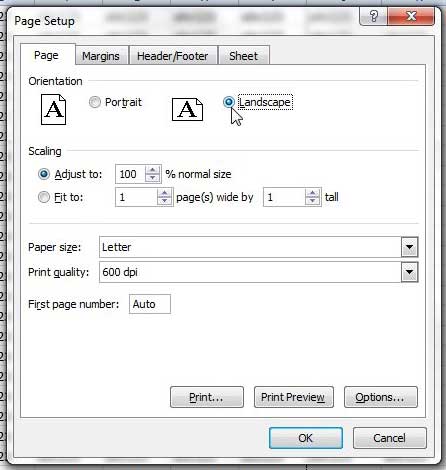
Step 3: Click the page orientation that you want to use.
We are going to be remaining on this menu for the rest of the tutorial, so don’t close it just yet!
Adjusting the Paper Size in Excel
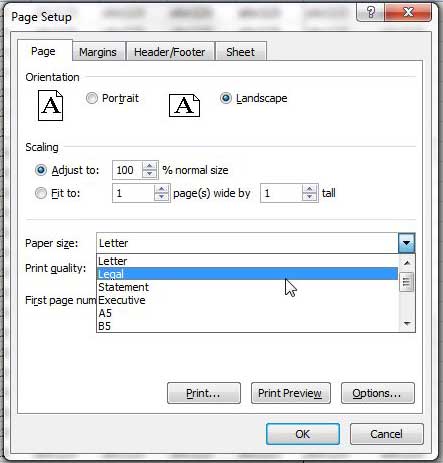
If most of your spreadsheets print better in the landscape orientation, then there might occasionally be documents that are even too big for that. One good solution to this is to use legal sized paper, which will allow you to fit even more columns on one page.
Reminder – This menu is accessed by clicking the Page Layout tab, then clicking the Page Setup button at the bottom-right corner of the Page Setup section of the navigational ribbon.
Step 1: Click the drop-down menu to the right of Paper Size , then click your desired paper size.
Adjusting the Margins in Excel
Adjusting the margins for your spreadsheet is usually done because you want to fit more information on the page. So, for the purposes of this tutorial, our example below is going to reduce the margins to a lower value.
Reminder – This menu is accessed by clicking the Page Layout tab, then clicking the Page Setup button at the bottom-right corner of the Page Setup section of the navigational ribbon.
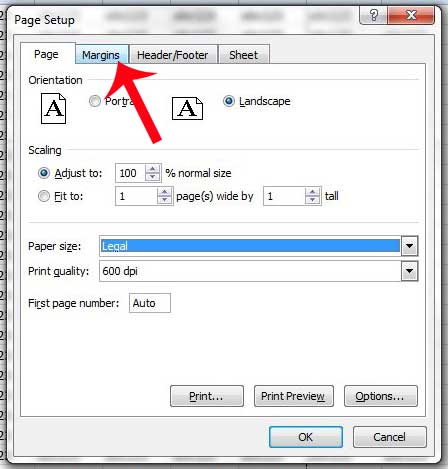
Step 1: Click the Margins tab at the top of the window.
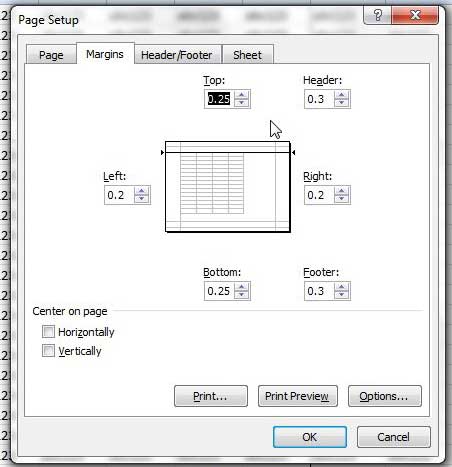
Step 2: Click the down arrow under Left to reduce the margin size, then repeat for Right , Top and Bottom . You will notice that I have not reduced my margins to 0, as my printer has difficulty printing documents without a margin. This is common among a lot of printers, so you may want to also consider using the margin sizes in the image below.
Printing Gridlines in Excel
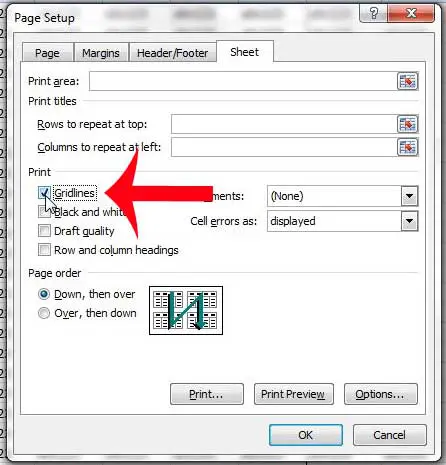
This is one of the most important changes to make to a printed spreadsheet, and is one that I make on almost anything that I print from Excel. Adding gridlines will make it much easier for readers to tell which column and row a cell belongs too, and can help to reduce mistakes.
Reminder – This menu is accessed by clicking the Page Layout tab, then clicking the Page Setup button at the bottom-right corner of the Page Setup section of the navigational ribbon.
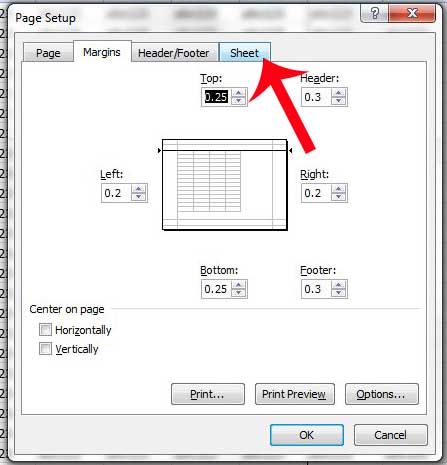
Step 1: Click the Sheet tab at the top of the window.
Step 2: Check the box to the left of Gridlines .
Repeating the Top Row on Every Page in Excel
This is another setting that you can take advantage of to make your spreadsheet more organized. Printing the top row on every page will make it simpler for readers to know which column a cell belongs to, which will help to eliminate mistakes.
Reminder – This menu is accessed by clicking the Page Layout tab, then clicking the Page Setup button at the bottom-right corner of the Page Setup section of the navigational ribbon.
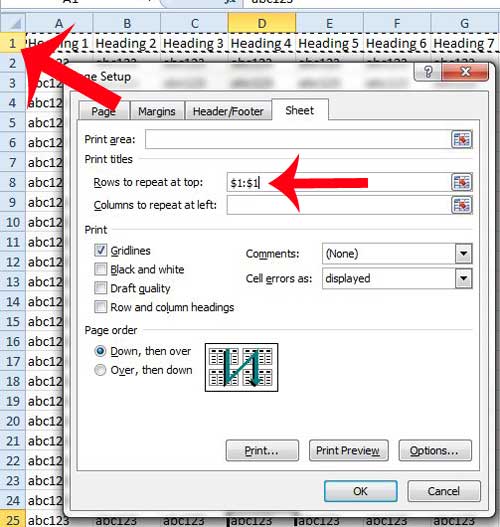
Step 1: Click inside the Rows to repeat at top field.
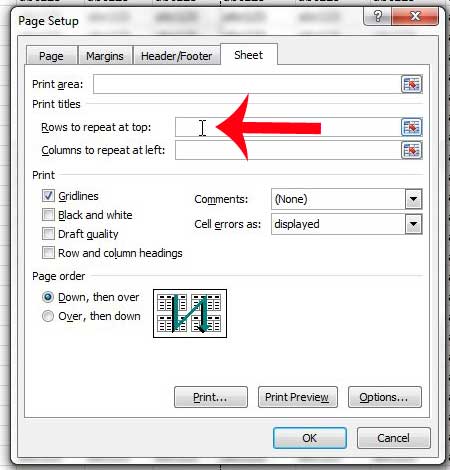
Step 2: Click the row that you want to repeat at the top of every page. In this example, I am using row 1.
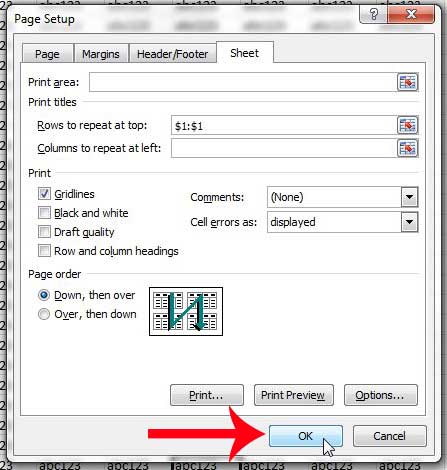
Click the OK button at the bottom of the window to save all of the changes that we have just made, because we are now done with this window.
If you would like to repeat a column at the left side of every page instead, you can read how in this article .
Fitting All of Your Columns on One Page in Excel
This is the last section of our tutorial, and it is a change that we are going to make directly from the Print menu.
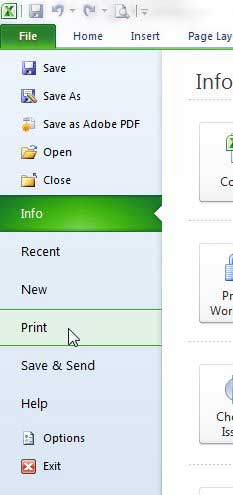
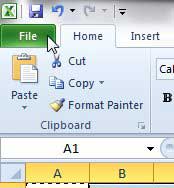
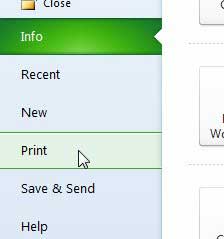
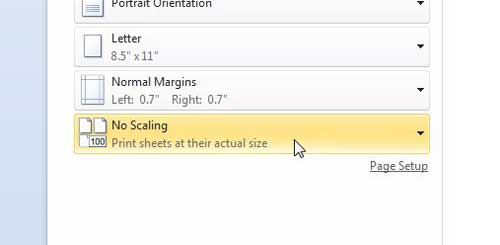
Step 1: Click the File tab at the top-left of the window.
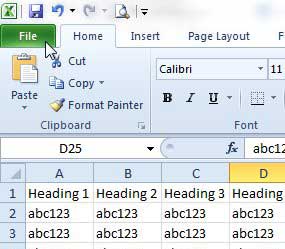
Step 2: Click Print in the column at the left side of the window.
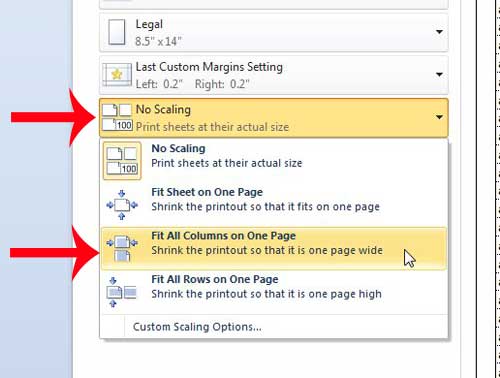
Step 3: Click the No Scaling button at the center of the window, then click the Fit All Columns on One Page option.
You should now have an Excel spreadsheet that will print in a simple, readable format that will appeal to your readers. If everything looks correct in the Print Preview at the right side of the window, then you can click the Print button to start printing your optimized spreadsheet.
Many of the options that we discuss in the article above will also work in newer versions of Excel as well. While much of these sections involved the use of the Page Setup section, some of these settings can be changed from other locations as well.
For example, you can click the Print Titles button on the Page Layout tab and select the top row of your spreadsheet to print that top row on every page.
Additionally, you will find options for including gridlines when you print by going to the Page Layout tab and clicking the Print option under Gridlines in the Sheet Options section of the ribbon.
Would you like to print a sheet of empty cells for a checklist or a manual inventory? Learn how in Excel 2010 .
- How to Insert Checkbox in Google Docs
Matthew Burleigh has been writing tech tutorials since 2008. His writing has appeared on dozens of different websites and been read over 50 million times.
After receiving his Bachelor’s and Master’s degrees in Computer Science he spent several years working in IT management for small businesses. However, he now works full time writing content online and creating websites.
His main writing topics include iPhones, Microsoft Office, Google Apps, Android, and Photoshop, but he has also written about many other tech topics as well.
Read his full bio here.
Featured guides and deals
Microsoft Excel can be a difficult application to work with when you need to print a spreadsheet. One common problem involves getting your column to fit correctly. Fortunately, you can learn how to print all columns in Excel on one page.
How to Fit All Columns on One Page in Excel 2010
- Open your Excel file.
- Click the File tab.
- Select the Print button.
- Click the No Scaling button.
- Choose the Print all Columns on One Page option.
- Click Print .
Our guide continues below with additional information on how to print all columns in Excel on a single printed page, including pictures of these steps.
The Microsoft Excel Print Preview window is a useful tool when you are trying to make sure that your completed spreadsheet looks good before you print it.
One area where you can have trouble with printed pages in your spreadsheet is simply getting your Excel spreadsheet to fit on one page. It may have seemed like the Excel expand all rows option was what you needed, but that doesn’t do much to affect printing.
You may have tried using manual page breaks, or switching between the normal view and the print window to check the Print Preview screen each time you changed a column width to see if that helped.
If you need to fit an Excel sheet on one page you can go to File > Print > and click the No Scaling button, then choose the Fit All Columns on One Page option.
Excel 2010 is a perfect program for a lot of different uses, but one area that can be frustrating is when you need to print a spreadsheet.
If your spreadsheet doesn’t perfectly fit on the paper in your printer, then Excel will automatically push extra columns to their own page, which can result in a lot of confusion and wasted paper.
Manually resizing columns can also be a futile effort, as adjusting one column can end up creating another problem.
Fortunately, Excel 2010 has a print setting that allows you to automatically fit all of your columns on one page, ensuring that the data is in a more print-friendly layout.
if you aren’t focused on printing, but simply want your data to be visible, then read our guide on how to autofit all columns in Excel for a quick and easy way to resize everything.
How to Print Multiple Columns on One Page in Excel 2010 (Guide with Pictures)
One thing to keep in mind when you are doing this, however, is that the size of your cells and text will be shrunk to accommodate the reduction in print real estate.
So Excel will fit 100 columns on one page if you tell it to, but the resulting printout will likely be very difficult to read.
This is a good situation to take advantage of the Print Preview on the right side of the Print screen, as it will give you an idea of how small the text is going to become.
Step 1: Open your spreadsheet in Excel 2010.
Step 2: Click theFiletab at the top-left corner of the window.
Step 3: Click thePrintoption in the column at the left side of the window.
Step 4: Click theNo Scalingbutton.
Step 5: Select theFit All Columns on One Pageoption.
If you are happy with how the preview looks, click the Print button.

Now that you know how to print all columns in Excel on one page you should be able to save yourself a lot of time and frustration in trying to configure everything manually.
Our tutorial continues below with additional discussion about using the different “fit” options on the Excel Print menu.
More Information on the Microsoft Excel “Fit All Columns on One Page” Setting
If the text is just slightly too small, consider switching to a landscape orientation instead .
You can also configure your Excel 2010 spreadsheet so that you can fit the entire spreadsheet on one page . When you click the No Scaling button on the Print menu there are options for:
- No Scaling
- Fit Sheet on One Page
- Fit All Columns on One Page
- Fit All Rows on One Page
There is also a Custom Scaling Options button at the bottom of this dropdown menu. If you select that then it will open the Page Setup menu, where you can try one of the other options found in that location.
Multi-page spreadsheets can greatly benefit when you print the top row on every page . This option is found on the Page Layout tab when you click the Print Titles button.
One other place that you can find a way to customize the print layout of your spreadsheet is the Page Setup dialog box. You can go to the Page Layout tab and click the small Page Setup dialog box launcher button at the bottom-right corner of the Page Setup group to open it.
There you will see a number of different tabs at the top of the window, including a Page tab. On this tab, you can choose the page orientation, adjust scaling, and even specify the number of pages to which you would like to fit your printed spreadsheet.
If you have tried everything you can to make your single-page worksheet look good and it’s still too small, then try hiding some of the less important columns. You can do this by right-clicking a column letter, then choosing the Hide option.
Matthew Burleigh has been writing tech tutorials since 2008. His writing has appeared on dozens of different websites and been read over 50 million times.
After receiving his Bachelor’s and Master’s degrees in Computer Science he spent several years working in IT management for small businesses. However, he now works full time writing content online and creating websites.
His main writing topics include iPhones, Microsoft Office, Google Apps, Android, and Photoshop, but he has also written about many other tech topics as well.
Read his full bio here.
Featured guides and deals
