Running the troubleshooter in Windows 11 is a straightforward way to solve common computer problems automatically. To start, open the Settings app from the Start menu, then select ‘System,’ followed by ‘Troubleshoot.’ From there, click ‘Other Troubleshooters’ and choose the specific troubleshooter you need. This process helps diagnose and fix issues like connectivity problems, audio malfunctions, or update errors. Following these steps will enable you to efficiently tackle and resolve many problems without needing advanced technical skills.
How to Run Troubleshooter in Windows 11
Using the troubleshooter in Windows 11 can solve many pesky issues your computer might be facing. Let’s walk through the steps to get your Windows running smoothly again.
Step 1: Open the Start Menu
Click the Start button located on the taskbar to open the Start menu.
The Start menu is your gateway to all the apps and settings in Windows 11. It’s like the front door to your digital house. Once you click it, you’ll see a list of your most-used apps and a search bar.
Step 2: Access Settings
Select ‘Settings’ from the Start menu options.
The Settings app is where you can adjust nearly everything in Windows 11. Think of it as the cockpit of your computer. Finding ‘Settings’ should be a breeze since it’s usually pinned right there in the Start menu.
Step 3: Navigate to System
In the Settings window, click on ‘System.’
The ‘System’ section in Settings deals with the core functionalities of your computer—like the engine of your car. This is where you find essential tools, including troubleshooting options.
Step 4: Open Troubleshoot
Select ‘Troubleshoot’ from the System menu on the left side.
The Troubleshoot option acts like your computer’s doctor. It’s there to help diagnose what’s going wrong and offers a range of specific troubleshooters for different issues.
Step 5: Choose Other Troubleshooters
Click ‘Other Troubleshooters’ to see a complete list of available troubleshooters.
Here, you’ll find a list of all the automated tools designed to fix specific problems. From internet connections to printer troubles, this list is like a toolbox full of handy gadgets.
Step 6: Run the Desired Troubleshooter
Find the specific troubleshooter you need and click ‘Run’ next to it.
Once you click ‘Run,’ the troubleshooter will start diagnosing the issue. It’s like having a handy mechanic checking under the hood of your car, but for your computer.
After you complete these steps, Windows 11 will automatically diagnose and try to fix the problem based on the troubleshooter you chose. This process can save you a lot of time and effort, as it automatically detects issues and provides recommended solutions, often fixing them on the spot.
Tips for Running Troubleshooter in Windows 11
- Ensure your system is up to date. Sometimes a Windows update is all you need to fix a problem.
- Run troubleshooters as an administrator for more access and better results.
- Regularly maintain your PC to prevent issues from cropping up.
- Familiarize yourself with different troubleshooters available to know which one to use for specific problems.
- Restart your computer after running a troubleshooter, as some fixes might require a reboot to take full effect.
Is the Windows 11 troubleshooter effective for all problems?
The troubleshooter is excellent for common issues, but it may not fix highly specific or hardware-related problems. Complex issues might still require additional support.
Can I run multiple troubleshooters at once?
It’s best to run them one at a time to ensure each issue is properly diagnosed and resolved without interference from another.
Does running a troubleshooter pose any risk to my files?
Troubleshooters are designed to be safe and typically won’t affect personal files. However, it’s always a good idea to back up important data just in case.
How often should I run troubleshooters?
Only run them when you encounter issues. They are tools for fixing problems, not for regular maintenance.
What if the troubleshooter doesn’t fix my issue?
If the problem persists, consider seeking help from a tech professional or checking online forums for solutions specific to your issue.
Summary
- Open Start Menu.
- Access Settings.
- Navigate to System.
- Open Troubleshoot.
- Choose Other Troubleshooters.
- Run the Desired Troubleshooter.
Conclusion
In the world of computing, running the troubleshooter in Windows 11 is like having your very own digital handyman at your disposal. It helps you tackle common issues efficiently and without the need for technical expertise. Whether it’s a bothersome audio glitch or a stubborn network problem, the troubleshooter offers a straightforward way to diagnose and resolve these annoyances. While it’s not a catch-all solution for every potential problem, it often resolves the most common ones, saving you time and potential frustration.
Keep in mind that running the troubleshooter should be one of your first steps when something goes wrong. It’s a quick and easy process, like checking the spark plugs when your car won’t start. And if it doesn’t fix the issue, you’ve lost nothing but a few minutes. Always remember to keep your system updated and perform regular maintenance to minimize future problems.
In summary, leverage the Windows 11 troubleshooter as your go-to tool for resolving everyday issues. If you need more guidance, don’t hesitate to seek additional resources or professional help. After all, when it comes to technology, being proactive is always better than being reactive.

Matthew Burleigh has been writing tech tutorials since 2008. His writing has appeared on dozens of different websites and been read over 50 million times.
After receiving his Bachelor’s and Master’s degrees in Computer Science he spent several years working in IT management for small businesses. However, he now works full time writing content online and creating websites.
His main writing topics include iPhones, Microsoft Office, Google Apps, Android, and Photoshop, but he has also written about many other tech topics as well.
Read his full bio here.
Featured guides and deals
If you’re used to working with printers frequently, you have probably faced situations where your machine is ready to print, but the printer status on your Windows 10 is showing offline.
This can happen due to minor network connectivity issues, poor printer connection, paper jams, or other problems.
Whatever the reason is, you should know how to get a printer online in Windows 10 to fix the problems and get your work done.
To make the task easier for you, we will discuss a number of methods of solving the printer offline issue and tell you some simple tricks to avoid such problems in the future.
We will cover it all, from minor paper jam problems to complex setting issues. So, let’s dive right in.
How to Use the Windows 10 Printer Troubleshooter to Get the Printer Online
- Press the Windows key + I to open Settings.
- Choose Devices in the left column.
- Select Printers and Scanners .
- Choose to run the troubleshooter.
- Let the troubleshooter run and perform the suggested tasks.
Our guide continues below with additional information on getting your Windows 10 printer online, including some other options that you can try which might help to resolve the situation.
Sometimes you will need to send someone a picture of the items that appear on your screen. Our article on how to screenshot on Acer laptops can help you with that.
How to Solve Windows 10 Printer Offline Issues – 10 Options
As you already know, your computer can show that your printer is offline for many reasons. Some problems are so trivial that you can solve them within moments, even without any printer technician. Below are some effective and detailed methods to solve the printer offline error yourself:
Method One – Perform Physical Checks
To bring back a printer online, you should properly check all the wire connections. If your machine is a local printer or a network printer and needs to be connected by a USB cable or Ethernet cable, you should check out whether the connection is firm or not. Try checking out the cable at both ends of your USB port and printer.
If the cable is too loose or broken, replace it with a new one. Also, try to use multiple USB ports on your computer to make sure that the problem isn’t in your cable, ethernet port, or USB ports.
Method Two – Check Your Internet Connection
If you have connected your printer using a Wi-Fi network, check out if the device’s network is working properly. The printer’s status might go offline if the network is too slow or if the network keeps dropping.
So, check out the condition of the network from the built-in options of your printer. If you don’t know how to connect your printer through Wi-Fi, look for instructions in your owner’s manual. Sometimes the printer status goes offline when you try to connect it using a VPN (virtual private network.)
In that case, you must disconnect the VPN connection and restart your printer. Otherwise, you can also try a more efficient VPN connection and adjust the VPN configuration to access the local network.
Method Three – Restart Your Printer and Computer
The process of restarting your devices is called power cycling. It’s a very common technique to solve minor glitches in your devices – power off both your PC and printer first. Then disconnect your printer from the computer and unplug its power cable.
Wait for 30 seconds before restarting the printer. When your printer is switched on, turn on your computer again and check if the offline status is turned online.
Method Four – Use Printer Offline Option
If our previously mentioned methods fail to solve your printer problems, it’s time to do some work manually. You need to open settings on your computer and make some necessary changes to the printer offline option. And here’s how to use the printer offline option in Windows 11 –
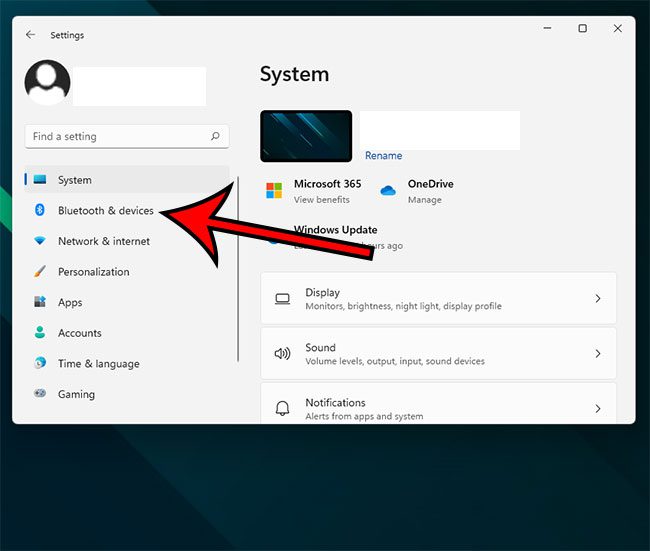
Step 1) On your windows computer, click on the ‘Start’ option from the bottom of your screen. From there, click on the ‘Settings’ option and then ‘Bluetooth and devices.’
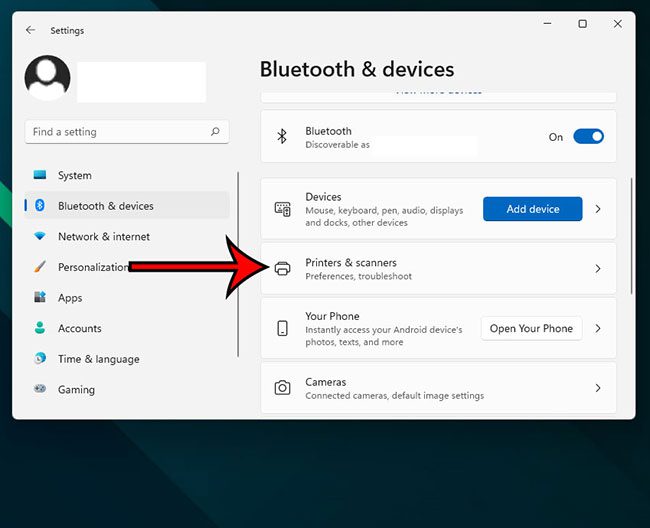
Step 2) Now select the option called ‘Printers & Scanners’.
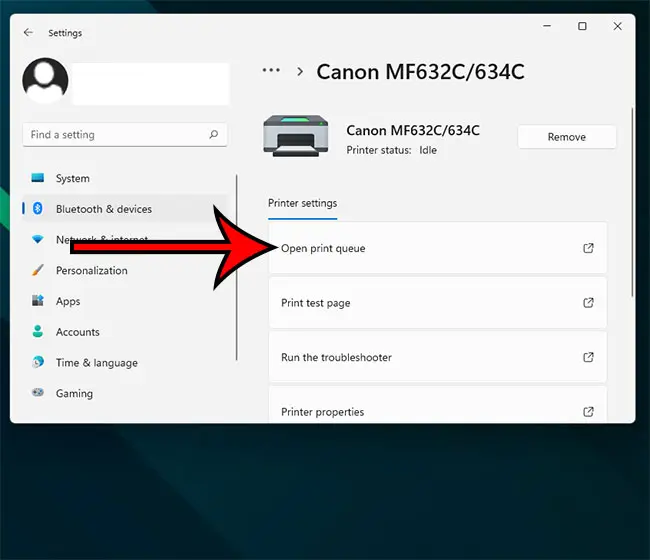
Step 3) Select your printer and choose the ‘Open print queue’ option.
Step 4) A new page will appear, and you need to look for the ‘Printer’ tab on the toolbar. Click on it, and a drop-down menu will arrive. Do you see any ‘Use Printer Offline’ option there? Check out if there’s a tick beside this option. Click on it to remove the tick mark and get your printer online.
<img loading=“lazy” src=“https://www.solveyourtech.com/wp-content/uploads/2022/02/how-to-get-printer-online-windows-10-4.jpg" onerror=“this.onerror=null;this.src=‘https://blogger.googleusercontent.com/img/a/AVvXsEhe7F7TRXHtjiKvHb5vS7DmnxvpHiDyoYyYvm1nHB3Qp2_w3BnM6A2eq4v7FYxCC9bfZt3a9vIMtAYEKUiaDQbHMg-ViyGmRIj39MLp0bGFfgfYw1Dc9q_H-T0wiTm3l0Uq42dETrN9eC8aGJ9_IORZsxST1AcLR7np1koOfcc7tnHa4S8Mwz_xD9d0=s16000';" alt=“turn off the “use printer offline” option - 5”>
For additional coverage of this topic, you can read our printer offline Windows 7 guide.
Method Five – Use Printer Troubleshooter
If the status of your printer keeps coming online briefly and going offline again, you can use a printer troubleshooter to solve the problem and start printing again. In fact, Windows 10 features several troubleshooters to solve the printer offline issues automatically. Here’s how you can perform troubleshooting –
Step 1) Use the dedicated Windows key to open the ‘Start’ menu and go to your settings. You can also press Windows key + I to open the Settings app directly. Click on ‘Devices’ and then on ‘Printers & Scanners.’
Step 2) Click on the ‘Run the troubleshooter’ option from the right-pane. You can find it right beneath the ‘Related Settings’ option.
Step 3) Now, the troubleshooter will run several series of checks. It will also suggest to you some ways to solve the detected problems. It might ask you to set your current printer as a default printer or ask you to update your printer driver. Act accordingly to fix the problems.
Method Six – Clear Your Pending Print Jobs
It’s always preferable to perform one print job at once. When you continue printing for a long time and multiple unfinished print jobs are queued, it might cause printer offline errors. Follow the steps given below to remove the print queue –
Step 1) Open settings and choose ‘Devices.’ Then select ‘Printers & Scanners’ and click on your printer’s name.
Step 2) Now click on ‘Open queue’ to get the list of all the pending documents. Select the ‘ Printer ‘ option from the toolbar at the top and then click ‘Cancel All Documents.’ It should clear all the pending jobs.
Step 3) You can restart your printer and your computer to clear the remaining documents of the print queue.
Method Seven – Use Print Spooler Service
The print spooler service controls the interactions between your computer and printer. You can restart the service to get the printer online. Here’s how you can do it –
Step 1) Open your computer’s start menu, type ‘Services’, and press enter. You can also press Windows Key + R and search by typing ‘Service.msc.’
Step 2) Look for the ‘Print Spooler’ option and right-click on it. Then choose ‘Restart,’ and your offline printer will go online again.
Method Eight – Change Printer Properties
Step 1) Open the control panel of your printer and then go to ‘Devices and Printers.’ Right-click on your printer’s name and select ‘Printer Properties.’
Step 2) From there, click on the ‘Ports’ tab and then choose the printer’s IP address. Now select the option ‘Configure Port.’
Step 3) Check if there’s any tick next to the ‘SNMP Status Enable’ option. Click on it to uncheck the option and then choose ‘OK’ for saving the changes.
Method Nine – Use Printer Software
Many printer manufacturers own printer software to let your windows manage and troubleshoot the printer. You can go to the printer manufacturer’s website to install the software. Or, your printer manufacturer might have provided a CD containing the software.
To check whether the software is installed or not, go to settings and click on ‘Devices.’ Then select ‘Printers & Scanners’, choose your printer’s name, and then ‘Manage.’ If the software is installed, you’ll see the option ‘Open printer app.’
Click on it to open the software and look for troubleshooting options to bring the offline printer status back online.
Method Ten – Reinstall the Printer
If the printer offline message keeps appearing even after you have tried all our methods, you should try to remove the current printer and reinstall it or install a new printer. Here’s how you can remove and reinstall it –
Step 1) Open your computer’s settings and choose ‘Devices.’ From the menu bar, select ‘Printers & Scanners’ and then your printer’s name.
Step 2) Click on ‘Remove Device’ and select ‘Yes’ to remove the current printer.
Step 3) Now go for the option ‘Add printer or scanner.’ Follow the necessary steps to reinstall the printer.
Final Words
So, now you know how to get a printer online Windows 10. Before anything else, try our first three methods to solve the printer offline errors in your Windows 10 easily.
If none of our methods work for your computer, the problem might be hardware-related. In that case, you need to get your printers to a technician or change the printer drivers to solve the issues.
Matthew Burleigh has been writing tech tutorials since 2008. His writing has appeared on dozens of different websites and been read over 50 million times.
After receiving his Bachelor’s and Master’s degrees in Computer Science he spent several years working in IT management for small businesses. However, he now works full time writing content online and creating websites.
His main writing topics include iPhones, Microsoft Office, Google Apps, Android, and Photoshop, but he has also written about many other tech topics as well.
Read his full bio here.
Featured guides and deals
