Saving a note as a PDF on an iPad is a simple process that allows you to easily share, archive, or print your notes. All you need is the Apple Notes app and a few taps to turn your digital note into a universally accessible PDF file. Let’s dive into the specifics.
How to Save a Note as a PDF on iPad
Converting a note to a PDF on your iPad is straightforward, allowing you to share and store your information efficiently. Follow the steps below to make your note a PDF.
Step 1: Open the Notes App
First, locate and open the Notes app on your iPad. This is where all your saved notes are stored.
Opening the app is as easy as tapping its icon. If you can’t find it on your home screen, swipe down and type “Notes” in the search bar.
Step 2: Select the Note You Want to Convert
Scroll through your list of notes and select the one you wish to save as a PDF.
Simply tap on the note’s title to open it. Ensure the note you select is the final version you want to convert.
Step 3: Access the Share Menu
Tap on the share button, which looks like a square with an arrow pointing upward, located at the top right corner of the screen.
This button opens a menu with various sharing options. It’s your gateway to converting and sharing your content.
Step 4: Choose “Print”
Scroll through the share options and select “Print.”
Even though you’re not printing your note, this option gives you access to the PDF conversion function.
Step 5: Pinch Outward on the Print Preview
On the print preview screen, use two fingers to pinch outward on the preview thumbnail.
This action zooms in and converts the preview into a full PDF document.
Step 6: Tap the Share Button Again
After the pinch-out action, tap the share button once more to bring up the sharing options.
This step finalizes your note as a PDF, making it ready to be shared or saved.
Step 7: Save or Share Your PDF
Select “Save to Files” to store the PDF on your device, or choose another sharing option, like email or AirDrop.
You can now decide where you want to save or send your PDF. Storing it in Files keeps it handy on your device.
After completing these steps, your note will be saved or shared as a PDF, retaining all its formatting and content for easy access or distribution.
Tips for Saving a Note as a PDF on iPad
- Keep Notes Organized: Label your notes clearly so it’s easier to find the one you want to convert.
- Preview Before Saving: Always double-check your note’s content and formatting before converting it to a PDF.
- Use iCloud: Save your PDFs to iCloud for easy access across all your devices.
- Annotate PDFs: Use the markup tools in the Files app to annotate your PDF if needed.
- Regular Backups: Periodically back up your notes to avoid losing important information.
Can I edit the PDF after saving it?
Once saved as a PDF, you can annotate or highlight it using tools in the Files app, but direct editing of the text requires additional software.
Is there a limit to the number of notes I can save as PDFs?
No, you can save as many notes as you like as PDFs, provided you have enough storage space on your device or iCloud.
Do I need any special apps to save a note as a PDF?
No, the Notes and Files apps that come pre-installed on your iPad are sufficient for this process.
Will saving a note as a PDF affect the original note?
No, the original note remains unchanged. The PDF is a separate file.
Can I password-protect the PDF?
Yes, after saving it to Files, you can use third-party apps to add password protection to your PDF.
Summary
- Open the Notes app.
- Select the note.
- Access the share menu.
- Choose “Print.”
- Pinch outward on the preview.
- Tap the share button again.
- Save or share your PDF.
Conclusion
Turning a note into a PDF on your iPad is a breeze, simplifying the ways you can share, store, and manage your information. This method ensures your notes are preserved in a secure, universally accessible format. Whether you’re saving meeting notes, class assignments, or creative ideas, converting them to PDFs keeps everything organized and easy to share.
Now that you know how to save a note as a PDF on your iPad, why not give it a try with one of your important notes? It’s a handy skill that can streamline your digital life. For more tips on using your iPad efficiently, check out our other articles. Explore, practice, and make the most out of your digital toolkit!

Matthew Burleigh has been writing tech tutorials since 2008. His writing has appeared on dozens of different websites and been read over 50 million times.
After receiving his Bachelor’s and Master’s degrees in Computer Science he spent several years working in IT management for small businesses. However, he now works full time writing content online and creating websites.
His main writing topics include iPhones, Microsoft Office, Google Apps, Android, and Photoshop, but he has also written about many other tech topics as well.
Read his full bio here.
Printing to PDF on an iPad is quite simple. You can do it directly from most apps by using the share or print options, which then allow you to save your document as a PDF. This is handy for archiving documents or sharing them in a universally readable format.
How to Print to PDF on iPad
The steps below will guide you on converting any document or webpage to a PDF file using your iPad. Whether you’re using Safari, Mail, or any other app with a print function, these steps will help you save your files as PDFs quickly and easily.
Step 1: Open the Document or Webpage
First, launch the app containing the document or webpage you want to convert to PDF.
For example, if you’re trying to convert a webpage, open Safari and navigate to that page. If it’s an email, open the Mail app and select the email.
Step 2: Access the Share Menu
Next, tap the Share button, usually represented by a square with an upward arrow.
This will open a menu with various sharing options. Don’t worry if it looks overwhelming; you’ll only use one or two of these options for this task.
Step 3: Choose Print
From the Share menu, scroll down and select the Print option.
This may seem odd because you’re not actually printing anything on paper. However, this step is crucial to accessing the PDF creation feature.
Step 4: Pinch Out on the Print Preview
Once the print preview opens, use a two-finger pinch-out gesture on the preview image of your document.
This gesture will expand the preview into a full-screen PDF view, enabling you to see the entire document as a PDF.
Step 5: Share or Save the PDF
Finally, tap the Share button again in the top right corner of the PDF view, and choose how you want to save or share the PDF.
You can save it to Files, send it via email, or even add it to a cloud storage service like iCloud or Dropbox.
After completing these steps, you’ll have a PDF version of your document or webpage saved on your iPad, ready to share or archive as needed.
Tips for Printing to PDF on iPad
- Check Compatibility: Ensure the app you’re using supports the Share or Print feature.
- File Management: Save your PDFs in a well-organized folder for easy access later.
- Use Cloud Storage: Utilize cloud services like iCloud or Dropbox for seamless file sharing and backup.
- Annotate PDFs: Use apps like Adobe Acrobat or Apple’s Markup tool to annotate your PDFs.
- Regular Updates: Keep your iPad and apps updated to avoid compatibility issues with the print-to-PDF feature.
Can I print to PDF from any app on my iPad?
Most apps that support printing should allow you to print to PDF, but some may not. Always check the Share or Print menu to see if the option is available.
Do I need any special apps to print to PDF?
No, the built-in iOS functions allow you to print to PDF without needing third-party apps.
Can I edit the PDF after creating it?
Yes, you can use apps like Adobe Acrobat Reader or Apple’s Markup tool to annotate or edit your PDF.
Where do I find my saved PDFs?
You can find saved PDFs in the Files app under the location you chose to save them, such as iCloud Drive or On My iPad.
Is the quality of the PDF good?
Yes, the quality of the PDF is generally excellent and retains the formatting of the original document.
Summary
- Open the document or webpage.
- Access the Share menu.
- Choose Print.
- Pinch out on the print preview.
- Share or save the PDF.
Conclusion
Printing to PDF on an iPad is a straightforward process that can be accomplished in just a few taps. This feature is incredibly useful for converting emails, web pages, and documents into a portable, universally readable format. Whether you’re a student wanting to save notes, a professional needing to archive emails, or someone who loves to keep things organized, this method has got you covered.
Remember, technology is supposed to make our lives easier. By mastering this simple skill, you’ll save time and reduce the hassle of dealing with various file formats. So go ahead, give it a try, and streamline your digital workflow. Once you’ve got the hang of it, you’ll wonder how you ever managed without it.
Matthew Burleigh has been writing tech tutorials since 2008. His writing has appeared on dozens of different websites and been read over 50 million times.
After receiving his Bachelor’s and Master’s degrees in Computer Science he spent several years working in IT management for small businesses. However, he now works full time writing content online and creating websites.
His main writing topics include iPhones, Microsoft Office, Google Apps, Android, and Photoshop, but he has also written about many other tech topics as well.
Read his full bio here.
Featured guides and deals
Printing a PDF from Word is a straightforward process. First, open the Word document you want to convert. Then, click on ‘File’ and select ‘Save As.’ In the Save As dialog box, choose PDF from the dropdown menu, and click ‘Save.’ Your Word document is now a PDF!
After completing this action, you will have a PDF version of your Word document. This PDF can be shared, printed, or stored as a digital file.
Introduction
Have you ever needed to share a document with someone, but they don’t have Microsoft Word? Or maybe you want to make sure the formatting stays exactly the same, no matter what device it’s viewed on. One solution is to convert your Word document into a PDF. This format is universally accessible and retains the layout and formatting of your document.
Converting Word documents to PDFs is a valuable skill for students, professionals, and anyone who shares documents online. Whether you’re submitting a paper, sending a resume, or sharing a report, a PDF ensures your document appears the same for everyone. Plus, PDFs are less easily altered than Word documents, providing an added layer of security for sensitive information.
Step by Step Tutorial: How to Print a PDF from Word
Before we dive into the steps, it’s important to understand that converting a Word document to a PDF is beneficial because it maintains the original formatting and is widely accepted for professional documents. Now, let’s get started.
Step 1: Open your Word document
Open the Word document that you want to convert to a PDF.
This is the document that contains the content you wish to print as a PDF. Make sure you’ve saved any changes before proceeding.
Step 2: Click on ‘File’
Go to the top left corner of the screen and click on the ‘File’ tab.
This will open the backstage view, where you can access various options for managing your document.
Step 3: Select ‘Save As’
In the ‘File’ menu, find and select the ‘Save As’ option.
This allows you to save a copy of your document, potentially in a different format.
Step 4: Choose PDF from the dropdown menu
In the ‘Save As’ dialog box, look for the ‘Save as type’ dropdown menu and select PDF.
PDF is listed among other file types like Word Document (.docx) and Plain Text (.txt).
Step 5: Click ‘Save’
After selecting PDF from the dropdown menu, click the ‘Save’ button.
Your Word document will now be converted and saved as a PDF file.
Pros
| Benefit | Explanation |
|---|---|
| Universally Accessible | PDF files can be opened on any device with a PDF reader, making sharing documents hassle-free. |
| Maintains Formatting | Converting to PDF ensures the document’s layout and formatting remain intact, regardless of where it’s opened. |
| Security | PDFs can be password protected and are more difficult to alter without leaving an electronic footprint. |
Cons
| Drawback | Explanation |
|---|---|
| Requires PDF Reader | To view a PDF, you must have a PDF reader installed on your device, which may be an extra step for some users. |
| Limited Editability | Once a document is saved as a PDF, it’s more challenging to make edits than in a Word document. |
| File Size | PDFs can sometimes have a larger file size than Word documents, which might be an issue when sharing via email. |
Additional Information
When you print a PDF from Word, you’re creating a secure and reliable copy of your document that can be easily shared and accessed on various devices. But remember, while PDFs are great for viewing a document as intended, they are not ideal if you need to make future edits. If you anticipate needing to update the document, it’s wise to keep the original Word file.
Another tip is to use the ‘Print’ option instead of ‘Save As’ if you want to directly print the document as a PDF. This can be particularly useful when working with a printer that supports direct PDF printing. Additionally, if you’re dealing with sensitive information, consider encrypting your PDF or adding a watermark before sharing it.
Lastly, keep in mind that while most modern Word processors can save documents as PDFs, the specific steps may vary slightly depending on your software version. The process outlined here is based on the most recent versions of Microsoft Word.
Summary
- Open your Word document
- Click on ‘File’
- Select ‘Save As’
- Choose PDF from the dropdown menu
- Click ‘Save’
Can I convert a Word document to PDF on a Mac?
Yes, the steps are similar to those on a Windows PC. Use the ‘File’ menu and choose ‘Export to PDF’ on a Mac.
Will my hyperlinks work in the PDF?
Generally, yes. Most PDF readers support active hyperlinks, but it’s always a good idea to test your PDF after conversion to ensure everything works as expected.
Can I convert a Word document to PDF without Microsoft Word?
Yes, there are online converters and other software options available that can convert Word documents to PDF.
Can I save multiple Word documents as one PDF?
Yes, you can combine multiple Word documents into one PDF using the ‘Combine’ feature in Adobe Acrobat or similar PDF editing software.
Is it possible to convert a PDF back into a Word document?
Yes, there are tools available that can convert PDFs back into editable Word documents, though the formatting may not be perfectly preserved.
Conclusion
Printing a PDF from Word is a simple yet powerful way to ensure your documents maintain their formatting, are easily shareable, and secure. Whether you’re a student turning in a paper, a professional sharing a report, or just need to send a document to someone without Word, knowing how to convert your files to PDF is a game-changer.
With this skill in your repertoire, you’re well-equipped to handle a range of document sharing needs. So go ahead, give it a try, and see how this trick can streamline your workflow!
Matthew Burleigh has been writing tech tutorials since 2008. His writing has appeared on dozens of different websites and been read over 50 million times.
After receiving his Bachelor’s and Master’s degrees in Computer Science he spent several years working in IT management for small businesses. However, he now works full time writing content online and creating websites.
His main writing topics include iPhones, Microsoft Office, Google Apps, Android, and Photoshop, but he has also written about many other tech topics as well.
Read his full bio here.
Featured guides and deals
Print areas in Microsoft Excel are a good solution when you need to print some of the data in a file, but not all of it. But occasionally a print area has been set and is no longer correct. Fortunately, you can use a similar process to remove a print area from your Excel spreadsheet if you don’t need it anymore.
Microsoft Excel 2010 allows you to customize most aspects of your spreadsheet, including the way that it prints. If you had previously set the print area for a document, then you know that you can force Excel to print out an area of cells that you have specified, regardless of whether there is information in those cells, or if there is additional information on the spreadsheet.
Unfortunately, while the print area is set, that is the only range of cells that you will be able to print. So if you need to learn how to clear the print area in Excel 2010 because the designated print area is either no longer accurate, or because you want to print a different area of your spreadsheet, then you can follow the instructions below.
How to Clear Print Area – Excel 2010
- Open your Excel file.
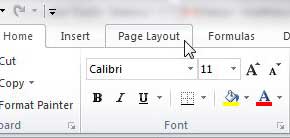
- Select the Page Layout tab at the top of the window.
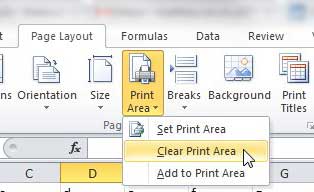
- Click the Print Area button.
- Choose the Clear Print Area option.
Our article continues below with additional information on clearing the print area in Excel, including pictures of these steps.
How to Stop Excel 2010 From Printing a Specified Print Area (Guide with Pictures)
Designating a print area in Excel 2010 is very helpful when you have a large spreadsheet and only periodically need to print a specific part of it. You do not need to remember to change your printer settings whenever you create a copy of the spreadsheet, and you can configure all of your page layout settings so that the spreadsheet prints to fit on a set number of pages. But when that print area changes and you need to remove the settings, you can clear the print area in Excel 2010.
Step 1: Open the Excel document with the set print area that you want to clear.
Step 2: Click thePage Layouttab at the top of the window.
Step 3: Click thePrint Areadrop-down menu in thePage Setupsection of the ribbon at the top of the window, then choose theClear Print Areaoption.
Note that after you clear the print area for your worksheet, all of the data on that sheet is going to print the next time you click the Print button. Often a worksheet that had a set print area is going to have some formatting options set which took that print area into consideration.
More Information on How to Clear the Print Area in Excel
After clearing the print area it’s a good idea to check the Print Preview before you click the Print button. This can save a lot of wasted paper, especially if you are dealing with a very large spreadsheet.
If you want to print your spreadsheet and ignore a print area this one time, while still leaving it intact for future printings you can also choose the Ignore Print Area option on the Print menu.
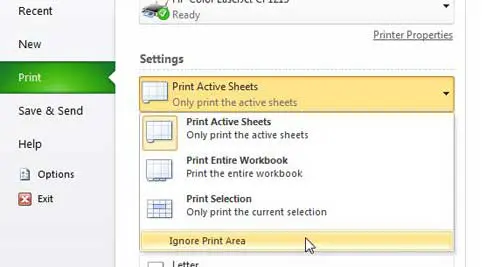
You can find this setting by clicking the File tab, clicking Print , clicking the Print Active Sheets drop-down menu, then choosing Ignore Print Area .
You can set a print area if you highlight the cells that you want to print, go the Page Setup group, click Print Area , then choose the Set Print Area option.
Additionally, if you would like to add more cells to an existing print area you can do so by choosing those cells, selecting the Page Layout tab, then clicking the Print Area button and selecting the Add to Print Area button.
You can have multiple print areas in Excel. However, if you do have multiple print areas and they aren’t connected to one another, they will print on separate pages. Creating multiple print areas is possible by either adding a selection of cells to an existing print area, or making a selection of cells, then holding down the Ctrl key before choosing another selection of cells. Once both print areas are selected you go to the Page Layout tab, go to the Page Setup group, click Print Area, then Set Print Area.
When you save the workbook in Excel, any defined print areas will be saved as well. However, print areas only apply to a worksheet, not an entire workbook. Therefore, if you go to print the entire workbook Excel will print only the print area on your worksheet, but will print the rest of the worksheets in their entirety, assuming that there are no print areas on those other sheets.
Conclusion
As we outlined above, you can clear a print area in Excel by going to Page Layout > Print Area > Clear Print Area . When there is no range of cells that is specified as a print area, Excel will print the entire worksheet.
After you have cleared a print area in Excel you can always choose to set a new area if you select the cells to include in the print area, then go to Page Layout > Print Area > Set Print Area .
- How to subtract in Excel
- How to sort by date in Excel
- How to center a worksheet in Excel
- How to select non-adjacent cells in Excel
- How to unhide a hidden workbook in Excel
- How to make Excel vertical text
Matthew Burleigh has been writing tech tutorials since 2008. His writing has appeared on dozens of different websites and been read over 50 million times.
After receiving his Bachelor’s and Master’s degrees in Computer Science he spent several years working in IT management for small businesses. However, he now works full time writing content online and creating websites.
His main writing topics include iPhones, Microsoft Office, Google Apps, Android, and Photoshop, but he has also written about many other tech topics as well.
Read his full bio here.
