Setting margins in Microsoft Word is a simple task that frames your document just right. First, open your Word document. Click on the “Layout” tab at the top. Look for the “Margins” button, click it, and choose your preferred margin setting from the list or customize your own. In just a few clicks, you’ll have your document looking neat and tidy!
How to Set Margins in Word
Changing the margins in Word helps you control the amount of white space around your text, making your document look professional and easy to read. Let’s dive into the steps!
Step 1: Open Your Document
Open the Word document you want to adjust.
Make sure the document is ready for editing. If you’re starting fresh, create a new document. If you’re altering an existing one, ensure it’s the correct file.
Step 2: Click on the “Layout” Tab
Go to the top of the Word window and click on “Layout”.
The “Layout” tab houses various tools for formatting your page. You’ll find it nestled among other tabs like “Home” and “Insert”.
Step 3: Select “Margins”
In the “Layout” tab, find and click the “Margins” button.
A dropdown menu will appear. This menu includes several preset margin options like Normal, Narrow, and Wide, which cater to different document needs.
Step 4: Choose a Preset or Custom Margin
Select a preset margin or click “Custom Margins” at the bottom of the list.
Preset margins are great for quick adjustments. If you need something specific, “Custom Margins” lets you set exact measurements.
Step 5: Adjust and Confirm
If you chose “Custom Margins,” input your desired measurements and hit “OK”.
This final step ensures your document has exactly the spacing you need. It’s a great way to fit more text on a page or follow specific formatting guidelines.
After completing these steps, your document’s margins will be set to your preferences. You’ll notice more or less white space around your text, making it look just right for your needs.
Tips for Setting Margins in Word
- Double-check requirements: If you’re working on a school or professional document, ensure you meet any specific margin requirements they provide.
- Use presets for speed: Preset options are perfect for quickly formatting a document without fuss.
- Customize for precision: Use the custom margins option to achieve precise measurements for your document.
- Consider readability: Wider margins can make a document easier to read by providing more white space.
- Adjust for printing: If you’re printing, remember that printers need certain minimum margins to avoid cutting off text.
What are the default margin settings in Word?
The default margin setting in Word is 1 inch on all sides.
This setting is typically suitable for most documents, providing a balanced look.
How do I set margins for specific pages?
Use section breaks to set different margins for specific pages.
Insert a section break, then adjust the margins for that section separately.
Can I change margins on a mobile device?
Yes, but the process is a bit different on mobile.
You typically find margin settings under formatting options, but the interface may vary.
Why are my margins greyed out?
Your document might be in “Read Mode” or protected.
Switch to “Print Layout” or check document protection settings.
How do margins affect printing?
Margins determine how much white space surrounds text on a printed page.
Ensure your margins are not too narrow to prevent text from being cut off.
Summary
- Open your document.
- Click the “Layout” tab.
- Select “Margins”.
- Choose preset or custom.
- Adjust and confirm.
Conclusion
Setting margins in Word is a fundamental skill that can significantly impact the appearance and readability of your documents. Whether you’re drafting an essay, a business report, or a creative piece, getting your margins right ensures that your work is presented neatly and professionally.
Remember, the default settings are there for convenience, but don’t hesitate to tweak them to suit your specific needs. Play around with different settings to see how they affect the look of your document.
If you’re ever in doubt, see what works best for the content type you’re working on. And if you’re following guidelines, double-check them to make sure your margins are just right. Happy formatting!

Matthew Burleigh has been writing tech tutorials since 2008. His writing has appeared on dozens of different websites and been read over 50 million times.
After receiving his Bachelor’s and Master’s degrees in Computer Science he spent several years working in IT management for small businesses. However, he now works full time writing content online and creating websites.
His main writing topics include iPhones, Microsoft Office, Google Apps, Android, and Photoshop, but he has also written about many other tech topics as well.
Read his full bio here.
Featured guides and deals
You will need to know how to change the page margins in Excel 2010 if you encounter a spreadsheet that is either slightly too big to fit on a printed page or if the spreadsheet might look better if it had larger margins.
But the method for changing page margins in Excel is a little different than other programs, such as Word, where you can immediately see the effects of adjusting the margins.
Fitting all of the information on a printed Microsoft Excel 2010 sheet is a pretty important element to consider when you are printing them out for reading purposes.
If you have a few extra columns or rows that spill over onto a second sheet, it can make for a difficult reading situation.
Additionally, if you have not printed column headings on that second page (which you can do by learning how to repeat rows in Excel 2010 ) then your readers might have difficulty determining what the outlying columns or rows are telling them.
Luckily Excel 2010 provides you with the necessary tools for learning how to set print margins in Excel 2010 , which you can use to your advantage to make as much of your spreadsheet fit on one page as possible.
How to Change Page Margins in Excel 2010
Adjusting the margins in Excel 2010 will not have any effect on how the spreadsheet appears on your computer screen.
The adjustment that the following methods will teach you to make is solely an element that will affect your printed documents.
One thing that you will need to take into consideration is your printer. Every printer is different, and you could theoretically encounter a situation where the printer will not be able to print the entire document if you make your margins too small.
In my experience, most printers are capable of creating documents with .2″ margins, even if you receive a warning that the document might not fit on the page.
However, your own experiences might vary. We offer three methods for changing the page margins in Excel 2010 below.
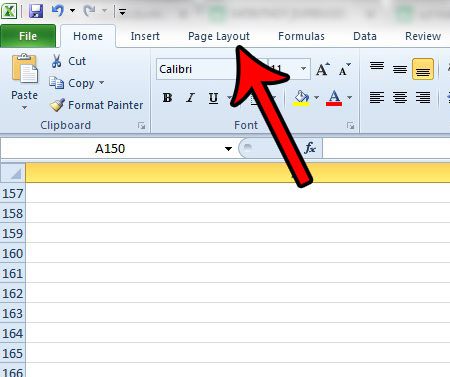
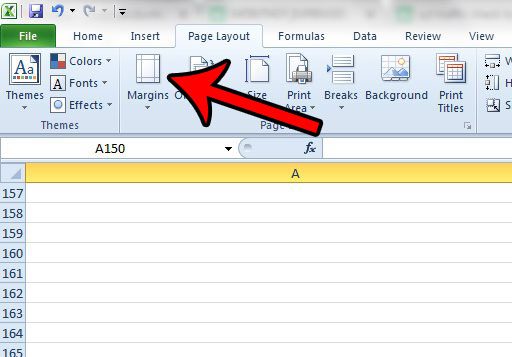
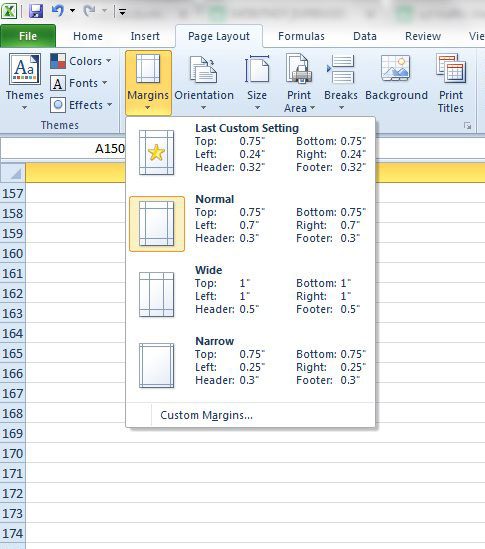
Method 1 – how to change the page margins from the Page Layout tab in Excel 2010
Step 1: Open your file in Excel 2010.
Step 2: Click the Page Layout tab at the top of the window.
Step 3: Click the Margins button.
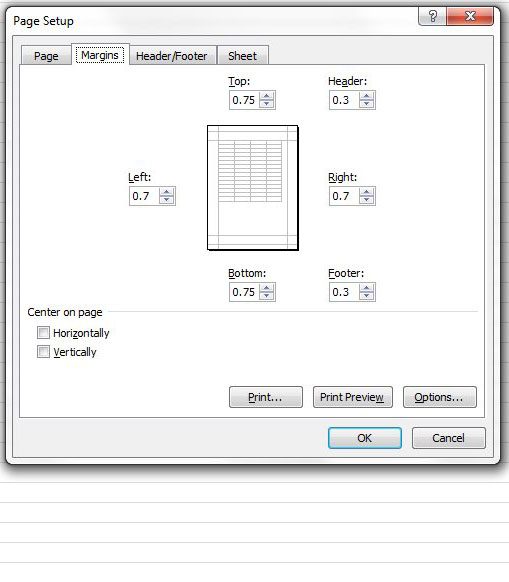
Step 4: Click the desired margin setting, or click Custom Margins to specify your own. If you clicked Custom Margins, continue to the next step. Otherwise you are done changing your page margins.
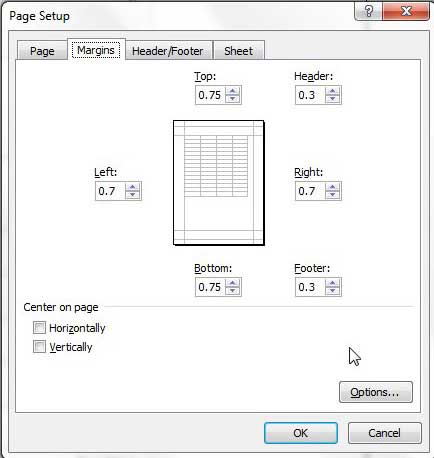
Step 5: Enter your desired margin sizes into the appropriate fields, then click the OK button.
Method 2 – change the page margins from the Print menu in Excel 2010
Step 1: Open the Excel spreadsheet for which you want to set the print margins.
Step 2: Click the File tab at the top-left corner of the window, then click the Print option in the column at the left side of the window.
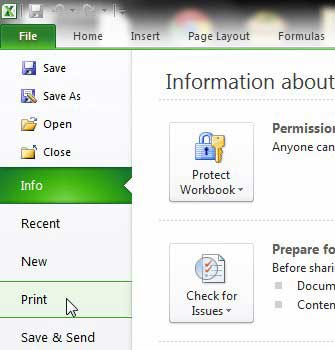
Step 3: Click the Normal Margins drop-down menu, then click the Custom Margins option at the bottom of the window. There are actually several preset options on this drop-down menu, so feel free to use on of them instead if it will suit your spreadsheet.
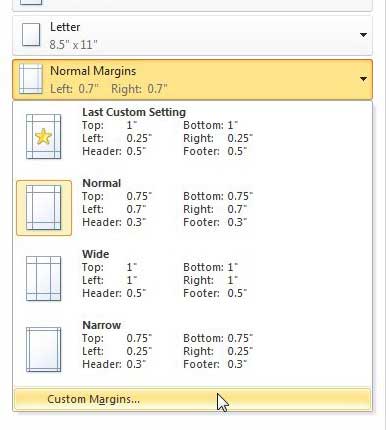
Step 4: Adjust the values in the individual margin fields until your document is fitting on the page as you would like it to. Since Excel 2010 does not offer a preview window for the margin adjustments, you may need to exit and re-enter this menu a few times to get it right.
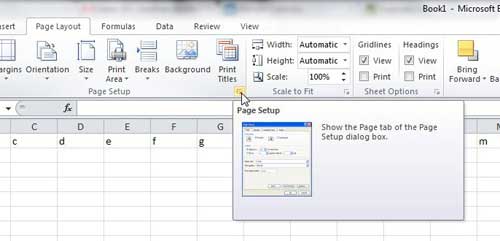
Method 3 – Change page margins by clicking the Page Setup button on the Page Layout tab
Note that you can also open the Page Setup window by clicking the Page Layout tab at the top of the window, then clicking the Page Setup button in the Page Setup section of the ribbon. You will then be taken to the Page Setup menu shown in Method 2.
Now that you know how to set print margins in Excel 2010, you can use whichever of these options you prefer to set that information for your spreadsheets.
Summary – How to change page margins in Excel 2010
- Click the Page Layout tab.
- Click the Margins button.
- Select one of the default page margin settings, or click Custom Margins to specify your own.
- Adjust the settings on the Page Setup window as needed.
- Click the OK button when you are finished.
Learning how to change page margins in Excel 2013 is one of several options available for you to improve the way your spreadsheets print. You can read our guide to printing in Excel for additional options and features that are available which can lead you to spreadsheets that print in a more optimal way.
Matthew Burleigh has been writing tech tutorials since 2008. His writing has appeared on dozens of different websites and been read over 50 million times.
After receiving his Bachelor’s and Master’s degrees in Computer Science he spent several years working in IT management for small businesses. However, he now works full time writing content online and creating websites.
His main writing topics include iPhones, Microsoft Office, Google Apps, Android, and Photoshop, but he has also written about many other tech topics as well.
Read his full bio here.
Featured guides and deals
