Setting up the fingerprint on your iPad is quite simple and ensures that your device is secure and easy to access. You just need to navigate through a few settings, follow some on-screen instructions, and you’ll be good to go. This guide will walk you through the entire process step by step.
How to Set Up Fingerprint on iPad
In this section, we’ll go through each step you need to take to set up your fingerprint on your iPad. By the end, you’ll have a fully functional Touch ID that will make unlocking your device and making purchases a breeze.
Step 1: Head to Settings
Go to your iPad’s Settings app.
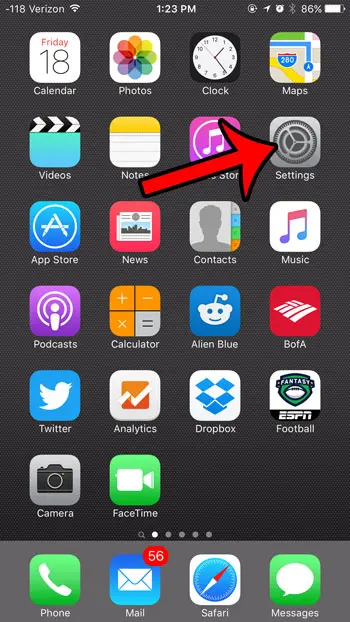
In your Settings app, you’ll find all the controls for your iPad. It’s like the control center of your device. Tap on the familiar grey icon with gears.
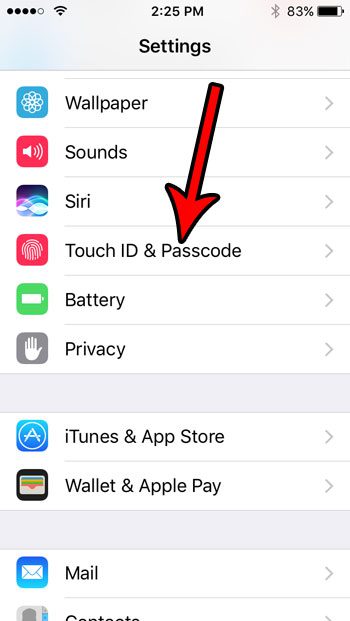
Step 2: Select Touch ID & Passcode
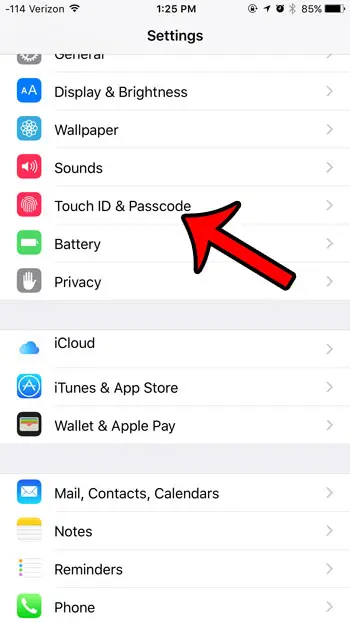
Look for and tap on “Touch ID & Passcode.”
This menu is where you manage all your fingerprint settings. It’s a one-stop shop for setting up and managing your Touch ID.
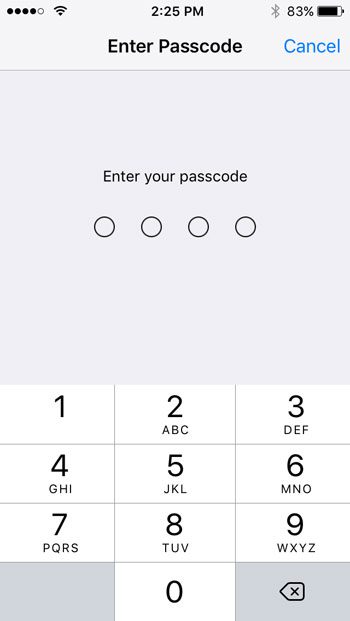
Step 3: Enter Your Passcode
Type in your current passcode.
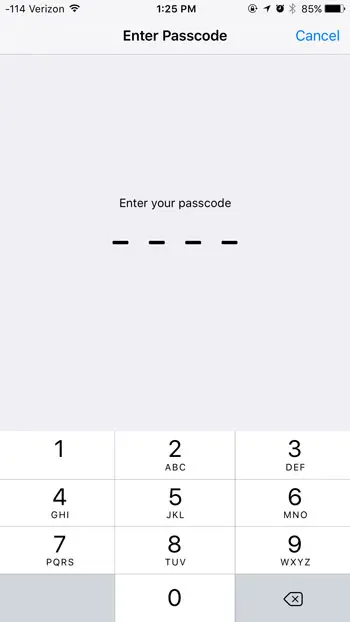
For security reasons, you need to enter your existing passcode to make changes to your Touch ID settings. This helps ensure that only you can make these changes.
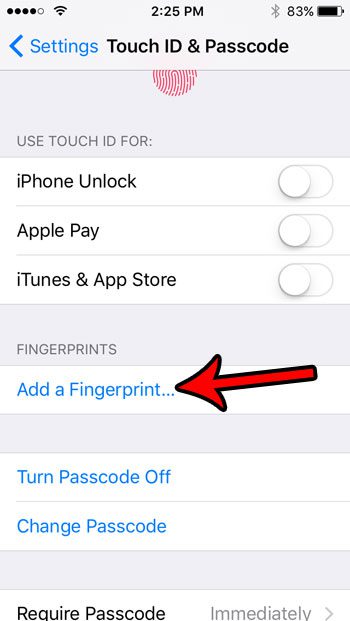
Step 4: Add a Fingerprint
Tap on “Add a Fingerprint.”
Your iPad will now guide you through the process of adding a fingerprint. Follow the on-screen instructions carefully.
Step 5: Place Your Finger on the Home Button
Place your finger on the Home button and lift it repeatedly.
You need to place and lift your finger several times so the iPad can get a full scan of your fingerprint. Try to cover different parts of your fingerprint to get the best scan.
Step 6: Adjust Your Grip
Adjust your grip and repeat the process.
This step ensures that the iPad can read your fingerprint from different angles, making it more efficient and reliable when you unlock your device or make purchases.
Once you have completed all the steps, your iPad will be able to recognize your fingerprint. You can now use Touch ID to unlock your device, authorize purchases, and access secure apps.
Tips for Setting Up Fingerprint on iPad
- Clean your fingers: Ensure your fingers are clean and dry for the best results.
- Multiple fingers: Register more than one finger to make it easier to unlock your iPad.
- Precise placement: Try to cover different parts of your fingerprint during the scan.
- Update iOS: Make sure your iPad is running the latest iOS version for the best performance.
- Adjust settings: Customize your Touch ID settings to best suit your needs.
Can I add more than one fingerprint?
Yes, you can add multiple fingerprints to your iPad. This is useful if you want to use different fingers or allow other trusted users access.
What should I do if Touch ID isn’t working?
If Touch ID isn’t working, try cleaning the Home button and your fingers. You can also delete and re-add your fingerprints.
Is Touch ID secure?
Yes, Touch ID is very secure. It uses advanced technology to ensure that your fingerprint data is protected.
Can I use Touch ID for app purchases?
Yes, you can use Touch ID to authorize purchases in the App Store and other apps that support it.
Do I need to use a passcode with Touch ID?
Yes, you still need a passcode as a backup in case Touch ID doesn’t recognize your fingerprint.
Summary
- Head to Settings.
- Select Touch ID & Passcode.
- Enter your passcode.
- Add a fingerprint.
- Place your finger on the Home button.
- Adjust your grip and repeat the process.
Conclusion
Setting up a fingerprint on your iPad is a straightforward process that enhances the security and convenience of your device. By following the steps outlined above, you can easily configure Touch ID to make your iPad more secure and simpler to use.
Understanding how to set up a fingerprint on iPad not only strengthens your device’s security but also significantly improves your user experience. It’s a small step that offers a big payoff. If you want to dive deeper into the wonders of iPad security, Apple’s official support page offers more detailed information.
So, what are you waiting for? It’s time to add that extra layer of security to your iPad!

Matthew Burleigh has been writing tech tutorials since 2008. His writing has appeared on dozens of different websites and been read over 50 million times.
After receiving his Bachelor’s and Master’s degrees in Computer Science he spent several years working in IT management for small businesses. However, he now works full time writing content online and creating websites.
His main writing topics include iPhones, Microsoft Office, Google Apps, Android, and Photoshop, but he has also written about many other tech topics as well.
Read his full bio here.
Featured guides and deals
Setting up the fingerprint on your iPad is quite simple and ensures that your device is secure and easy to access. You just need to navigate through a few settings, follow some on-screen instructions, and you’ll be good to go. This guide will walk you through the entire process step by step.
How to Set Up Fingerprint on iPad
In this section, we’ll go through each step you need to take to set up your fingerprint on your iPad. By the end, you’ll have a fully functional Touch ID that will make unlocking your device and making purchases a breeze.
Step 1: Head to Settings
Go to your iPad’s Settings app.
In your Settings app, you’ll find all the controls for your iPad. It’s like the control center of your device. Tap on the familiar grey icon with gears.
Step 2: Select Touch ID & Passcode
Look for and tap on “Touch ID & Passcode.”
This menu is where you manage all your fingerprint settings. It’s a one-stop shop for setting up and managing your Touch ID.
Step 3: Enter Your Passcode
Type in your current passcode.
For security reasons, you need to enter your existing passcode to make changes to your Touch ID settings. This helps ensure that only you can make these changes.
Step 4: Add a Fingerprint
Tap on “Add a Fingerprint.”
Your iPad will now guide you through the process of adding a fingerprint. Follow the on-screen instructions carefully.
Step 5: Place Your Finger on the Home Button
Place your finger on the Home button and lift it repeatedly.
You need to place and lift your finger several times so the iPad can get a full scan of your fingerprint. Try to cover different parts of your fingerprint to get the best scan.
Step 6: Adjust Your Grip
Adjust your grip and repeat the process.
This step ensures that the iPad can read your fingerprint from different angles, making it more efficient and reliable when you unlock your device or make purchases.
Once you have completed all the steps, your iPad will be able to recognize your fingerprint. You can now use Touch ID to unlock your device, authorize purchases, and access secure apps.
Tips for Setting Up Fingerprint on iPad
- Clean your fingers: Ensure your fingers are clean and dry for the best results.
- Multiple fingers: Register more than one finger to make it easier to unlock your iPad.
- Precise placement: Try to cover different parts of your fingerprint during the scan.
- Update iOS: Make sure your iPad is running the latest iOS version for the best performance.
- Adjust settings: Customize your Touch ID settings to best suit your needs.
Can I add more than one fingerprint?
Yes, you can add multiple fingerprints to your iPad. This is useful if you want to use different fingers or allow other trusted users access.
What should I do if Touch ID isn’t working?
If Touch ID isn’t working, try cleaning the Home button and your fingers. You can also delete and re-add your fingerprints.
Is Touch ID secure?
Yes, Touch ID is very secure. It uses advanced technology to ensure that your fingerprint data is protected.
Can I use Touch ID for app purchases?
Yes, you can use Touch ID to authorize purchases in the App Store and other apps that support it.
Do I need to use a passcode with Touch ID?
Yes, you still need a passcode as a backup in case Touch ID doesn’t recognize your fingerprint.
Summary
- Head to Settings.
- Select Touch ID & Passcode.
- Enter your passcode.
- Add a fingerprint.
- Place your finger on the Home button.
- Adjust your grip and repeat the process.
Conclusion
Setting up a fingerprint on your iPad is a straightforward process that enhances the security and convenience of your device. By following the steps outlined above, you can easily configure Touch ID to make your iPad more secure and simpler to use.
Understanding how to set up a fingerprint on iPad not only strengthens your device’s security but also significantly improves your user experience. It’s a small step that offers a big payoff. If you want to dive deeper into the wonders of iPad security, Apple’s official support page offers more detailed information.
So, what are you waiting for? It’s time to add that extra layer of security to your iPad!
Matthew Burleigh has been writing tech tutorials since 2008. His writing has appeared on dozens of different websites and been read over 50 million times.
After receiving his Bachelor’s and Master’s degrees in Computer Science he spent several years working in IT management for small businesses. However, he now works full time writing content online and creating websites.
His main writing topics include iPhones, Microsoft Office, Google Apps, Android, and Photoshop, but he has also written about many other tech topics as well.
Read his full bio here.
Featured guides and deals
JavaScript tidak tersedia.
We’ve detected that JavaScript is disabled in this browser. Please enable JavaScript or switch to a supported browser to continue using x.com. You can see a list of supported browsers in our Help Center.
Pusat Bantuan
Persyaratan Layanan Kebijakan Privasi Kebijakan Penggunaan Kuki Jejak Informasi iklan © 2026 X Corp.

Dengan mengeklik Lanjutkan, Anda menyetujui Perjanjian Pengguna , Kebijakan Privasi , dan Kebijakan Cookie LinkedIn.
Kami telah mengirimkan link sekali pakai ke alamat email utama Anda
Klik link untuk login langsung ke akun LinkedIn Anda.
Jika Anda tidak menemukan email tersebut di kotak pesan, periksa folder spam.
Setuju & Bergabung dengan LinkedIn
Dengan mengeklik Lanjutkan, Anda menyetujui Perjanjian Pengguna , Kebijakan Privasi , dan Kebijakan Cookie LinkedIn.
Adding another fingerprint on your iPad is a straightforward process that can help make accessing your device even more convenient. By following a few simple steps, you’ll be able to add a new fingerprint, whether it’s for a different finger or for another user, in no time.
How to Add Another Fingerprint on iPad
In this section, we’ll break down the process of adding a new fingerprint to your iPad. By the end of these steps, your iPad will recognize the additional fingerprint and allow access accordingly.
Step 1: Open Settings
Start by opening the Settings app from your home screen.
The Settings app is where you’ll manage all the configurations for your iPad, including security features like fingerprint recognition.
Step 2: Go to Touch ID & Passcode
Tap on the “Touch ID & Passcode” option in the Settings menu.
You’ll need to enter your current passcode to proceed. This step ensures that only authorized users can make changes to your iPad’s security settings.
Step 3: Add a Fingerprint
Scroll down and tap on “Add a Fingerprint.”
Your iPad will prompt you to place your finger on the Home button multiple times to capture various parts of your fingerprint. Follow the on-screen instructions carefully.
Step 4: Follow On-screen Prompts
Place your finger on the Home button as instructed by the device.
Make sure your finger is clean and dry. Adjust the position of your finger so that the iPad can capture all sides of your fingerprint.
Step 5: Complete the Process
Once the iPad has successfully scanned your finger, tap “Continue” to finalize the addition of the new fingerprint.
Your iPad will confirm that the new fingerprint has been added and will now recognize it for unlocking and other authenticated activities.
Once you’ve completed these steps, your iPad is now equipped to recognize the new fingerprint. You can use either the original or the new fingerprint to unlock your device or perform other secure actions.
Tips for Adding Another Fingerprint on iPad
- Cleanliness : Make sure your finger is clean and dry before scanning.
- Multiple Angles : Move your finger around to capture different parts of the fingerprint.
- Passcode : Always have a strong passcode as a backup.
- Family and Friends : Add fingerprints for trusted family members.
- Regular Updates : Ensure your iPad’s software is up-to-date for the best security features.
Can I add multiple fingerprints?
Yes, you can add up to five different fingerprints on your iPad.
Is it possible to delete a fingerprint?
Absolutely, just go to “Touch ID & Passcode” and swipe left on the fingerprint you want to delete.
What should I do if my fingerprint isn’t recognized?
Try cleaning the Home button and your finger. If that doesn’t work, you may need to re-add the fingerprint.
Do I need to enter my passcode after adding a fingerprint?
Yes, your passcode is a backup and will be required for some actions, especially after restarting your iPad.
Can I use Touch ID for apps?
Yes, many apps support Touch ID for authentication, and you can enable this in each app’s settings.
Summary
- Open Settings.
- Go to Touch ID & Passcode.
- Add a Fingerprint.
- Follow On-screen Prompts.
- Complete the Process.
Conclusion
Adding another fingerprint on your iPad is a quick and easy way to improve the usability and security of your device. Whether you’re adding a second fingerprint for yourself or allowing a loved one to access your iPad, these steps ensure that the process is smooth and straightforward. Keeping your iPad updated and secure is crucial, and using Touch ID is a simple yet effective way to do just that. If you found this guide helpful, take a moment to explore other security features and tips to get the most out of your iPad. Happy fingerprinting!
Matthew Burleigh has been writing tech tutorials since 2008. His writing has appeared on dozens of different websites and been read over 50 million times.
After receiving his Bachelor’s and Master’s degrees in Computer Science he spent several years working in IT management for small businesses. However, he now works full time writing content online and creating websites.
His main writing topics include iPhones, Microsoft Office, Google Apps, Android, and Photoshop, but he has also written about many other tech topics as well.
Read his full bio here.
The Touch ID sensor on your iPhone has a number of different applications, including the ability to unlock the device, or even make a payment with Apple Wallet.
These functions can be enabled or disabled to suit your personal preferences, but they require fingerprints to be saved on the device in order to function.
You likely enrolled several fingerprints when you first set up your iPhone in iOS 9, but you may find that a certain fingerprint isn’t working.
Fortunately, the fingerprints on your iPhone are not set in stone, and you can update or remove them as needed.
Below are the steps needed to remove or update a Touch ID fingerprint on an iPhone in iOS 9 –
- Open the Settings menu.
- Select the Touch ID & Passcode option.
- Enter your passcode (if one is currently set on the device).
- Select the fingerprint that you wish to update or remove.
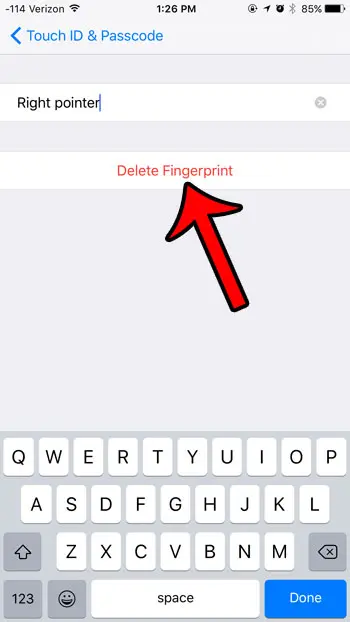
- Change the name if that is the element of the fingerprint that you wish toupdate. If you want to remove or update the fingerprint itself, then tap the Delete Fingerprint button. Continue below if you wish to update the fingerprint that you just deleted.
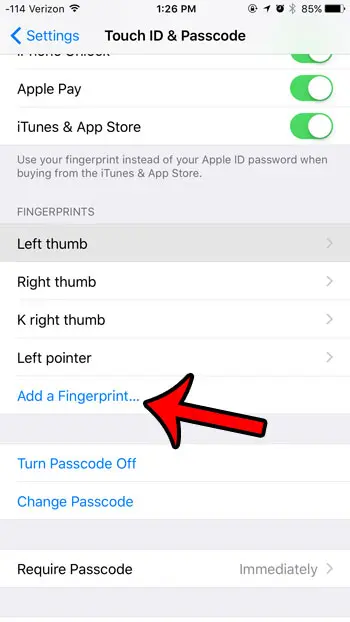
- Tap the Add a Fingerprint button.
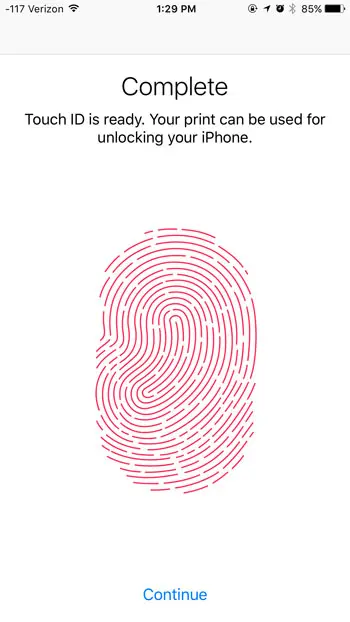
- Place and lift your finger repeatedly until the iPhone indicates that the fingerprint is complete.
These steps are repeated below with pictures –
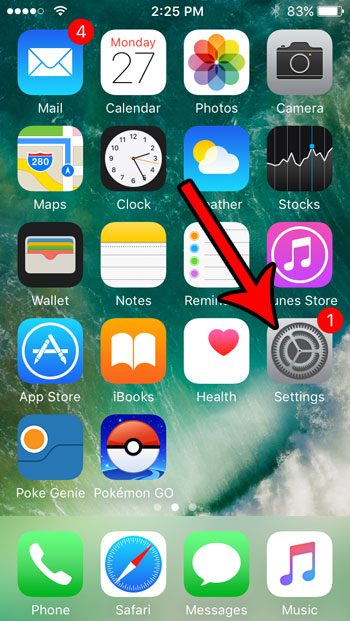
Step 1: Tap the Settings icon.
Step 2: Open the Touch ID & Passcode menu.
Step 3: Enter your device passcode, if prompted.
Step 4: Tap the listing for the fingerprint that you wish to update.
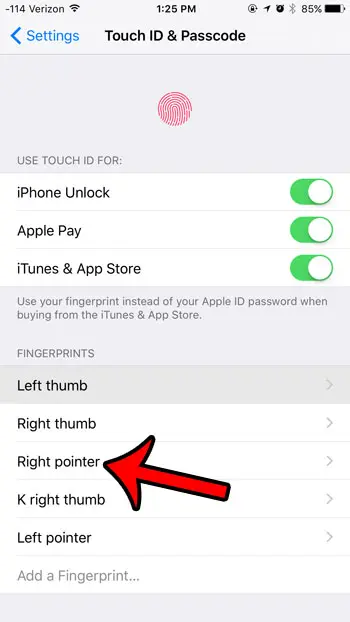
Step 5: Delete and enter a new name for the fingerprint, if that is what you wish to update. However, if you wish to delete or update the fingerprint itself, then tap the Delete Fingerprint button. If you simply wished to delete the fingerprint, then you are done. If you wish to re-add the same fingerprint or a new one, then continue below.
Step 6: Tap the Add a Fingerprint button.
Step 7: Place and lift your finger on the Touch ID sensor as instructed. Your iPhone will let you know once it has enough information to complete the fingerprint entry.
Now that you know how to add or remove fingerprints in iOS 9 on your iPhone, you can edit the fingerprints that are currently saved on the device and used to unlock it.
Would you like to change the passcode on your iPhone, or switch to a different passcode format? Learn how with this article .
Matthew Burleigh has been writing tech tutorials since 2008. His writing has appeared on dozens of different websites and been read over 50 million times.
After receiving his Bachelor’s and Master’s degrees in Computer Science he spent several years working in IT management for small businesses. However, he now works full time writing content online and creating websites.
His main writing topics include iPhones, Microsoft Office, Google Apps, Android, and Photoshop, but he has also written about many other tech topics as well.
Read his full bio here.
Featured guides and deals
While adding a passcode to your iPhone is a great way to increase the security of the device, your iPhone SE also has something called Touch ID for even more security.
But if you’ve been wondering how to add an iPhone SE fingerprint if you initially dismissed the Touch ID set up, or if you only added one fingerprint and now want to use more, then our tutorial will show you where to find this option and how to use it.
How to Set Up Touch ID on an iPhone SE
- Open Settings .
- Choose Touch ID & Passcode .
- Enter your passcode.
- Select Add a Fingerprint .
- Follow the instructions to register your fingerprint.
Our guide continues below with additional information on how to add an iPhone SE fingerprint to your device, including pictures of these steps.
Some of the iPhone models that are available for sale include a feature that can store and scan your fingerprint. This fingerprint option, also called Touch ID, can be used to authenticate certain apps and device features, such as unlocking the iPhone.
Using your fingerprint to unlock your iPhone is typically faster than entering a passcode. You can even put sever of your fingerprints into the iPhone so that you can unlock the device even when holding it a couple of different ways. Our tutorial below will show you how to add a fingerprint to your iPhone if you haven’t done it before, or if you only added one or two fingers and want to add more.
Our tutorial on how to scan iPhone documents will walk you through using a really helpful tool on the device that effectively turns your iPhone into a document scanner.
How to Put Another Fingerprint on Your iPhone SE (Guide with Pictures)
The steps in this article were performed on an iPhone SE in iOS 10.3.2.
Note that you will be able to add and remove fingerprints from your device at any time, and that you can have fingerprints of your friends or family members on your device, if you so choose.
You also have some control over what you can use the fingerprint for.
Step 1: Open theSettingsapp.
Step 2: Select theTouch ID & Passcodeoption.
Step 3: Enter the current device passcode, if one is set.
Step 4: Touch theAdd a Fingerprintbutton.
Step 5: Follow the instructions on the screen until the phone has registered your full fingerprint. You can then repeat this process to add additional fingers.
Now that you have completed our guide on how to add an iPhone SE fingerprint you will be able to make your device more secure in the event that it is stolen or someone else has physical access to your device and you don’t want them snooping around on your phone.
Does it seem like your iPhone’s screen doesn’t actually turn off unless you manually press the Power button? Find out why this might be happening and see where to find the setting that lets you control how long your iPhone waits before it locks the screen.
Matthew Burleigh has been writing tech tutorials since 2008. His writing has appeared on dozens of different websites and been read over 50 million times.
After receiving his Bachelor’s and Master’s degrees in Computer Science he spent several years working in IT management for small businesses. However, he now works full time writing content online and creating websites.
His main writing topics include iPhones, Microsoft Office, Google Apps, Android, and Photoshop, but he has also written about many other tech topics as well.
Read his full bio here.
