Transferring music from your iPhone to your iPad might seem like a techy challenge, but it’s actually pretty simple once you get the hang of it. Whether you want to sync your favorite tunes for offline listening or just transfer a couple of songs, there are a few easy ways to get the job done. In this guide, we’ll walk you through the steps to make sure your music follows you wherever you go.
How to Transfer Music from iPhone to iPad
Follow these steps to seamlessly transfer music from your iPhone to your iPad. Whether you choose to use iCloud Music Library, Apple Music, or iTunes, we’ve got you covered.
Step 1: Enable iCloud Music Library on iPhone
Ensure your music is synced with iCloud.
First, grab your iPhone and go to Settings. Scroll down, tap Music, and toggle on iCloud Music Library. If you’re using Apple Music, this option might appear as Sync Library.
Step 2: Enable iCloud Music Library on iPad
Sync your iPad with iCloud Music Library.
Now, switch to your iPad and follow the same steps: Settings > Music > toggle on iCloud Music Library (or Sync Library). This ensures both devices are connected to the same cloud service.
Step 3: Check Your Internet Connection
Make sure both devices are online.
A stable Wi-Fi connection is crucial for the iCloud sync to work smoothly. Check that both your iPhone and iPad are connected to the internet.
Step 4: Open the Music App on iPad
Access your music library on the iPad.
Launch the Music app on your iPad. You should see your entire music library, including the songs from your iPhone, thanks to the iCloud sync.
Step 5: Download the Songs for Offline Listening
If needed, download specific tracks on your iPad.
Tap the cloud icon next to any song or album to download it for offline listening. This way, you can enjoy your music even without an internet connection.
After completing these steps, all the music from your iPhone should be available on your iPad. You can listen, download, and enjoy your favorite tracks anytime, anywhere.
Tips for Transferring Music from iPhone to iPad
- Make sure both devices are signed into the same Apple ID to sync your music.
- If using Apple Music, you can create custom playlists on your iPhone and they will automatically appear on your iPad.
- Regularly update your devices to the latest iOS version for optimal performance.
- If you have a large music library, consider using Wi-Fi instead of cellular data to avoid extra charges.
- Use iTunes on a computer as an alternative method if you face issues with iCloud.
Do I need an Apple Music subscription to transfer music?
No, you don’t need an Apple Music subscription. You can use the iCloud Music Library feature if you have purchased music from the iTunes Store or added it manually to iTunes.
What if the music doesn’t appear on my iPad?
Ensure both devices have iCloud Music Library enabled and are connected to the same Apple ID. Restarting both devices can also help.
Can I transfer music without using the internet?
Yes, you can use iTunes on a computer to manually transfer music without an internet connection.
Is there a limit to the number of songs I can transfer?
No, there’s no specific limit. However, your total music library size should not exceed the available storage on your iPad.
What if my iCloud storage is full?
You may need to upgrade your iCloud storage plan or remove some files to free up space for your music library.
Summary of Steps
- Enable iCloud Music Library on iPhone
- Enable iCloud Music Library on iPad
- Check your internet connection
- Open the Music app on iPad
- Download the songs for offline listening
Conclusion
Transferring music from your iPhone to your iPad doesn’t have to be a daunting task. With just a few simple steps, you can easily sync your favorite tracks across both devices. Whether you’re a dedicated Apple Music user or preferring to manually manage your music, the process is straightforward and user-friendly.
For more tech tips and how-to guides, stay tuned. Got a question or need further help? Drop a comment or reach out. Your seamless music experience awaits!

Matthew Burleigh has been writing tech tutorials since 2008. His writing has appeared on dozens of different websites and been read over 50 million times.
After receiving his Bachelor’s and Master’s degrees in Computer Science he spent several years working in IT management for small businesses. However, he now works full time writing content online and creating websites.
His main writing topics include iPhones, Microsoft Office, Google Apps, Android, and Photoshop, but he has also written about many other tech topics as well.
Read his full bio here.
Featured guides and deals
Do you have a long list of songs in your iTunes library, and want to view them when you are not near your computer? This can be helpful if you want to create a playlist while you are traveling, or if you want to see if there are songs that you do not own and want to purchase. One simple way to do this is to print out a list of all of the songs that you have in iTunes.
You might have previously done this in an earlier version of iTunes, but are having trouble doing so in iTunes 11. Fortunately it is still possible, and you can follow the few short steps in our tutorial below and print a document with a list of songs.
How to Print a List of Your iTunes Library in iTunes 11 in Windows
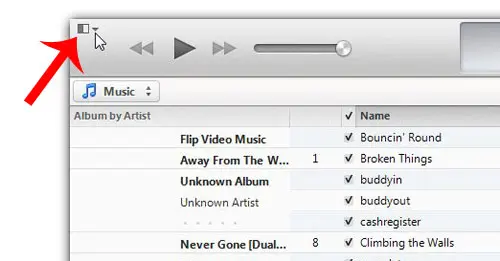
- Open iTunes .
- Click the menu icon.
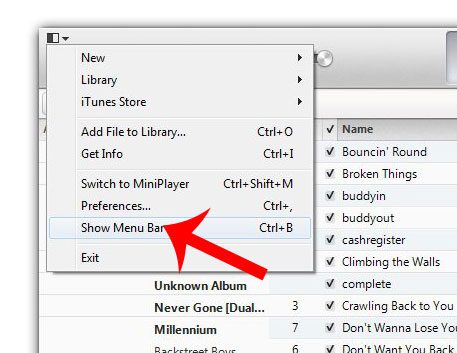
- Choose Show Menu Bar .
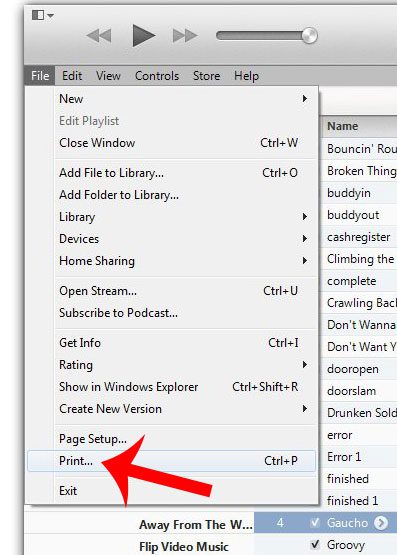
- Select File , then Print .
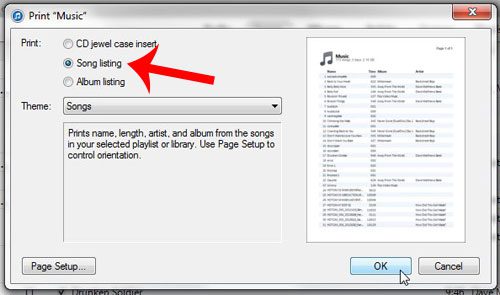
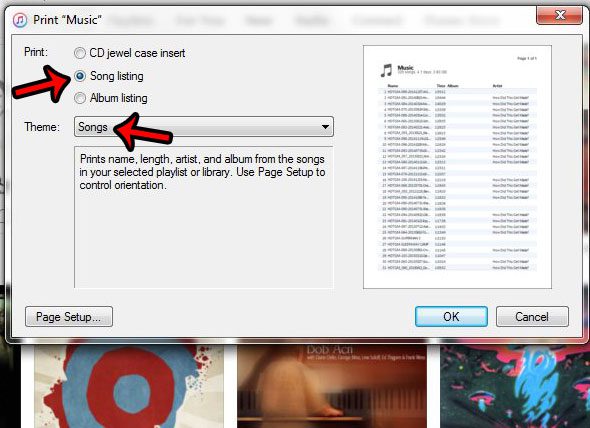
- Choose Song Listing , then OK .
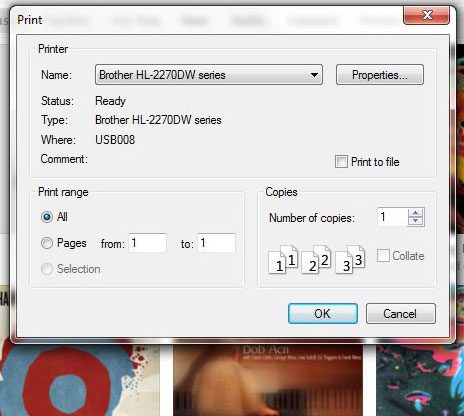
- Click Print .
Our guide continues below with additional information on working with song and file lists in iTunes, including pictures of these steps.
Printing Your iTunes Library in Windows
The steps in this tutorial were written using iTunes 11 on a Windows computer . We will be printing a list of the songs in your library in the steps below. The steps may be slightly different if you are using a different version of iTunes, or if you are on a Mac.
Step 1: Launch iTunes, then navigate to the library or playlist that you want to print.
Step 2: Click the iTunes menu icon at the top-left corner of the window.
Step 3: Click the Show Menu Bar option.
Step 4: Click the File tab at the top of the window, then click the Print option.
Step 5: Click the Song Listing option, then click the OK button.
Step 6: Click the Print button to print the list.
Do you want to download purchased songs in iTunes, but you are not able to? You might need to authorize your computer with your Apple ID to enable the ability to download songs through the program.
How to Create a List of Your iTunes Music Library
If you have ever needed to share a list of the songs in your iTunes library, whether you were planning an event, or were making a playlist of CD for someone, then you may have been looking for a simple way to generate that list. You can accomplish this goal by printing your library as a document, which can save you the hassle of a series of screenshots, or manually writing or typing a list.
But the option for printing a list of your iTunes library is not immediately obvious, so you can follow our guide below to see how to use the built-in printing functionality of iTunes on your Windows computer.
Print Your iTunes Library as a List in Windows 7
The steps in this article were performed using iTunes version 12.3.1.23, on a computer running Windows 7. However, this process is similar for many other iTunes versions in Windows.
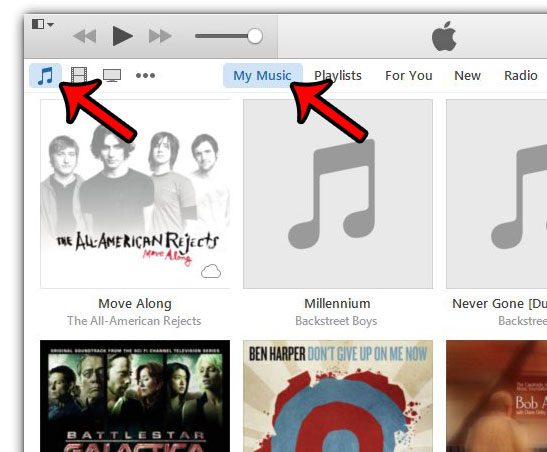
Step 1: Launch iTunes, then click the Music button, and select the My Music option to display your iTunes library. If you would prefer instead to create a list of movies or TV shows, then select that option instead.
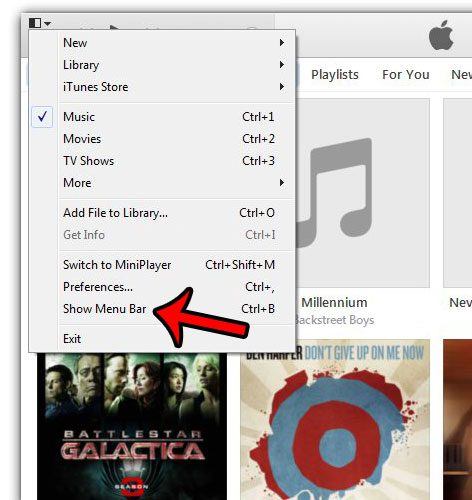
Step 2: Click the iTunes Menu button at the top-left corner of the window, then click the Show Menu Bar option. You can also display the Menu Bar by pressing Ctrl + B on your keyboard.
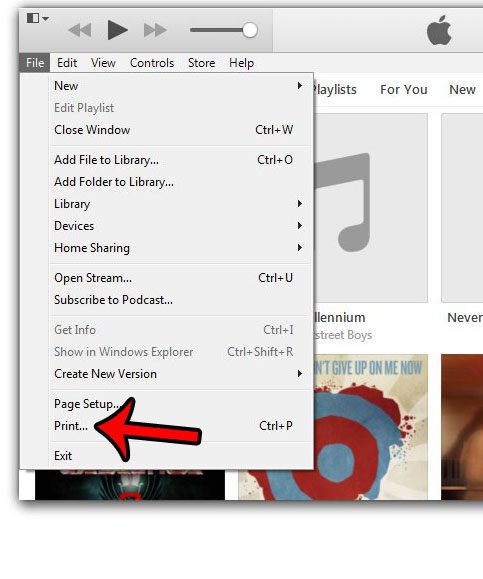
Step 3: Click File , then click Print . Note that you can shortcut to the Print menu by pressing Ctrl + P on your keyboard instead.
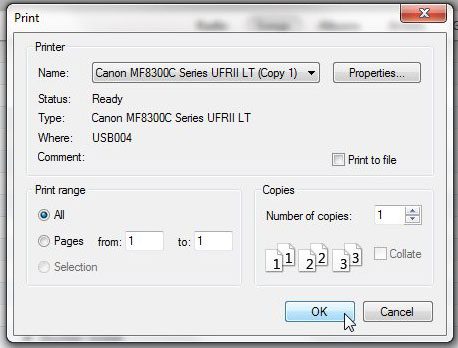
Step 4: Select either the CD jewel case insert , Songs , or Albums option in the top-section, then click the Theme drop-down menu to specify how you want your selection to be listed. You can click the OK button at the bottom of the window when you have finished.
Step 5: Change any of the options that you wish to adjust on this window, then click the OK button to print the list of songs.
Did you add a gift card to your iTunes account, and you want to see how much is left on it? Learn how to check your Apple gift card balance from an iPhone.
Matthew Burleigh has been writing tech tutorials since 2008. His writing has appeared on dozens of different websites and been read over 50 million times.
After receiving his Bachelor’s and Master’s degrees in Computer Science he spent several years working in IT management for small businesses. However, he now works full time writing content online and creating websites.
His main writing topics include iPhones, Microsoft Office, Google Apps, Android, and Photoshop, but he has also written about many other tech topics as well.
Read his full bio here.
Featured guides and deals
