If you need to uninstall NVIDIA drivers from your Windows 11 computer, you can do it quickly and efficiently through a few simple steps. This process involves accessing your device manager, identifying the NVIDIA driver, and uninstalling it. By following these steps, you’ll have your system free of NVIDIA drivers in no time.
How to Uninstall NVIDIA Drivers on Windows 11
Uninstalling NVIDIA drivers on Windows 11 is necessary if you’re facing issues with the current drivers or if you need to install a different version. The following steps will guide you through the entire process.
Step 1: Open Device Manager
The first step is to open the Device Manager on your Windows 11 computer.
To do this, right-click the Start button and select “Device Manager” from the context menu. Alternatively, you can press “Win + X” and then select “Device Manager.”
Step 2: Locate Display Adapters
In the Device Manager, you need to find the section labeled “Display adapters.”
Expand this section by clicking the arrow next to it. You should see your NVIDIA graphics card listed here.
Step 3: Select NVIDIA Graphics Card
Now, you need to select your NVIDIA graphics card from the list.
Right-click on your NVIDIA graphics card and choose “Uninstall device” from the context menu. This will bring up a new dialog box.
Step 4: Confirm Uninstallation
In the dialog box that appears, confirm that you want to uninstall the device.
Make sure to check the box that says “Delete the driver software for this device” if you see it, then click “Uninstall.”
Step 5: Restart Your Computer
After the uninstallation is complete, it’s essential to restart your computer.
Rebooting will ensure that all changes take effect and the NVIDIA drivers are fully removed from your system.
Once you’ve completed these steps, your Windows 11 computer will no longer have the NVIDIA drivers installed. This can help resolve various issues or prepare your system for new driver installations.
Tips for Uninstalling NVIDIA Drivers on Windows 11
- Create a system restore point : Before uninstalling, create a system restore point. It’s a safety net in case anything goes wrong.
- Use Display Driver Uninstaller (DDU) : For a more thorough removal, use a tool like DDU, which can clean out remnants of old drivers.
- Check for updates : Ensure your Windows 11 is up to date before installing new drivers to avoid compatibility issues.
- Backup important data : Always back up your important files to prevent data loss during the process.
- Disable antivirus : Sometimes, antivirus software can interfere with driver uninstallation. Temporarily disable it if you encounter issues.
What happens if I uninstall NVIDIA drivers?
Uninstalling NVIDIA drivers will remove the software that allows your graphics card to communicate with your operating system, which can temporarily degrade display performance.
Can I reinstall NVIDIA drivers after uninstalling them?
Yes, you can reinstall NVIDIA drivers after uninstalling them. Simply download the latest drivers from NVIDIA’s website and follow the installation instructions.
Do I need to uninstall old drivers before installing new NVIDIA drivers?
It’s a good practice. Uninstalling old drivers can prevent potential conflicts and issues with new driver installations.
Will my computer work without NVIDIA drivers?
Your computer will still work, but you may experience reduced graphics performance. Windows will use a generic driver in the meantime.
How do I know if my NVIDIA driver uninstallation was successful?
After the computer restarts, you can check the Device Manager again. If the NVIDIA graphics card no longer appears under Display adapters, the uninstallation was successful.
Summary
- Open Device Manager.
- Locate Display Adapters.
- Select NVIDIA Graphics Card.
- Confirm Uninstallation.
- Restart Your Computer.
Conclusion
Uninstalling NVIDIA drivers on Windows 11 can seem daunting, but it’s quite straightforward if you follow the steps outlined above. Whether you’re troubleshooting an issue or preparing for a fresh driver installation, removing the old drivers is a necessary step.
Remember to take precautions like creating a system restore point and backing up important data to ensure a smooth process. Tools like Display Driver Uninstaller (DDU) can further help by thoroughly cleaning out old driver remnants.
For further reading, consider looking into guides on reinstalling drivers or optimizing your system’s performance post-uninstallation. If you encounter any issues, the NVIDIA community and support forums are excellent resources for finding solutions. So, go ahead, take control of your system, and keep it running smoothly by managing your drivers effectively.

Matthew Burleigh has been writing tech tutorials since 2008. His writing has appeared on dozens of different websites and been read over 50 million times.
After receiving his Bachelor’s and Master’s degrees in Computer Science he spent several years working in IT management for small businesses. However, he now works full time writing content online and creating websites.
His main writing topics include iPhones, Microsoft Office, Google Apps, Android, and Photoshop, but he has also written about many other tech topics as well.
Read his full bio here.
Featured guides and deals
If you have been using the same computer for a while, or if you have recently cycled through printer installations, then you probably have some printer drivers on your computer.
Even if you have gone through the hassle of using the Remove Device option for a printer on the Devices and Printers menu, the driver for that printer is likely to still be on your computer.
Since the old printer is no longer visible, you assume that there is no need to remove old printer drivers, because they are already gone. Windows 7 does not do this to complicate the printer installation process; they leave the driver on there in case you decide to use the printer again in the future.
Unfortunately, if you want to make changes to the printer driver, if you installed the wrong one, or if you want to install another printer that uses the same or a similar driver, then you will need to remove old printer drivers to get the current installation to work correctly.
Locating the List of Installed Printer Drivers
The list of printer drivers installed on your computer can be found by clicking the Start button at the bottom-left corner of your screen, then clicking Devices and Printers at the right side of the Start menu. Click one time on any installed printer, then click the Print Server Properties button in the horizontal blue bar at the top of the window.
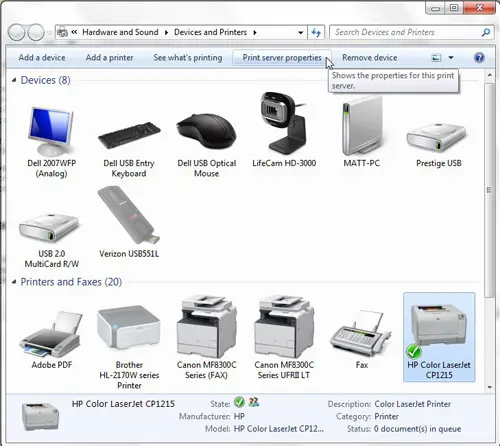
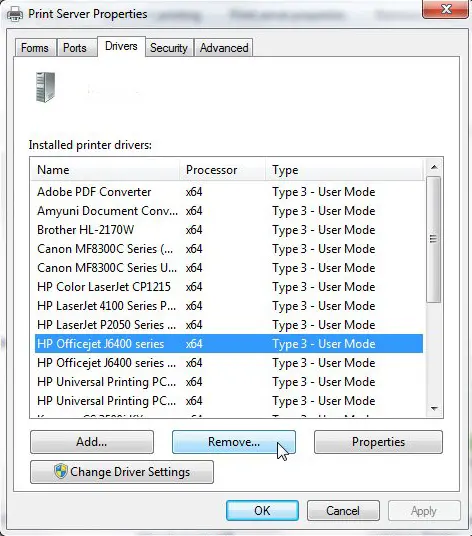
This will open a new Printer Server Properties window. Click the Drivers tab at the top of this window, click the old printer driver you want to remove, then click the Remove button at the bottom of the window.
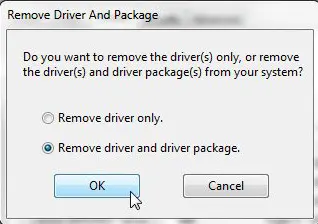
Click the option to the left of Remove driver and driver package , then click the OK button.
In most situations this will be the end of the process, and you will have removed all traces of the old printer driver. Unfortunately, it might not always be this easy.
Problems You May Encounter When You Want to Remove Old Printer Drivers
When I unsuccessfully attempt to remove an old printer driver, i usually get an error of the type “XX Printer could not be removed because driver XX is in use.” Unfortunately it is difficult to pinpoint exactly why you are receiving this message, but there are usually a few culprits that can be to blame.
1. Have you gone through the process of removing the device from the Devices and Printers menu?
While this step does not remove the driver from your computer, you cannot actually remove the driver until you have done this. To perform this step, open the Devices and Printers menu, right-click the printer whose driver you want to uninstall, then click the Remove Device option.
2. Is an open program still attempting to communicate with the printer?
This is a less common problem, but is one that I have encountered specifically with label printers for shipping programs. It is particularly prevalent in cases where the printer stopped working, and a print job was stuck in the print queue. The exact method for clearing this issue will vary depending upon your own specific circumstances, but a good way to resolve it is to close every program on your computer from which you can print, then press the Feed button on the printer a couple times.
3. Is there a print job stuck in the print queue?
When you right-click on a printer in the Devices and Printers menu, there is a See what’s printing option. When you click that option, it will show you the current print queue, as well as any documents that you cancelled, that you paused, or that were otherwise not successfully printer. If you cannot use the Cancel document or Cancel all documents option to clear this from the print queue, then you might need to restart your computer, remove the device from the Devices and Printers menu, then attempt to remove the driver using the procedure outlined above.
An issue that many people frequently experience is a broken printer.
Fortunately, this can usually be fixed with a few short troubleshooting steps, which we will go through below.
How to Fix a Faulty Windows Printer
For a variety of reasons, a printer may look offline in Windows 7. In addition to print driver difficulties, they can also involve problems with electricity and network access.
For further troubleshooting options, see our networked printer offline Windows 7 post.
If your printer is now showing as offline, you could try the following steps.
- Click Start .
- Choose Devices and Printers .
- Using the right-click menu on the printer icon, choose See what’s printing .
- Click the Printer tab, followed by Use printer offline , to bring the printer online.
You can also try rebooting the printer and computer, removing all of the printer’s cords, and, if necessary, reinstalling the printer if that doesn’t work.
Windows 11 Information
Printers! They’re like that one friend who needs a little extra attention. When they’re happy, everything is smooth sailing. But when they’re not, boy do they let you know! If you’ve recently upgraded or switched printers, those old drivers still hanging around on your Windows 11 system might just be the culprits causing the fuss. Time for a bit of digital spring cleaning! Let’s walk through the steps to remove those old printer drivers.
Understanding Printer Drivers
Ever wonder why we even need printer drivers? Think of them as the interpreters. Your computer speaks one language, and your printer speaks another. The driver is like the mutual friend that translates for both, ensuring your documents look exactly as they should when printed.
Getting Started: Accessing the Printer Server Properties
Before diving in, ensure you’re logged in with an administrator account. Trust me, it’ll save you a headache later!
- Press the Windows key + R on your keyboard. This opens the ‘Run’ dialogue box.
- Type in “control printers” and hit Enter. This should bring up the ‘Devices and Printers’ window.
- In the toolbar, you’ll spot an option that says “Print server properties”. Click on it.
Diving Deeper: Removing the Old Printer Drivers
- Now, in the ‘Print server properties’ window, switch to the ‘Drivers’ tab. This is where the magic happens!
- You’ll see a list of all the installed printer drivers. If your list is anything like mine, it’s longer than expected.
- Locate the old or unwanted printer driver.
- Select it, and click on the “Remove” button.
- A pop-up window will ask which driver to remove. Choose “Remove driver and driver package”.
- Confirm the action.
Voila! The old printer driver should now be history. But don’t rush off just yet, I’ve got some bonus tips for you!
Additional Information
- Backup First : As with any significant system changes, consider backing up your system before removing any drivers. It’s like wearing a helmet – better safe than sorry.
- Restart after Removal : After removing the driver, a quick system restart can help clear out any lingering files.
- Windows Update : Sometimes, if you remove a printer driver, Windows might try to reinstall it during an update. To prevent this, hide the specific update related to the printer driver.
- Manual Cleanup : Some drivers can be stubborn. If you still find traces, consider diving into the ‘Program Files’ or ‘Program Files (x86)’ directories and deleting related folders. But tread carefully; you don’t want to delete something important.
- Why should I remove old printer drivers? Old printer drivers can sometimes conflict with new ones or simply take up unnecessary space.
- Can I remove a driver if I’m not an admin? Usually, no. Admin rights are typically required for such tasks.
- What if I accidentally remove the wrong driver? Don’t panic! You can always reinstall the driver either from the printer’s official website or by reconnecting your printer.
- Does removing the driver uninstall the printer software too? Not always. Some printers come with additional software. You might need to uninstall that separately.
- Do I need to physically disconnect the printer? No, but it might be a good idea to ensure it’s turned off to avoid any mid-process surprises.
Matthew Burleigh has been writing tech tutorials since 2008. His writing has appeared on dozens of different websites and been read over 50 million times.
After receiving his Bachelor’s and Master’s degrees in Computer Science he spent several years working in IT management for small businesses. However, he now works full time writing content online and creating websites.
His main writing topics include iPhones, Microsoft Office, Google Apps, Android, and Photoshop, but he has also written about many other tech topics as well.
Read his full bio here.
Featured guides and deals
